
Introduction to Brownie Fruit Pizza Recipe
As a passionate home cook, I often find joy in experimenting with flavors and textures. One of my favorite creations is the Brownie Fruit Pizza. Imagine a delightful dessert that combines the rich, fudgy goodness of brownies with the vibrant freshness of fruits. It’s like a party on a plate! This recipe has become a staple in my kitchen, especially during warm summer days when I crave something sweet yet refreshing.
Let me take you back to the first time I made this dessert. It was a sunny afternoon, and I had friends over for a casual get-together. I wanted to impress them with something unique, so I decided to whip up a Brownie Fruit Pizza. The moment I pulled it out of the oven, the aroma filled the room, and I could see my friends’ eyes light up with excitement. As I sliced into the brownie base, the creamy topping and colorful fruits peeked through, creating a stunning visual treat. The first bite was pure bliss, and I knew I had struck gold!
This recipe is not just about taste; it’s about creating memories. Whether it’s a birthday celebration, a picnic in the park, or simply a cozy night in, this Brownie Fruit Pizza is sure to bring smiles all around. Plus, it’s incredibly easy to make! With just a few simple ingredients, you can create a dessert that looks as good as it tastes.
So, grab your apron and let’s dive into the world of Brownie Fruit Pizza. I promise you, this is one culinary adventure you won’t want to miss!
Ingredients for Brownie Fruit Pizza Recipe
Before we embark on this delicious journey, let’s gather our ingredients. I believe that using quality ingredients makes all the difference in the world. When I make my Brownie Fruit Pizza, I always opt for the freshest fruits and the best chocolate I can find. Here’s what you’ll need:
Main Ingredients
- 1 cup of all-purpose flour
- 1 cup of granulated sugar
- 1/2 cup of unsweetened cocoa powder
- 1/2 cup of unsalted butter, melted
- 2 large eggs
- 1 teaspoon of vanilla extract
- 1/4 teaspoon of salt
- 1/2 cup of semi-sweet chocolate chips (optional, but highly recommended!)
These ingredients come together to create a rich brownie base that’s both chewy and fudgy. I always make sure to use high-quality cocoa powder and chocolate chips. It really elevates the flavor!
Optional Add-ons
- 1/2 cup of chopped nuts (like walnuts or pecans) for added crunch
- 1/2 cup of shredded coconut for a tropical twist
- Fresh fruits such as strawberries, blueberries, kiwi, or bananas for topping
- Mint leaves for garnish
Feel free to get creative with your toppings! I love using a mix of colorful fruits to make the pizza visually appealing. Sometimes, I even add a drizzle of chocolate sauce on top for an extra indulgent touch. The beauty of this recipe is that you can customize it to suit your taste or the season!
Now that we have our ingredients ready, let’s move on to the next step of preparing this delightful Brownie Fruit Pizza!
How to Prepare Brownie Fruit Pizza Recipe
Now that we have our ingredients ready, it’s time to roll up our sleeves and get cooking! Making a Brownie Fruit Pizza is a delightful experience, and I can’t wait to share the step-by-step process with you. Each step is filled with little tips and tricks that I’ve learned along the way, so let’s dive right in!
Step 1: Preheat the Oven and Prepare the Baking Dish
First things first, we need to preheat our oven to 350°F (175°C). This ensures that our brownies bake evenly and come out perfectly fudgy. While the oven is warming up, I like to prepare my baking dish. I usually use a round pizza pan, but a square or rectangular dish works just as well. Just make sure to grease it lightly with butter or cooking spray to prevent sticking.
Tips for Step 1
- For an extra layer of protection against sticking, you can line the bottom of the pan with parchment paper.
- Make sure your oven is fully preheated before placing the brownie batter inside. This helps achieve that perfect rise!
Step 2: Mix the Brownie Batter
Next, let’s mix our brownie batter! In a large mixing bowl, combine the melted butter and sugar. I love the way the sugar sparkles as it blends with the butter. Then, add in the eggs, one at a time, mixing well after each addition. The batter should become smooth and glossy. Now, it’s time to sift in the flour, cocoa powder, and salt. Stir until just combined, being careful not to overmix. If you’re adding chocolate chips or nuts, fold them in gently at this stage.
Tips for Step 2
- Using room temperature eggs helps them blend more easily into the batter.
- Don’t worry if the batter looks a bit thick; that’s what makes the brownies fudgy!
Step 3: Bake the Brownie Base
Pour the brownie batter into your prepared baking dish, spreading it out evenly. I like to use a spatula to smooth the top. Now, it’s time to bake! Place the dish in the preheated oven and let it bake for about 20-25 minutes. The edges should look set, while the center may still be a bit soft. Remember, the brownies will continue to cook a little after you take them out!
Tips for Step 3
- To check for doneness, insert a toothpick into the center. It should come out with a few moist crumbs, not wet batter.
- Let the brownies cool in the pan for about 10 minutes before transferring them to a wire rack to cool completely.
Step 4: Prepare the Cream Cheese Topping
While the brownies are cooling, let’s whip up the creamy topping! In a mixing bowl, beat together the cream cheese, powdered sugar, and vanilla extract until smooth and fluffy. This topping is like a cloud of sweetness that pairs perfectly with the rich brownie base. If you want a little zing, you can add a splash of lemon juice for a refreshing twist!
Tips for Step 4
- Make sure your cream cheese is at room temperature for easy mixing.
- For a lighter topping, you can fold in some whipped cream after mixing the cream cheese.
Step 5: Assemble the Brownie Fruit Pizza
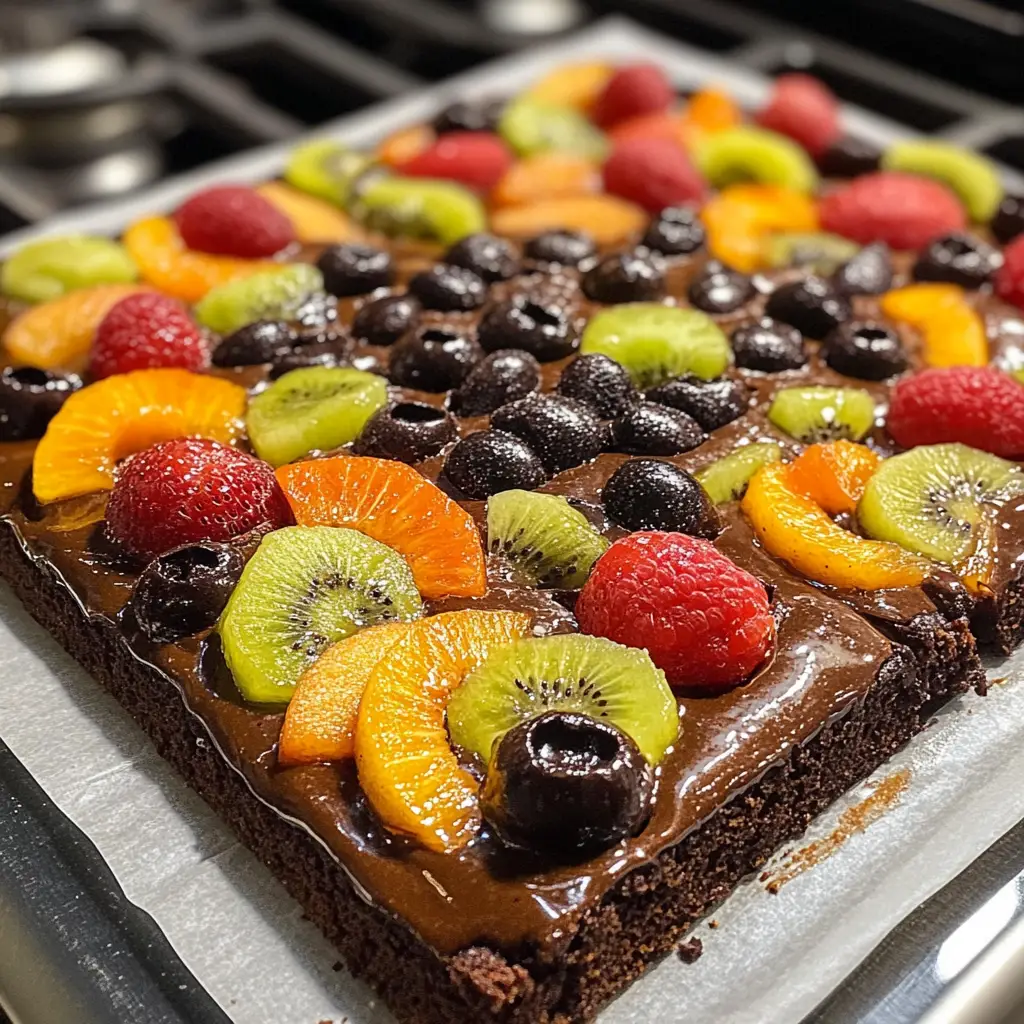
Now comes the fun part—assembling our Brownie Fruit Pizza! Once the brownies are completely cool, spread the cream cheese topping evenly over the top. Then, it’s time to decorate with your choice of fresh fruits. I love using a rainbow of colors—strawberries, blueberries, kiwi, and bananas all look stunning together. Finally, you can drizzle some chocolate sauce on top for that extra touch of decadence!
Tips for Step 5
- Arrange the fruits in a fun pattern to make your pizza visually appealing.
- Serve immediately or refrigerate for a bit to let the flavors meld together.
And there you have it! Your Brownie Fruit Pizza is ready to be enjoyed. I can already imagine the smiles on everyone’s faces as they take their first bite. It’s a dessert that truly brings people together!
How to Prepare Brownie Fruit Pizza Recipe
Now that we have our ingredients ready, it’s time to roll up our sleeves and get cooking! Making a Brownie Fruit Pizza is a delightful experience, and I can’t wait to share the step-by-step process with you. Each step is filled with little tips and tricks that I’ve learned along the way, so let’s dive right in!
Step 1: Preheat the Oven and Prepare the Baking Dish
First things first, we need to preheat our oven to 350°F (175°C). This ensures that our brownies bake evenly and come out perfectly fudgy. While the oven is warming up, I like to prepare my baking dish. I usually use a round pizza pan, but a square or rectangular dish works just as well. Just make sure to grease it lightly with butter or cooking spray to prevent sticking.
Tips for Step 1
- For an extra layer of protection against sticking, you can line the bottom of the pan with parchment paper.
- Make sure your oven is fully preheated before placing the brownie batter inside. This helps achieve that perfect rise!
Step 2: Mix the Brownie Batter
Next, let’s mix our brownie batter! In a large mixing bowl, combine the melted butter and sugar. I love the way the sugar sparkles as it blends with the butter. Then, add in the eggs, one at a time, mixing well after each addition. The batter should become smooth and glossy. Now, it’s time to sift in the flour, cocoa powder, and salt. Stir until just combined, being careful not to overmix. If you’re adding chocolate chips or nuts, fold them in gently at this stage.
Tips for Step 2
- Using room temperature eggs helps them blend more easily into the batter.
- Don’t worry if the batter looks a bit thick; that’s what makes the brownies fudgy!
Step 3: Bake the Brownie Base
Pour the brownie batter into your prepared baking dish, spreading it out evenly. I like to use a spatula to smooth the top. Now, it’s time to bake! Place the dish in the preheated oven and let it bake for about 20-25 minutes. The edges should look set, while the center may still be a bit soft. Remember, the brownies will continue to cook a little after you take them out!
Tips for Step 3
- To check for doneness, insert a toothpick into the center. It should come out with a few moist crumbs, not wet batter.
- Let the brownies cool in the pan for about 10 minutes before transferring them to a wire rack to cool completely.
Step 4: Prepare the Cream Cheese Topping
While the brownies are cooling, let’s whip up the creamy topping! In a mixing bowl, beat together the cream cheese, powdered sugar, and vanilla extract until smooth and fluffy. This topping is like a cloud of sweetness that pairs perfectly with the rich brownie base. If you want a little zing, you can add a splash of lemon juice for a refreshing twist!
Tips for Step 4
- Make sure your cream cheese is at room temperature for easy mixing.
- For a lighter topping, you can fold in some whipped cream after mixing the cream cheese.
Step 5: Assemble the Brownie Fruit Pizza
Now comes the fun part—assembling our Brownie Fruit Pizza! Once the brownies are completely cool, spread the cream cheese topping evenly over the top. Then, it’s time to decorate with your choice of fresh fruits. I love using a rainbow of colors—strawberries, blueberries, kiwi, and bananas all look stunning together. Finally, you can drizzle some chocolate sauce on top for that extra touch of decadence!
Tips for Step 5
- Arrange the fruits in a fun pattern to make your pizza visually appealing.
- Serve immediately or refrigerate for a bit to let the flavors meld together.
And there you have it! Your Brownie Fruit Pizza is ready to be enjoyed. I can already imagine the smiles on everyone’s faces as they take their first bite. It’s a dessert that truly brings people together!
Equipment Needed for Brownie Fruit Pizza Recipe
Before we dive into the deliciousness of our Brownie Fruit Pizza, let’s make sure we have the right tools at hand. Having the right equipment can make the cooking process smoother and more enjoyable. Here’s what you’ll need:
- Mixing Bowls: A large mixing bowl for the brownie batter and a smaller one for the cream cheese topping. If you don’t have a mixing bowl, any large container will do!
- Whisk or Electric Mixer: A whisk works great for mixing by hand, but an electric mixer can save you time and effort, especially for the cream cheese topping.
- Spatula: A rubber spatula is perfect for folding in ingredients and spreading the cream cheese topping evenly.
- Baking Dish: A round pizza pan is ideal, but you can also use a square or rectangular baking dish. Just remember to adjust the baking time slightly if you change the shape!
- Parchment Paper (optional): This can be used to line the baking dish for easier removal of the brownies.
- Toothpick: A handy tool for checking the doneness of your brownies.
With these tools ready, you’re all set to create your Brownie Fruit Pizza masterpiece! Remember, cooking is all about improvisation, so feel free to use what you have on hand. Let’s get baking!
Variations of Brownie Fruit Pizza Recipe
One of the things I love most about my Brownie Fruit Pizza is its versatility. You can easily switch things up to suit your taste or the season. Here are a few fun variations that I’ve tried and absolutely adored:
- Nutty Delight: Add a mix of chopped nuts like almonds or hazelnuts to the brownie batter for a delightful crunch. The nutty flavor pairs beautifully with the creamy topping and fresh fruits.
- Chocolate Lovers: For an extra chocolatey experience, use chocolate pudding as a topping instead of cream cheese. It creates a rich layer that complements the brownie base perfectly.
- Tropical Twist: Swap out the traditional fruits for tropical ones like mango, pineapple, and coconut. This variation brings a refreshing taste of the islands right to your kitchen!
- Berry Blast: Use only mixed berries—strawberries, raspberries, and blueberries—for a burst of flavor. The tartness of the berries balances the sweetness of the brownie and cream cheese.
- Vegan Version: Substitute the eggs with flaxseed meal and use a dairy-free cream cheese alternative. You can also replace the butter with coconut oil for a delicious vegan treat!
These variations not only keep things exciting but also allow you to cater to different dietary preferences. I encourage you to get creative and make this recipe your own. After all, cooking is all about having fun and exploring new flavors!
Cooking Notes for Brownie Fruit Pizza Recipe
As I’ve journeyed through the delightful world of making Brownie Fruit Pizza, I’ve gathered a few cooking notes that can help you achieve the best results. These little nuggets of wisdom can make a big difference in your baking experience!
- Cooling Time: Patience is key! Allow the brownie base to cool completely before adding the cream cheese topping. This prevents the topping from melting and ensures a beautiful presentation.
- Fruit Freshness: Choose ripe, fresh fruits for the best flavor. If you can, visit a local farmer’s market to find seasonal fruits bursting with sweetness. They’ll elevate your pizza to a whole new level!
- Storage: If you have leftovers (which is rare in my house!), store them in an airtight container in the refrigerator. The flavors meld beautifully overnight, making for an even tastier treat the next day.
- Serving Size: This dessert is rich and satisfying, so cut it into smaller slices. Trust me, a little goes a long way when it comes to indulgence!
- Experimentation: Don’t hesitate to try different flavor combinations! Whether it’s adding spices like cinnamon or using flavored cream cheese, the possibilities are endless.
These cooking notes are just a few tips I’ve picked up along the way. Remember, every kitchen adventure is a chance to learn and grow. So, embrace the process and enjoy every moment of creating your Brownie Fruit Pizza!
Serving Suggestions for Brownie Fruit Pizza Recipe
Now that your Brownie Fruit Pizza is ready, it’s time to think about how to serve it! Presentation can elevate your dessert from delicious to dazzling. Here are some serving suggestions that I’ve found to be crowd-pleasers:
- Slice and Serve: Cut the Brownie Fruit Pizza into wedges, just like a traditional pizza. This makes it easy for guests to grab a slice and enjoy!
- Garnish with Mint: A sprinkle of fresh mint leaves on top adds a pop of color and a refreshing aroma. It’s like a little green crown for your dessert!
- Pair with Ice Cream: Serve each slice with a scoop of vanilla or chocolate ice cream on the side. The warm brownie and cold ice cream create a delightful contrast that’s hard to resist.
- Drizzle with Sauce: A drizzle of chocolate or caramel sauce over the top can take your Brownie Fruit Pizza to the next level. It adds an extra layer of sweetness and visual appeal.
- Serve on a Platter: For a more festive presentation, place the entire Brownie Fruit Pizza on a decorative platter. Surround it with extra fruits or chocolate shavings for a beautiful display.
These serving suggestions not only enhance the visual appeal but also add to the overall experience of enjoying this delightful dessert. Whether it’s a family gathering or a special occasion, your Brownie Fruit Pizza is sure to be the star of the show!
Tips for Making the Best Brownie Fruit Pizza Recipe
As I’ve whipped up my fair share of Brownie Fruit Pizzas, I’ve gathered some golden tips that can help you create the ultimate dessert masterpiece. These little nuggets of wisdom can make all the difference in your baking journey!
- Use Quality Ingredients: The better the ingredients, the better the flavor! Opt for high-quality chocolate and fresh fruits. Trust me, it makes a world of difference.
- Don’t Overmix: When mixing your brownie batter, be gentle. Overmixing can lead to tough brownies. Just mix until everything is combined, and you’re good to go!
- Chill the Topping: If you have time, chill the cream cheese topping for about 30 minutes before spreading it on the brownies. This helps it set nicely and makes it easier to spread.
- Experiment with Fruits: Don’t be afraid to mix and match fruits! Seasonal fruits not only taste better but also add a beautiful array of colors to your pizza.
- Serve Fresh: For the best experience, serve your Brownie Fruit Pizza soon after assembling. The freshness of the fruits and the creaminess of the topping are at their peak!
With these tips in your back pocket, you’re all set to create a Brownie Fruit Pizza that will wow your family and friends. Happy baking!
Breakdown of Time for Brownie Fruit Pizza Recipe
Now that we’ve covered the delicious details of making a Brownie Fruit Pizza, let’s talk about the time it takes to whip up this delightful dessert. I always find it helpful to have a clear idea of the time commitment before diving into a recipe. Here’s a quick breakdown:
- Prep Time: 15 minutes. This includes gathering your ingredients, mixing the brownie batter, and preparing the cream cheese topping.
- Cooking Time: 25 minutes. This is the time it takes for the brownies to bake to perfection in the oven.
- Cooling Time: 30 minutes. Allowing the brownies to cool completely is essential before adding the cream cheese topping.
- Assembly Time: 10 minutes. Spreading the topping and decorating with fresh fruits is the fun part!
Total Time: Approximately 1 hour and 20 minutes. This includes all the prep, cooking, cooling, and assembly time. It’s a small investment for a dessert that brings so much joy!
With this timeline in mind, you can easily plan your baking adventure. Whether it’s for a special occasion or just a sweet treat for yourself, this Brownie Fruit Pizza is worth every minute spent in the kitchen!
Nutritional Information for Brownie Fruit Pizza Recipe
As a passionate home cook, I always find it helpful to know the nutritional content of the dishes I prepare. While my Brownie Fruit Pizza is a delightful treat, it’s good to be aware of what’s in it. Here’s a general breakdown of the nutritional information per serving, assuming the recipe yields about 12 slices:
- Calories: Approximately 250 calories
- Protein: 3 grams
- Carbohydrates: 35 grams
- Fat: 12 grams
- Saturated Fat: 7 grams
- Cholesterol: 40 mg
- Sodium: 150 mg
- Fiber: 2 grams
- Sugar: 18 grams
Keep in mind that these values can vary based on the specific ingredients you use and any optional add-ons you choose to include. For instance, adding nuts or using a different type of cream cheese can alter the nutritional profile. I always encourage balance, so enjoy your Brownie Fruit Pizza as part of a varied diet!
With this information, you can savor each slice with a little more awareness. After all, it’s not just about the taste; it’s about enjoying the experience of cooking and sharing delicious food with loved ones!
Frequently Asked Questions about Brownie Fruit Pizza Recipe
As I’ve shared my love for Brownie Fruit Pizza, I’ve often received questions from fellow home cooks eager to try this delightful dessert. Here are some of the most frequently asked questions, along with my answers to help you on your culinary journey!
Can I make Brownie Fruit Pizza ahead of time?
Absolutely! You can prepare the brownie base a day in advance and store it in an airtight container. Just wait to add the cream cheese topping and fresh fruits until you’re ready to serve. This keeps everything fresh and delicious!
What fruits work best for topping?
While I love using strawberries, blueberries, kiwi, and bananas, you can get creative! Seasonal fruits like peaches or raspberries also work wonderfully. Just make sure they’re ripe and fresh for the best flavor!
Can I use a different type of frosting instead of cream cheese?
Definitely! If cream cheese isn’t your thing, you can use whipped cream, chocolate ganache, or even a fruit-flavored yogurt. Each option brings a unique twist to the dessert!
Is there a gluten-free version of this recipe?
Yes! You can substitute the all-purpose flour with a gluten-free flour blend. Just make sure to check the other ingredients for gluten content, especially the chocolate chips.
How do I store leftovers?
If you have any leftovers (which is rare in my house!), store them in an airtight container in the refrigerator. They’ll stay fresh for about 2-3 days. The flavors actually meld together beautifully overnight!
Can I freeze Brownie Fruit Pizza?
While I recommend enjoying it fresh, you can freeze the brownie base without the toppings. Wrap it tightly in plastic wrap and then in aluminum foil. When you’re ready to enjoy, just thaw it and add the toppings!
These FAQs should help clear up any uncertainties you might have about making your own Brownie Fruit Pizza. Remember, cooking is all about experimenting and having fun, so don’t hesitate to make this recipe your own!
Conclusion on Brownie Fruit Pizza Recipe
As I wrap up this delightful journey into the world of Brownie Fruit Pizza, I can’t help but feel a sense of joy. This recipe is more than just a dessert; it’s a celebration of flavors, colors, and creativity. The rich, fudgy brownie base paired with the creamy topping and vibrant fruits creates a symphony of taste that’s hard to resist.
What I love most about this Brownie Fruit Pizza is its versatility. Whether you’re hosting a summer barbecue, celebrating a birthday, or simply treating yourself, this dessert fits every occasion. Plus, it’s incredibly easy to make, allowing you to spend less time in the kitchen and more time enjoying the company of loved ones.
So, the next time you’re looking for a show-stopping dessert that’s sure to impress, remember this Brownie Fruit Pizza. It’s a sweet reminder that cooking is not just about the food; it’s about the memories we create and the smiles we share. I hope you enjoy making and savoring this recipe as much as I do!
