
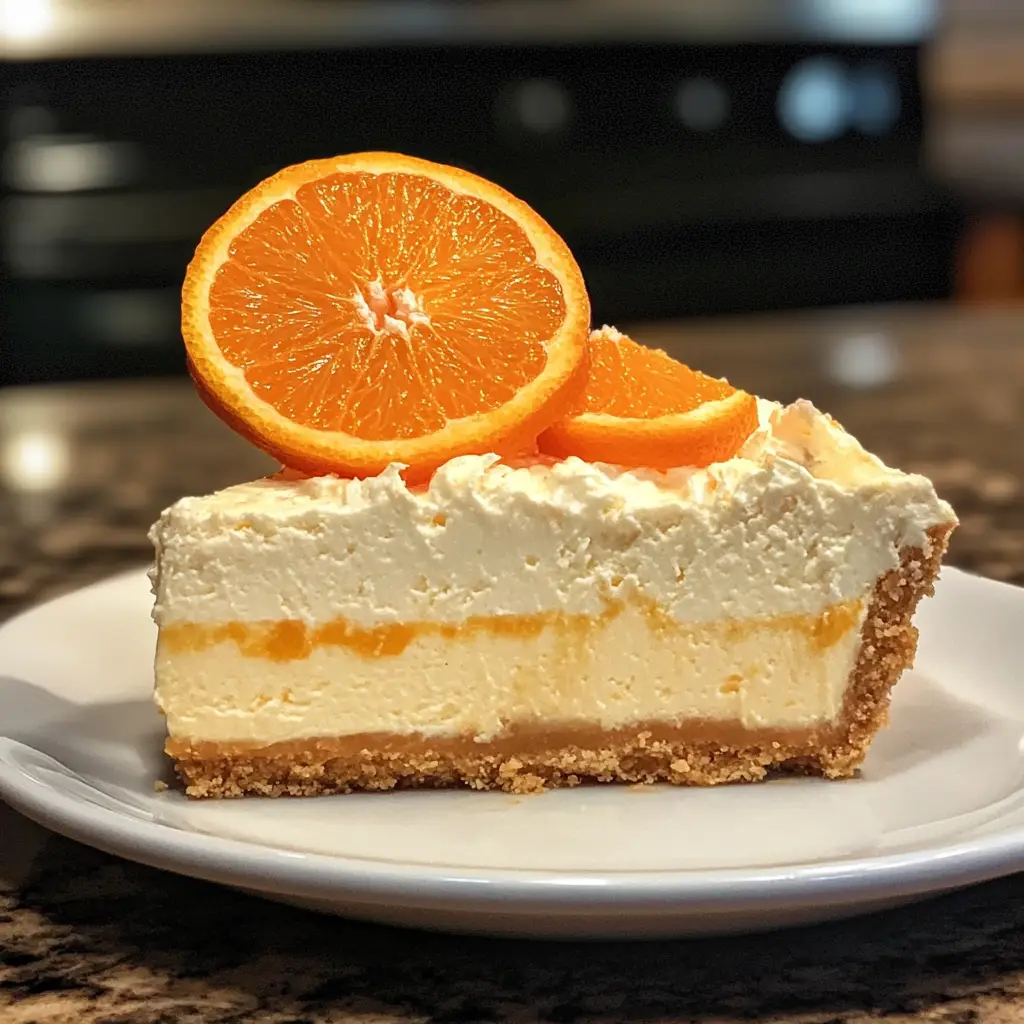
Introduction to No-Bake Orange Creamsicle Cheesecake Recipe
As a passionate home cook, I often find myself reminiscing about the sweet, sunny days of summer. One of my fondest memories is enjoying a refreshing orange creamsicle on a hot afternoon. The creamy texture and zesty flavor always brought a smile to my face. Inspired by those delightful moments, I decided to create a dessert that captures that same joy: the No-Bake Orange Creamsicle Cheesecake.
This cheesecake is not just a treat; it’s a celebration of flavors that dance on your palate. Imagine the smooth, velvety cream cheese mingling with the bright, citrusy notes of orange. It’s like a summer breeze wrapped in a delicious dessert! Plus, the best part? You don’t need to turn on the oven. This recipe is perfect for those warm days when you want something sweet without the heat.
In this recipe, I’ll guide you through each step, sharing tips and tricks that I’ve learned along the way. Whether you’re a seasoned baker or a novice in the kitchen, I promise you’ll find joy in making this cheesecake. It’s a fantastic way to impress your friends and family, and trust me, they’ll be asking for seconds!
So, grab your mixing bowls and let’s dive into the world of creamy, dreamy desserts. I can’t wait for you to experience the magic of this No-Bake Orange Creamsicle Cheesecake!
Ingredients for No-Bake Orange Creamsicle Cheesecake Recipe
Before we embark on this delightful culinary journey, let’s gather our ingredients. I believe that using quality ingredients makes all the difference in the world. When I whip up this No-Bake Orange Creamsicle Cheesecake, I always choose fresh, vibrant oranges and rich cream cheese. Trust me, it’s worth it! Here’s what you’ll need:
Main Ingredients
- 1 ½ cups graham cracker crumbs
- ½ cup unsalted butter, melted
- 2 cups cream cheese, softened
- 1 cup powdered sugar
- 1 cup heavy whipping cream
- 1 cup fresh orange juice (about 3-4 oranges)
- 1 tablespoon orange zest (from the same oranges)
- 1 teaspoon vanilla extract
When selecting your cream cheese, opt for a full-fat version for that rich, creamy texture. I’ve tried low-fat options, but they just don’t deliver the same lusciousness. And don’t skimp on the fresh oranges; their bright flavor is what makes this cheesecake sing!
Optional Add-ons
- 1 tablespoon gelatin (for a firmer texture)
- Fresh orange slices or zest for garnish
- Whipped cream for topping
- Chocolate shavings for a fun twist
If you want a firmer cheesecake, adding gelatin can help. Just remember to dissolve it in warm water before mixing it in. As for garnishes, I love adding fresh orange slices on top for a pop of color and flavor. It’s like a little sunshine on your plate!
Now that we have our ingredients ready, let’s move on to the fun part—preparing this scrumptious cheesecake!
How to Prepare No-Bake Orange Creamsicle Cheesecake Recipe
Now that we have our ingredients ready, it’s time to roll up our sleeves and dive into the preparation of this delightful No-Bake Orange Creamsicle Cheesecake. I find that the process of making this cheesecake is just as enjoyable as eating it! Each step is simple, and I’ll share some of my favorite tips along the way to ensure your cheesecake turns out perfectly.
Step 1: Prepare the Crust
First things first, let’s create a delicious crust that will hold all that creamy goodness. In a mixing bowl, combine the graham cracker crumbs and melted butter. Stir until the crumbs are evenly coated. The mixture should resemble wet sand.
Tips for a Perfect Crust
- Press the crumb mixture firmly into the bottom of a 9-inch springform pan. I like to use the bottom of a measuring cup to get an even layer.
- For an extra touch, you can bake the crust at 350°F (175°C) for about 10 minutes. This step is optional but adds a nice crunch!
Step 2: Make the Cheesecake Filling
Next, let’s whip up that creamy filling! In a large mixing bowl, beat the softened cream cheese until it’s smooth and fluffy. Gradually add in the powdered sugar, mixing until well combined. Then, pour in the fresh orange juice, orange zest, and vanilla extract. Mix until everything is blended beautifully.
Tips for Creamy Filling
- Make sure your cream cheese is at room temperature. This helps it blend smoothly without lumps.
- For an extra creamy texture, consider using a hand mixer or stand mixer. It makes a world of difference!
Step 3: Assemble the Cheesecake
Now comes the fun part—assembling the cheesecake! In a separate bowl, whip the heavy cream until stiff peaks form. Gently fold the whipped cream into the cream cheese mixture. This step adds lightness and airiness to your cheesecake.
Tips for Layering
- Be gentle when folding in the whipped cream. You want to keep that fluffy texture!
- Pour the filling over the prepared crust and spread it evenly. I like to use a spatula for this.
Step 4: Chill the Cheesecake
Once your cheesecake is assembled, it’s time to let it chill. Cover the springform pan with plastic wrap and place it in the refrigerator for at least 4 hours, or overnight if you can wait!
Tips for Proper Chilling
- The longer you chill, the better the flavors meld together. I often make this cheesecake a day in advance.
- To prevent condensation, make sure the cheesecake is well covered while chilling.
And there you have it! With these steps, you’re well on your way to creating a No-Bake Orange Creamsicle Cheesecake that will impress everyone. I can already picture the smiles on your friends’ and family’s faces when they take that first bite!
Equipment Needed for No-Bake Orange Creamsicle Cheesecake Recipe
Before we dive into the kitchen, let’s gather the essential tools for making this delightful No-Bake Orange Creamsicle Cheesecake. Having the right equipment can make the process smoother and more enjoyable. Here’s what you’ll need:
- 9-inch Springform Pan: This is perfect for easy removal of your cheesecake. If you don’t have one, a regular pie dish will work, but it may be a bit trickier to serve.
- Mixing Bowls: A couple of medium to large mixing bowls will help you keep your ingredients organized. I love using glass bowls because I can see the beautiful colors of my ingredients!
- Electric Mixer: A hand mixer or stand mixer is ideal for whipping the cream cheese and heavy cream. If you don’t have one, a whisk can work, but it will take a bit more elbow grease!
- Spatula: A rubber spatula is great for folding in the whipped cream and spreading the filling evenly. It’s a must-have in my kitchen!
- Measuring Cups and Spoons: Accurate measurements are key to a successful cheesecake. Make sure you have these handy!
- Plastic Wrap: This will help cover your cheesecake while it chills in the fridge, preventing any unwanted odors from seeping in.
With these tools at your side, you’re all set to create a creamy masterpiece. I always find that having everything ready makes the cooking process feel like a breeze. So, let’s get started on this delicious adventure!
Variations of No-Bake Orange Creamsicle Cheesecake Recipe
As I’ve experimented with my No-Bake Orange Creamsicle Cheesecake, I’ve discovered that there are so many fun variations to try! Each twist brings a new flavor profile that can make this dessert even more exciting. Here are a few of my favorite variations that you might want to explore:
- Berry Bliss: Swap out the orange juice for a mix of fresh berries like strawberries or raspberries. The vibrant colors and tartness create a delightful contrast to the creamy filling.
- Chocolate Orange: Add a layer of melted dark chocolate to the crust or mix in some cocoa powder into the filling. The combination of chocolate and orange is simply divine!
- Coconut Creamsicle: Incorporate coconut cream into the filling for a tropical twist. You can also sprinkle some toasted coconut flakes on top for added texture.
- Minty Fresh: Add a few drops of peppermint extract to the filling for a refreshing mint flavor. Garnish with fresh mint leaves for a beautiful presentation.
These variations not only keep things interesting but also allow you to cater to different tastes and preferences. I love how a simple change can transform the entire dessert! So, don’t hesitate to get creative and make this No-Bake Orange Creamsicle Cheesecake your own. The possibilities are endless, and I can’t wait for you to try them!
Cooking Notes for No-Bake Orange Creamsicle Cheesecake Recipe
As I’ve made my No-Bake Orange Creamsicle Cheesecake time and time again, I’ve picked up a few cooking notes that can help you achieve the best results. These little tips can make a big difference in your cheesecake’s texture and flavor. Here’s what I’ve learned:
- Room Temperature Ingredients: Always ensure your cream cheese and heavy cream are at room temperature before mixing. This helps create a smooth, lump-free filling that’s a joy to eat.
- Freshness Matters: Use fresh oranges for juice and zest. The vibrant flavor of fresh oranges elevates the cheesecake, making it taste like a slice of sunshine!
- Chill Time: Patience is key! Allowing the cheesecake to chill for a full 8 hours or overnight will enhance the flavors and improve the texture. Trust me, it’s worth the wait!
- Serving Temperature: For the best experience, serve the cheesecake slightly chilled. This way, the flavors are bright, and the texture is creamy and delightful.
- Storage Tips: If you have leftovers (which is rare!), store the cheesecake in the refrigerator, covered tightly with plastic wrap. It should last for about 3-4 days, but I doubt it will last that long!
With these cooking notes in mind, you’re well on your way to creating a No-Bake Orange Creamsicle Cheesecake that will leave everyone asking for the recipe. Happy baking, and enjoy every delicious bite!
Serving Suggestions for No-Bake Orange Creamsicle Cheesecake Recipe
Now that your No-Bake Orange Creamsicle Cheesecake is ready to dazzle, let’s talk about how to serve it up! Presentation can elevate your dessert from delicious to absolutely stunning. Here are some of my favorite serving suggestions that will make your cheesecake shine:
- Garnish with Fresh Fruit: Top each slice with a slice of fresh orange or a few berries. The vibrant colors not only look beautiful but also add a burst of flavor!
- Whipped Cream Delight: A dollop of freshly whipped cream on top adds a light, airy touch. You can even pipe it on for a fancy look!
- Chocolate Drizzle: For a fun twist, drizzle some melted chocolate over the cheesecake before serving. The combination of chocolate and orange is simply irresistible!
- Serve with a Side of Sorbet: Pairing a slice of cheesecake with a scoop of orange or vanilla sorbet creates a refreshing contrast that’s perfect for warm days.
- Elegant Plating: Use a cake stand or a decorative plate to present your cheesecake. A sprinkle of orange zest or edible flowers can add a touch of elegance.
These serving suggestions not only enhance the visual appeal but also add layers of flavor that will leave your guests raving about your dessert. I love to get creative with my presentations, and I can’t wait for you to try these ideas. Enjoy serving your delightful No-Bake Orange Creamsicle Cheesecake!
Tips for Making No-Bake Orange Creamsicle Cheesecake Recipe
As I’ve whipped up my No-Bake Orange Creamsicle Cheesecake countless times, I’ve gathered a treasure trove of tips that can help you achieve the perfect dessert. These little nuggets of wisdom can make all the difference in your cheesecake-making adventure. Here are my top tips to ensure your cheesecake turns out absolutely divine:
- Use Quality Ingredients: Always opt for fresh, high-quality ingredients. The flavor of your cheesecake will shine through when you use the best cream cheese and fresh oranges.
- Don’t Rush the Chilling: Patience is key! Allow your cheesecake to chill for at least 4 hours, but overnight is even better. This helps the flavors meld beautifully.
- Fold Gently: When incorporating the whipped cream into the filling, be gentle. This keeps the mixture light and airy, giving your cheesecake that dreamy texture.
- Experiment with Flavors: Don’t hesitate to get creative! Try adding different extracts or mix-ins to customize your cheesecake to your taste.
- Keep It Covered: While chilling, cover your cheesecake with plastic wrap to prevent it from absorbing any odors from the fridge. This keeps it fresh and flavorful!
With these tips in your back pocket, you’re ready to create a No-Bake Orange Creamsicle Cheesecake that will wow your friends and family. Happy baking, and enjoy every creamy, zesty bite!
Breakdown of Time for No-Bake Orange Creamsicle Cheesecake Recipe
As a home cook, I know that timing is everything in the kitchen. When it comes to making my No-Bake Orange Creamsicle Cheesecake, understanding the time involved helps me plan my day better. Here’s a quick breakdown of the time you’ll need:
- Prep Time: 30 minutes – This includes gathering your ingredients, preparing the crust, and mixing the cheesecake filling.
- Chilling Time: 4 hours (or overnight) – This is crucial for allowing the flavors to meld and the cheesecake to set properly. I often make it the night before for the best results!
- Total Time: 4 hours 30 minutes (or overnight) – While the active time is just 30 minutes, the chilling time is where the magic happens.
By keeping this timeline in mind, you can easily fit this delightful dessert into your schedule. I love making it ahead of time, so I can relax and enjoy the moment when it’s finally time to serve. Happy baking!
Nutritional Information for No-Bake Orange Creamsicle Cheesecake Recipe
As a passionate home cook, I always find it helpful to know the nutritional information of the dishes I prepare. It allows me to enjoy my creations while being mindful of what I’m eating. Here’s a general breakdown of the nutritional information for a slice of No-Bake Orange Creamsicle Cheesecake, assuming the recipe serves 12:
- Calories: Approximately 320 calories
- Fat: 22g (Saturated Fat: 12g)
- Carbohydrates: 30g (Sugars: 18g)
- Protein: 4g
- Fiber: 1g
Keep in mind that these values can vary based on the specific brands of ingredients you use and any optional add-ons you choose to include. If you’re looking to lighten things up, consider using reduced-fat cream cheese or a sugar substitute. I’ve found that even small changes can make a difference without sacrificing flavor!
Enjoying a slice of this cheesecake is a delightful treat, and knowing the nutritional information helps me savor each bite even more. So, whether you’re indulging for a special occasion or just because, this No-Bake Orange Creamsicle Cheesecake is sure to bring a smile to your face!
Frequently Asked Questions about No-Bake Orange Creamsicle Cheesecake Recipe
As I’ve shared my No-Bake Orange Creamsicle Cheesecake with friends and family, I’ve noticed a few common questions pop up. It’s always great to clarify any doubts, especially when it comes to creating such a delightful dessert. Here are some frequently asked questions that I hope will help you on your cheesecake-making journey:
Can I use bottled orange juice instead of fresh?
While bottled orange juice can work in a pinch, I highly recommend using fresh oranges. The vibrant flavor and aroma of fresh juice truly elevate the cheesecake, making it taste like a slice of summer!
How long can I store the cheesecake?
If you have leftovers (which is rare!), you can store the cheesecake in the refrigerator for about 3-4 days. Just make sure to cover it tightly with plastic wrap to keep it fresh and prevent it from absorbing any odors.
Can I freeze the No-Bake Orange Creamsicle Cheesecake?
Yes, you can freeze it! Just make sure to wrap it well in plastic wrap and then in aluminum foil. When you’re ready to enjoy it, let it thaw in the refrigerator overnight. The texture may change slightly, but it will still be delicious!
What can I use instead of graham cracker crumbs for the crust?
If you’re looking for alternatives, you can use crushed digestive biscuits, vanilla wafers, or even Oreo cookies for a chocolatey twist. Each option brings its own unique flavor to the crust!
Can I make this cheesecake without gelatin?
Absolutely! The cheesecake will still set nicely without gelatin, especially if you chill it for a longer time. However, if you prefer a firmer texture, adding gelatin is a great option.
These questions are just a few of the common inquiries I’ve encountered while making my No-Bake Orange Creamsicle Cheesecake. I hope this section helps clear up any uncertainties you might have. Remember, the joy of cooking comes from experimenting and making the recipe your own. Happy baking!
Conclusion on No-Bake Orange Creamsicle Cheesecake Recipe
As I wrap up this delightful journey through the world of No-Bake Orange Creamsicle Cheesecake, I can’t help but feel a sense of joy. This recipe is more than just a dessert; it’s a celebration of flavors that brings back cherished memories of summer days. The creamy texture, zesty orange notes, and the ease of preparation make it a standout choice for any occasion.
Whether you’re hosting a gathering, celebrating a special moment, or simply treating yourself, this cheesecake is sure to impress. The best part? You don’t need to turn on the oven, making it a perfect option for warm days or busy schedules. With just a few simple steps, you can create a dessert that not only looks stunning but tastes like a slice of sunshine.
So, gather your ingredients, unleash your creativity, and dive into the joy of making this No-Bake Orange Creamsicle Cheesecake. I can’t wait for you to experience the smiles and satisfaction it brings. Happy baking, and may every bite be as delightful as the memories it evokes!
