
Few natural phenomena captivate the human imagination as much as a thunderstorm. The sudden clash of thunder, the electric shimmer of lightning cutting through a cloudy sky, and the turbulent movement of the storm all work together to create a scene of both beauty and power. While these phenomena are grand and sometimes dangerous in nature, it is possible to safely replicate the wonder and intrigue of a storm—particularly lightning—through a captivating home or classroom activity known as the Lightning Storm in a Jar.
This simple yet visually stunning experiment combines basic science concepts with artistic flair. It is an excellent project for parents, teachers, homeschoolers, and caregivers looking to engage children in educational play. By using common household items, you can simulate the essence of a lightning storm within the confines of a glass container. This project not only introduces kids to fundamental principles in chemistry and physics but also provides a hands-on experience that encourages observation, prediction, and experimentation.
In the following sections, you’ll find everything you need to know to carry out the Lightning Storm in a Jar project. From the science behind the reactions to step-by-step instructions, tips, variations, and frequently asked questions, this guide ensures that your indoor storm will be both enlightening and enjoyable.
Why is the Lightning Storm so popular?
The “Lightning Storm in a Jar” is popular for several compelling reasons, especially among parents, educators, and curious kids. Here’s why it captures so much attention:
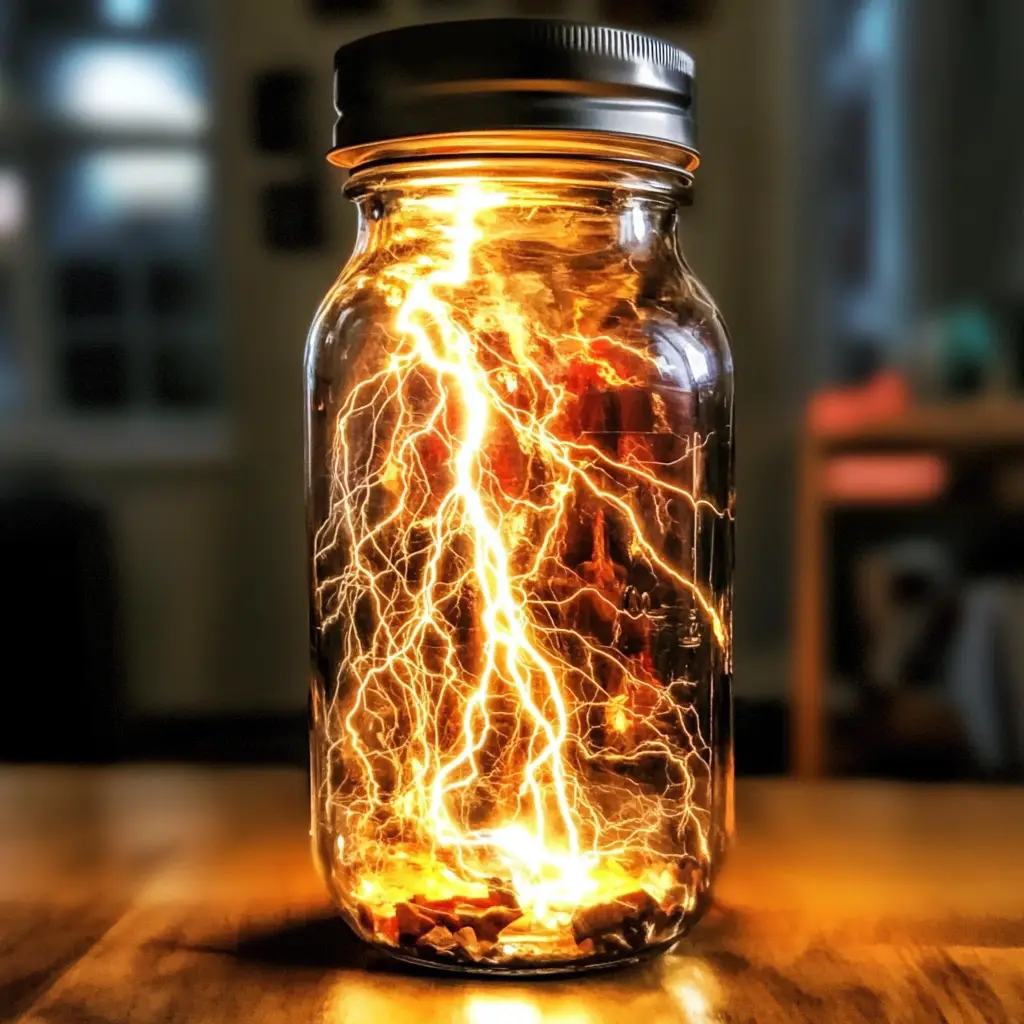
1. Visual Impact
The dramatic visual of lightning-like streaks inside a jar is mesmerizing. The contrast of bright colors swirling and fizzing against the clear background makes it look like a mini thunderstorm, creating an instant wow-factor.
2. Educational Value
It’s an engaging way to introduce kids to scientific concepts such as:
-
Density (oil vs. water)
-
Chemical reactions (bubbling from Alka-Seltzer)
-
Light and color mixing
-
Weather phenomena simulation
It makes learning hands-on and fun, which helps children retain information better.
3. Sensory Engagement
This project involves:
-
Visual stimulation (colors, motion)
-
Auditory stimulation (fizzing sounds)
-
Tactile experience (handling ingredients)
This makes it an excellent sensory activity, especially for early childhood development and special needs education.
4. Easy and Safe
All the materials are common household items (jar, oil, water, food coloring, Alka-Seltzer), making it accessible and safe. There’s no need for special equipment or adult-only tools, so it’s perfect for supervised DIY fun.
5. Quick Setup, Big Results
It takes just 10 minutes to prepare, but the results are immediate and exciting. That instant gratification keeps children interested and excited.
6. Creative Flexibility
You can experiment with:
-
Different colors
-
Types of lighting
-
Shapes of jars
-
Amount of fizzing tablets
This gives it replay value and room for creative expression, making each storm unique.
7. Social Media Friendly
The vibrant visuals photograph beautifully. That makes it perfect for Instagram, Pinterest, and TikTok—parents, teachers, and crafters love sharing it online, which adds to its viral appeal.
8. Cross-Age Appeal
It’s not just for little kids. Tweens, teens, and even adults enjoy the experiment for its cool science vibe and hypnotic visuals. It’s a crowd-pleaser at science fairs, classrooms, and rainy-day activities.
Why You’ll Love This Recipe
The Lightning Storm in a Jar activity is more than just a science project—it’s a complete sensory experience. Here are the top reasons why both children and adults find it irresistible:
-
Educational Value: This project incorporates fundamental scientific principles such as density, solubility, and chemical reactions. It creates a platform to discuss why oil and water don’t mix, how effervescence works, and how gases interact with liquids.
-
Visually Mesmerizing: The swirling food coloring and bubbling reaction create a vibrant, storm-like spectacle that captures the eye and holds attention. It’s an ideal way to turn an abstract concept like lightning into something children can observe up close.
-
Low-Cost Materials: You won’t need to purchase any specialized supplies. The materials used are commonly found in kitchens and bathrooms, making this experiment accessible to most households.
-
Safe for Kids: As long as there is adult supervision, this activity poses minimal risk. Unlike real lightning, the storm in a jar is completely contained and predictable.
-
Quick and Easy Setup: The total preparation time is under ten minutes, with a similarly short execution window, making it suitable even for shorter attention spans.
-
Reusable: The jar and oil can be reused for repeated experiments, allowing children to tweak variables and compare results—a great way to encourage scientific thinking.
-
Cross-Curricular Connections: The activity can be linked to lessons in science, art, language arts (descriptive writing), and even math (measuring and comparing results).

Ingredients and Supplies
To conduct your own Lightning Storm in a Jar experiment, you’ll need the following:
-
One clear jar or transparent container with a wide opening (mason jars are ideal)
-
Tap or distilled water
-
Vegetable oil (alternatives like canola or baby oil also work)
-
Alka-Seltzer tablets or similar effervescent antacid tablets
-
Liquid food coloring (blue and yellow work well for stormy effects)
-
Spoon or dropper
-
Funnel (optional, for easier pouring)
-
Flashlight or LED light source (optional, for enhanced lighting effects)
-
Paper towels or tray for spill control
Preparation (Step-by-Step Instructions)
Follow these detailed steps to create your lightning storm in a jar. The steps are divided into preparation and execution phases.
Step 1: Prepare Your Workspace
Place your jar on a stable, flat surface, preferably one protected by a tray or paper towels to catch any accidental spills. Make sure all your materials are within reach to avoid interruptions during the experiment.
Step 2: Fill the Jar with Water
Pour water into the jar until it is approximately one-third full. This layer represents the atmosphere where most of the action will take place. Use room-temperature water for best results.
Step 3: Add the Oil Layer
Slowly pour vegetable oil into the jar until it is nearly full, leaving about one inch of space at the top to prevent overflow when the chemical reaction occurs. The oil will float on top of the water due to its lower density. This clear separation between layers is crucial for the visual contrast that mimics storm clouds and sky.
Step 4: Add Food Coloring
Carefully add several drops of food coloring to the jar. The drops will fall through the oil layer and settle into the water, where they will begin to mix and form clouds of color. For the most storm-like appearance, use blue and yellow food coloring. The oil prevents the dye from dispersing too quickly, allowing for a slow and dramatic mixing process.
Step 5: Activate the Reaction
Break an Alka-Seltzer tablet into quarters. Drop one piece into the jar. As it sinks through the oil and reaches the water, it will start to fizz and release carbon dioxide gas. The gas bubbles rise, carrying colored water upwards through the oil. As the bubbles burst at the surface, they release the colored water back down, creating swirling and flickering effects that mimic lightning.
Step 6: Enhance with Lighting (Optional)
Turn off surrounding lights and shine a flashlight or LED light through the side or bottom of the jar. The interplay of light with the moving colored bubbles creates a more realistic and dramatic lightning storm effect.
Step 7: Repeat the Reaction
Once the fizzing stops, you can add another tablet piece to repeat the experiment. Each new piece generates a fresh round of bubbling and visual excitement.

Variations
Experimentation is a core principle of science. Here are several ways to modify the basic Lightning Storm in a Jar setup to explore different outcomes:
1. Color Combinations
Try different color schemes to see how they change the atmosphere of your storm. Red and purple can create a more dramatic sunset thunderstorm look, while green and blue may evoke a calm before the storm feeling.
2. Use Glitter
Add a pinch of fine glitter to the water before adding oil to simulate lightning flashes and add sparkle. Note that glitter can make cleanup more involved.
3. Different Oils
Test different types of oil—baby oil, mineral oil, or even lamp oil—to compare how viscosity affects the movement of the bubbles.
4. Different Jar Shapes
Use jars of different sizes or shapes to explore how container dimensions influence the motion of the bubbles and the visual storm effects.
5. Baking Soda and Vinegar Substitute
If you don’t have Alka-Seltzer tablets, a mixture of baking soda and vinegar can produce a similar reaction, though less controlled. Pour vinegar into the water before the oil layer and sprinkle in baking soda when ready to activate.
Scientific Explanation
This experiment is packed with educational value and gives children a real-world understanding of several scientific principles:
Density
Oil floats on water because it is less dense. This is why the two liquids stay in separate layers. Density differences are also why colored water moves downward through the oil after the bubbles pop.
Solubility
Food coloring is water-based and does not dissolve in oil. Instead, it stays in droplet form until it reaches the water layer, where it can fully mix and spread. This principle demonstrates how solubility is specific to solvent and solute types.
Chemical Reaction
The main reaction occurs when Alka-Seltzer meets water. The tablet contains citric acid and sodium bicarbonate (baking soda), which react when wet to produce carbon dioxide gas. This gas forms bubbles that rise through the oil, lifting colored water with them and simulating a lightning flash.
Gas Behavior
The bubbles eventually pop, releasing the gas and allowing the denser colored water to fall back through the oil. This cycle repeats as long as new gas is introduced, showing how gases behave in a liquid medium.
Light and Refraction
Shining a light into the jar introduces concepts of light refraction, reflection, and diffusion. The light interacts differently with oil, water, and bubbles, mimicking the natural way lightning flickers through storm clouds.
Serving Suggestions
This activity fits a variety of educational and recreational contexts:
-
Classroom Demonstration: Use during weather or chemistry units.
-
Science Fair Projects: Add labels and scientific diagrams to create a full presentation.
-
Rainy Day Activity: Turn an indoor day into an opportunity for hands-on learning.
-
Birthday Parties: Set up a storm-in-a-jar station as a creative party activity.
-
STEM Camps: Integrate into your science, technology, engineering, and math enrichment curriculum.
Tips
-
Use a clear container for the best visibility.
-
Prepare in advance and test a batch to determine the right amount of tablets and coloring.
-
Supervise children during every step, especially when handling food coloring or small tablet pieces.
-
For easier cleanup, do the experiment over a tray or old towel.
Prep Time: 10 minutes
Activity Time: 10–15 minutes
Total Time: 20–25 minutes
Nutritional Information
Not applicable—this is not a food-based activity.
FAQs
Can I use any kind of oil?
Yes, but vegetable oil is the most commonly available and offers the best clarity. Baby oil can add a glossy sheen, but some oils may be too viscous for optimal results.
Is the reaction reusable?
While the liquid setup can be reused, the Alka-Seltzer needs to be replaced each time.
Is it safe for young children?
Yes, with proper supervision. Small pieces of Alka-Seltzer can be a choking hazard, so never leave children unattended.
Can I store the jar?
Yes, but keep in mind the reaction effect diminishes after each use. Store the jar in a cool place if you plan to reuse it within a few hours.
Can I scale this up?
Yes, larger containers will require more oil, water, and food coloring. Adjust Alka-Seltzer quantity accordingly.
Conclusion
The Lightning Storm in a Jar is more than just an eye-catching craft; it’s a miniature laboratory where children can witness scientific principles at work. Through bubbling reactions, swirling colors, and flickering lights, participants not only replicate a natural storm but also gain insight into density, solubility, and chemical reactions. Whether you’re a teacher seeking an engaging science demonstration, a parent looking for a rainy-day project, or a young scientist eager to explore the natural world, this activity promises both fun and learning in equal measure. Simple, affordable, and endlessly fascinating, the storm in a jar brings science to life—one fizz at a time.
