
In a world filled with synthetic fragrances, aerosol sprays, and chemically saturated air fresheners, finding a safer, cleaner way to scent your home can feel like a breath of fresh air—literally. That’s where homemade gel air fresheners come in. With just a handful of natural ingredients, you can create beautiful, aromatic, and toxin-free air fresheners that enhance your home’s ambiance while reflecting your personal style.
Whether you’re a seasoned crafter or a beginner looking for an easy project, gel air fresheners are a delightful way to bring a touch of freshness into every corner of your living space. They’re versatile, cost-effective, eco-friendly, and can be tailored with your favorite essential oils, decorative elements, and colors. From relaxing lavender to uplifting citrus blends, the options are endless.
In this comprehensive guide, you’ll learn exactly how to make your own gel air fresheners at home—from gathering materials and crafting your mixture to customizing scents and troubleshooting common issues.
Why Make Your Own Gel Air Fresheners?
Before diving into the step-by-step process, let’s take a closer look at why DIY gel air fresheners are worth the effort:
1. Non-Toxic and Safe
Store-bought air fresheners often contain phthalates, synthetic fragrances, and volatile organic compounds (VOCs) that can irritate the lungs, trigger allergies, or affect indoor air quality. Homemade versions let you choose natural, skin-safe ingredients—especially helpful for homes with children or pets.
2. Budget-Friendly
Making your own air fresheners is significantly cheaper than purchasing branded options. A single batch can yield multiple jars, and with reusable materials like jars and essential oils, your costs drop over time.
3. Creative and Personal
You’re not limited to one scent or color. Blend oils, decorate your jars, and personalize each batch to match the room, mood, or season. They also make thoughtful handmade gifts.
4. Eco-Friendly
Reusable glass jars and natural ingredients reduce waste and environmental impact compared to disposable plug-ins and plastic aerosol cans.
5. Fun DIY Project
This is a simple, hands-on project that doesn’t require any specialized equipment or skills. It’s a great weekend activity and even kid-friendly with adult supervision.
What You’ll Need
Creating gel air fresheners at home only requires a few basic, easy-to-find ingredients. You can find most of them at grocery stores, craft stores, or online.
Essential Ingredients:
-
1 cup water (½ cup cold + ½ cup hot)
-
1 packet (0.25 oz) unflavored gelatin – acts as the gelling agent
-
1 tablespoon salt – natural preservative to prevent mold
-
20–30 drops essential oil – for fragrance
-
Food coloring (optional) – for visual appeal
-
Small glass jars or containers – mason jars, baby food jars, or decorative bowls
Optional Decorative Additions:
-
Dried flowers (lavender buds, rose petals, chamomile)
-
Glitter (fine craft glitter, not chunky types)
-
Herbs (rosemary sprigs, mint leaves)
-
Citrus zest (lemon, orange)
-
Mini seashells or pebbles for themed jars

Step-by-Step Instructions
Follow these steps carefully to ensure smooth, successful gel air fresheners that not only smell great but also look beautiful on your shelves.
Step 1: Bloom the Gelatin
In a medium-sized mixing bowl, pour ½ cup of cold water and sprinkle the unflavored gelatin evenly over the surface. Allow it to sit for 5–10 minutes. This process, called blooming, helps the gelatin absorb water and ensures a smooth, lump-free gel later.
Step 2: Heat the Remaining Water
While the gelatin is blooming, heat the remaining ½ cup of water until it is just about boiling. You can do this in a small saucepan on the stove or microwave it in a heatproof container for about 1–2 minutes.
Step 3: Dissolve the Gelatin
Carefully pour the hot water into the bloomed gelatin mixture. Stir continuously until the gelatin is completely dissolved and the mixture is smooth. This may take 1–2 minutes.
Step 4: Add Salt
Add 1 tablespoon of salt to the warm gelatin mixture. Stir well until the salt is dissolved. Salt not only preserves the gel but also helps maintain its texture over time by preventing mold and bacterial growth.
Step 5: Add Essential Oils and Color
Now it’s time to add 20–30 drops of essential oil. Choose oils based on your preference or desired effect (see scent combinations below). Stir the oil into the mixture.
If you want to color your gel, add a few drops of food coloring. One or two drops are usually enough to tint the gel lightly, but you can add more for a bolder hue. Stir until evenly mixed.
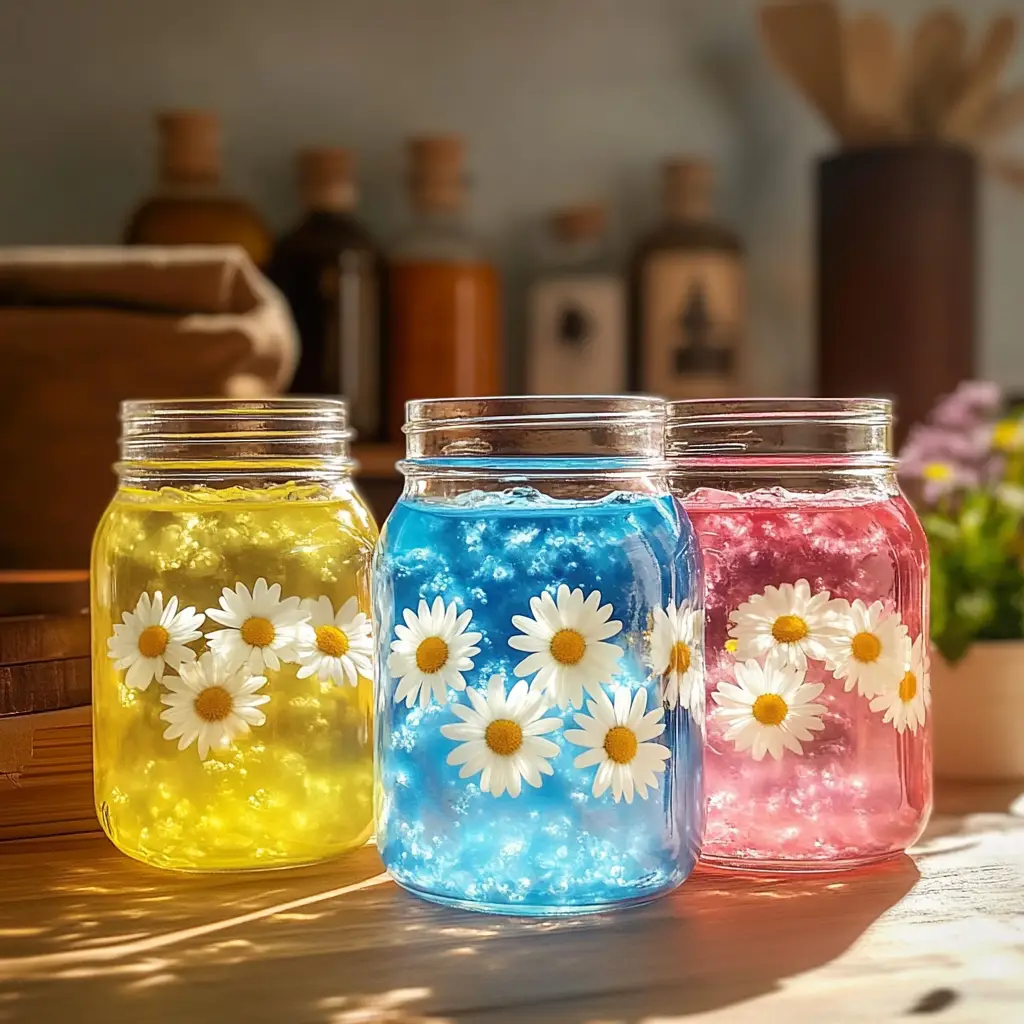
Step 6: Add Decorative Elements (Optional)
If desired, add a pinch of dried flowers, a sprinkle of glitter, or a few herbs to the mixture. These elements float beautifully in the gel and can give your jars a decorative, seasonal look.
Step 7: Pour Into Containers
Pour the prepared mixture into clean glass jars or containers. Fill them nearly to the top, leaving just a small space to avoid spillage. Wipe off any drips from the rim.
Step 8: Let It Set
Leave the containers uncovered at room temperature for several hours, preferably overnight, until the mixture is firm and set. Do not refrigerate, as this may cause condensation or sweating.
Step 9: Place and Enjoy
Place your gel air fresheners around your home—in the bathroom, bedroom, laundry room, closet, or car. They work best in small, enclosed spaces. When the scent fades after a few weeks, simply make a new batch.
Scent Combinations to Try
The beauty of DIY air fresheners is the ability to create a signature scent. Here are some blends you might love:
-
🌿 Relaxing Spa: Lavender + Eucalyptus + Chamomile
-
🍋 Citrus Sunshine: Lemon + Grapefruit + Sweet Orange
-
🌲 Forest Retreat: Pine + Cedarwood + Sage
-
🍪 Cozy Kitchen: Vanilla + Cinnamon + Clove
-
🌸 Romantic Bloom: Rose + Jasmine + Ylang-Ylang
-
🌬️ Clean Linen: Peppermint + Tea Tree + Lavender
Creative Decoration Ideas
The visual appeal of your gel air fresheners can be just as impactful as the scent. Consider these ideas:
-
Spring Theme: Pastel colors, flower petals, chamomile
-
Summer Vibes: Citrus zest, mint leaves, seashells
-
Fall Cozy: Cinnamon sticks, orange coloring, star anise
-
Winter Holidays: Red or green gels, pine needles, cranberries
-
Minimalist Chic: Clear gel, eucalyptus leaves, neutral jars
Use jars with lids if you want to store them before use or give them as gifts.

Where to Use Your Gel Air Fresheners
-
Bathroom: A lavender-mint blend offers a clean, calming aroma
-
Bedroom: Try rose or chamomile for a sleep-friendly scent
-
Closet: Lemongrass or cedarwood helps combat musty odors
-
Kitchen: Citrus or vanilla enhances freshness without overpowering
-
Office Desk: Peppermint or rosemary boosts alertness and focus
-
Car: A small lidded jar with lemon or eucalyptus is perfect for travel
Storage, Longevity, and Shelf Life
With proper care, each gel air freshener lasts 2 to 4 weeks, depending on room temperature, air circulation, and essential oil volatility.
Tips to Extend Freshness:
-
Keep out of direct sunlight to prevent melting or drying out
-
Use jars with tight-fitting lids if not using immediately
-
Store leftover gelatin mixture in the fridge (short term only)
-
Add a few drops of essential oil to the gel mid-cycle to refresh the scent
-
If mold develops (rare with salt), discard and make a fresh batch
Frequently Asked Questions
Can I use agar agar instead of gelatin?
Yes, agar agar is a great plant-based substitute. It sets firmer and is ideal for vegans. Use about 1 teaspoon per cup of liquid, and follow similar heating and dissolving instructions.
Is it safe to use near pets and children?
Yes, but always place the jars out of reach. While the ingredients are natural, essential oils can be potent and should not be ingested.
Can I reuse the jars?
Absolutely! Wash them thoroughly with warm, soapy water and sanitize before reusing. This makes your project even more eco-friendly.
How do I make a stronger scent?
Use more essential oil drops—up to 40 for a strong fragrance. Also, place the air freshener in a small, closed space for maximum effect.
Will the gel melt in hot weather?
If exposed to high temperatures (above 80°F/27°C), the gel may soften. To avoid this, place in shaded or cooler areas.
Final Thoughts
Making your own gel air fresheners is a rewarding DIY project that blends creativity, sustainability, and practicality. These homemade jars of scent allow you to reclaim control over your indoor air quality, personalize the atmosphere in your home, and express your style through scent and design.
From fresh citrus bursts in the kitchen to soothing floral notes in your bedroom, you can match your gel air fresheners to every space, every season, and every mood. They also make fantastic gifts—thoughtful, handcrafted, and full of personality.
So the next time your home needs a little aromatic lift, skip the chemical sprays and create something that’s natural, beautiful, and truly yours.
