

Introduction to Butterfinger Balls
Hey there, fellow dessert lovers! If you’re anything like me, you know that life can get pretty hectic. Between juggling work, family, and everything in between, finding time to whip up a delightful treat can feel impossible. That’s where these irresistible Butterfinger Balls come in! They’re a quick solution for a busy day, requiring just 15 minutes of your time. Plus, they’re sure to impress your loved ones with their sweet, crunchy goodness. Trust me, once you make these no-bake delights, they’ll become a staple in your dessert repertoire!
Why You’ll Love This Butterfinger Balls
These Butterfinger Balls are a dream come true for busy moms and professionals alike! They’re incredibly easy to make, requiring no baking at all. In just 15 minutes, you can create a delicious treat that’s perfect for any occasion. The combination of creamy peanut butter and crunchy Butterfinger bars creates a flavor explosion that will have everyone coming back for more. Plus, they’re a hit with kids and adults alike!
Ingredients for Butterfinger Balls
Let’s gather our ingredients for these delightful Butterfinger Balls! Each component plays a crucial role in creating that perfect balance of flavor and texture.
- Crushed Butterfinger candy bars: The star of the show! Their sweet, crunchy texture adds a delightful twist to our treats.
- Creamy peanut butter: This ingredient brings richness and binds everything together. You can use smooth or chunky, depending on your preference.
- Powdered sugar: This sweetener adds just the right amount of sweetness and helps achieve that perfect consistency.
- Chocolate chips: For coating, these provide a luscious, chocolatey finish. Dark, milk, or even white chocolate can be used for a fun twist!
- Coconut oil: This helps the chocolate melt smoothly and gives a nice sheen to the coating. You can substitute it with vegetable oil if needed.
For those looking to get creative, consider adding crushed nuts or colorful sprinkles on top of the chocolate before it sets. You’ll find the exact measurements for these ingredients at the bottom of the article, ready for printing!
How to Make Butterfinger Balls
Step 1: Mix the Base
Let’s kick things off by mixing our base! In a large mixing bowl, combine the crushed Butterfinger candy bars, creamy peanut butter, and powdered sugar. Use a sturdy spatula or your hands to blend everything together until it’s well mixed. The mixture should be thick and slightly sticky, but don’t worry, that’s just how it should be! If you find it too crumbly, a little extra peanut butter can help. This step is where the magic begins, so make sure to mix it well!
Step 2: Form the Balls
Now that our base is ready, it’s time to form the balls! Take small portions of the mixture and roll them into bite-sized balls, about one inch in diameter. Place each ball on a baking sheet lined with parchment paper. This will prevent them from sticking and make cleanup a breeze. If you find the mixture sticking to your hands, a little dusting of powdered sugar can help. Keep going until you’ve formed all the balls!
Step 3: Melt the Chocolate
Next up, let’s melt the chocolate! In a microwave-safe bowl, combine the chocolate chips and coconut oil. Microwave in 30-second intervals, stirring in between, until the mixture is smooth and fully melted. Be careful not to overheat it, as chocolate can seize up quickly. The coconut oil will help give the chocolate a nice sheen and make it easier to coat the balls. Once melted, it’s time to dip!
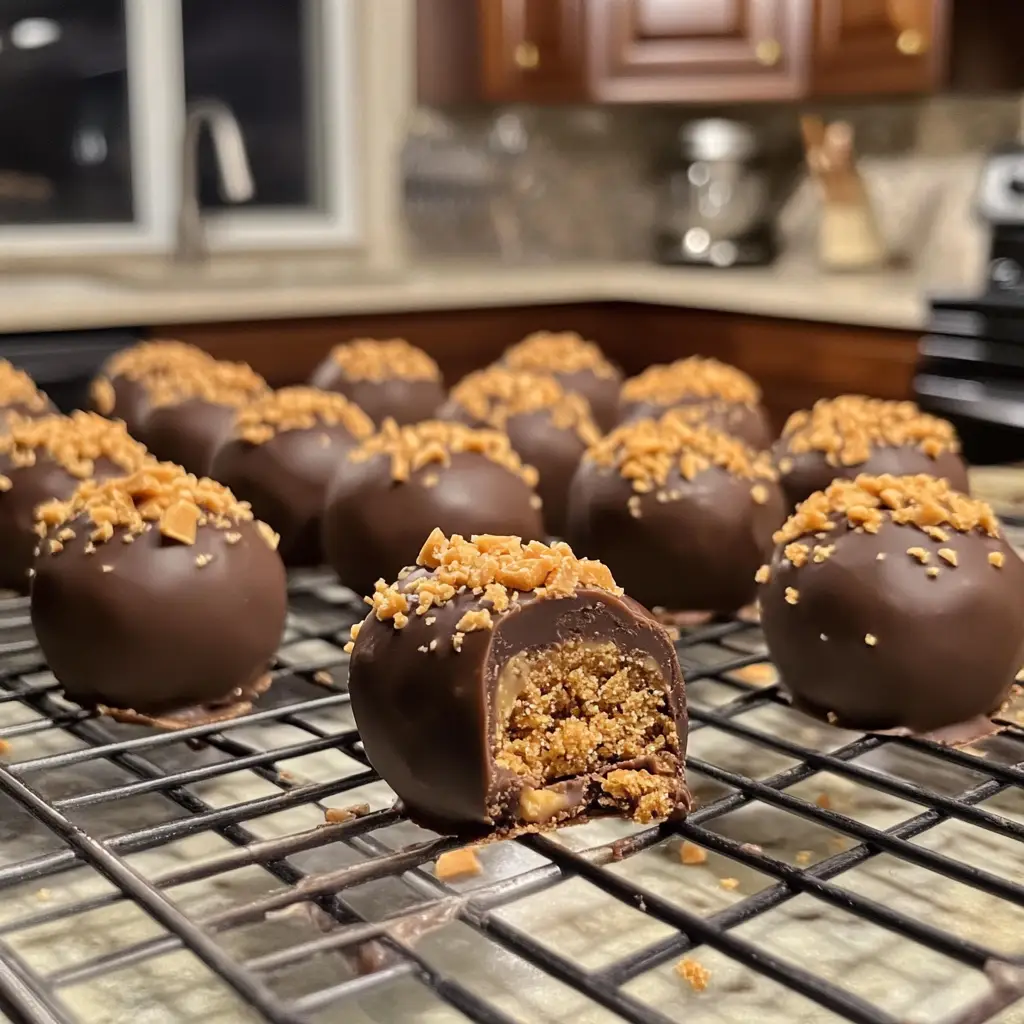
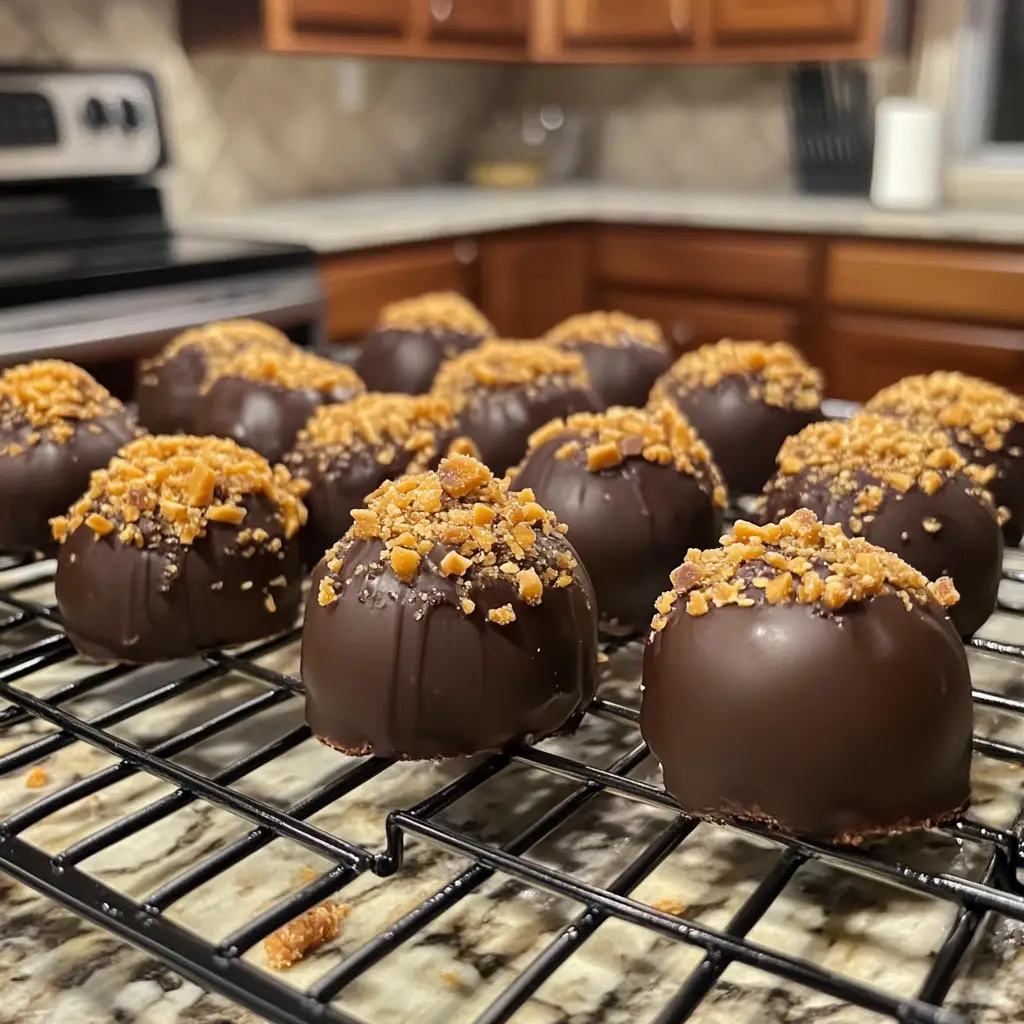
Step 4: Coat the Balls
Now comes the fun part—coating the balls! Take each ball and dip it into the melted chocolate, ensuring it’s fully coated. You can use a fork or your fingers to help with this. Let any excess chocolate drip off before placing the coated ball back on the parchment-lined baking sheet. If you want to add a little flair, sprinkle some crushed nuts or colorful sprinkles on top before the chocolate sets. It’s all about making them look as good as they taste!
Step 5: Chill and Set
Finally, it’s time to chill and set our Butterfinger Balls! Return the chocolate-coated balls to the baking sheet and pop them in the refrigerator. Let them chill for about 30 minutes, or until the chocolate hardens completely. This step is crucial for that perfect bite! Once set, you can enjoy these delightful treats right away or store them in an airtight container in the fridge. Trust me, they won’t last long!
Tips for Success
- Make sure your Butterfinger bars are finely crushed for even mixing.
- Use room temperature peanut butter for easier blending.
- Don’t rush the chocolate melting process; stir gently to avoid burning.
- For a smoother coating, let the chocolate cool slightly before dipping.
- Experiment with different chocolate types for unique flavors!
Equipment Needed
- Mixing bowl: A large bowl works best, but any bowl will do.
- Spatula: Use a sturdy spatula for mixing; a wooden spoon is a great alternative.
- Baking sheet: A regular baking sheet lined with parchment paper is ideal.
- Microwave-safe bowl: Any microwave-safe dish will work for melting chocolate.
- Fork or hands: Use either for dipping the balls in chocolate.
Variations of Butterfinger Balls
- Nutty Delight: Add chopped nuts like almonds or walnuts to the mixture for an extra crunch.
- Peanut Butter Swirl: Use crunchy peanut butter instead of creamy for a delightful texture contrast.
- Dark Chocolate Coating: Swap out milk chocolate for dark chocolate for a richer flavor.
- Vegan Option: Use dairy-free chocolate chips and natural nut butter to make these treats vegan-friendly.
- Flavor Infusion: Mix in a teaspoon of vanilla extract or a pinch of sea salt for added depth of flavor.
Serving Suggestions for Butterfinger Balls
- Pair these treats with a glass of cold milk for a classic combination.
- Serve them on a decorative platter for a festive touch at parties.
- For a fun twist, add a scoop of vanilla ice cream on the side.
- Drizzle some caramel sauce over the top for an extra indulgent treat.
- Present them in cute cupcake liners for a charming dessert display.
FAQs about Butterfinger Balls
Got questions about these delightful Butterfinger Balls? I’ve got you covered! Here are some common queries that might pop up as you whip up these no-bake treats.
Can I use other candy bars instead of Butterfinger?
Absolutely! While Butterfinger is the star, you can experiment with other candy bars like Snickers or Reese’s for a fun twist. Just keep the ratios similar for the best results!
How long do Butterfinger Balls last?
These treats can be stored in an airtight container in the refrigerator for up to a week. But trust me, they’ll likely disappear long before then!
Can I freeze Butterfinger Balls?
Yes, you can freeze them! Just make sure to place them in a single layer in a freezer-safe container. They’ll stay fresh for up to three months. Just thaw them in the fridge before enjoying!
What can I use instead of coconut oil?
If you don’t have coconut oil on hand, vegetable oil works just fine. It helps the chocolate melt smoothly and gives a nice finish to your treats.
Are Butterfinger Balls gluten-free?
Yes, as long as you use gluten-free Butterfinger bars, these treats can be enjoyed by those following a gluten-free diet. Always check the labels to be sure!
Final Thoughts
Making Butterfinger Balls is more than just whipping up a quick treat; it’s about creating sweet memories with your loved ones. The joy of seeing their faces light up as they take that first bite is priceless. These no-bake delights are perfect for any occasion, whether it’s a family gathering or a simple weeknight dessert. Plus, they’re so easy to make that even the busiest of moms can find time to indulge. So, roll up your sleeves, gather your ingredients, and let the fun begin! You’ll be glad you did, and your taste buds will thank you!
Print
Butterfinger Balls: Irresistibly Easy No-Bake Treats!
- Total Time: 15 minutes
- Yield: 24 balls 1x
- Diet: Vegetarian
Description
Butterfinger Balls are delicious no-bake treats made with crushed Butterfinger candy bars and creamy peanut butter, coated in chocolate for a sweet and crunchy dessert.
Ingredients
- 1 cup crushed Butterfinger candy bars
- 1/2 cup creamy peanut butter
- 1 cup powdered sugar
- 1 cup chocolate chips
- 1 tablespoon coconut oil
Instructions
- In a mixing bowl, combine crushed Butterfinger candy bars, peanut butter, and powdered sugar until well mixed.
- Form the mixture into small balls and place them on a baking sheet lined with parchment paper.
- In a microwave-safe bowl, melt chocolate chips and coconut oil together until smooth.
- Dip each ball into the melted chocolate, ensuring they are fully coated.
- Return the chocolate-coated balls to the baking sheet and refrigerate until the chocolate hardens.
Notes
- Store in an airtight container in the refrigerator for up to a week.
- For a fun twist, try adding crushed nuts or sprinkles on top of the chocolate before it sets.
- Prep Time: 15 minutes
- Cook Time: 0 minutes
- Category: Dessert
- Method: No-Bake
- Cuisine: American
Nutrition
- Serving Size: 1 ball
- Calories: 120
- Sugar: 10g
- Sodium: 50mg
- Fat: 7g
- Saturated Fat: 3.5g
- Unsaturated Fat: 2g
- Trans Fat: 0g
- Carbohydrates: 12g
- Fiber: 0g
- Protein: 2g
- Cholesterol: 0mg
Keywords: Butterfinger Balls, no-bake treats, dessert recipes
