
Cherry Rice Krispie Treats: Chewy, Juicy Bliss Awaits!
Sensory-Rich Introduction with Immediate Craving
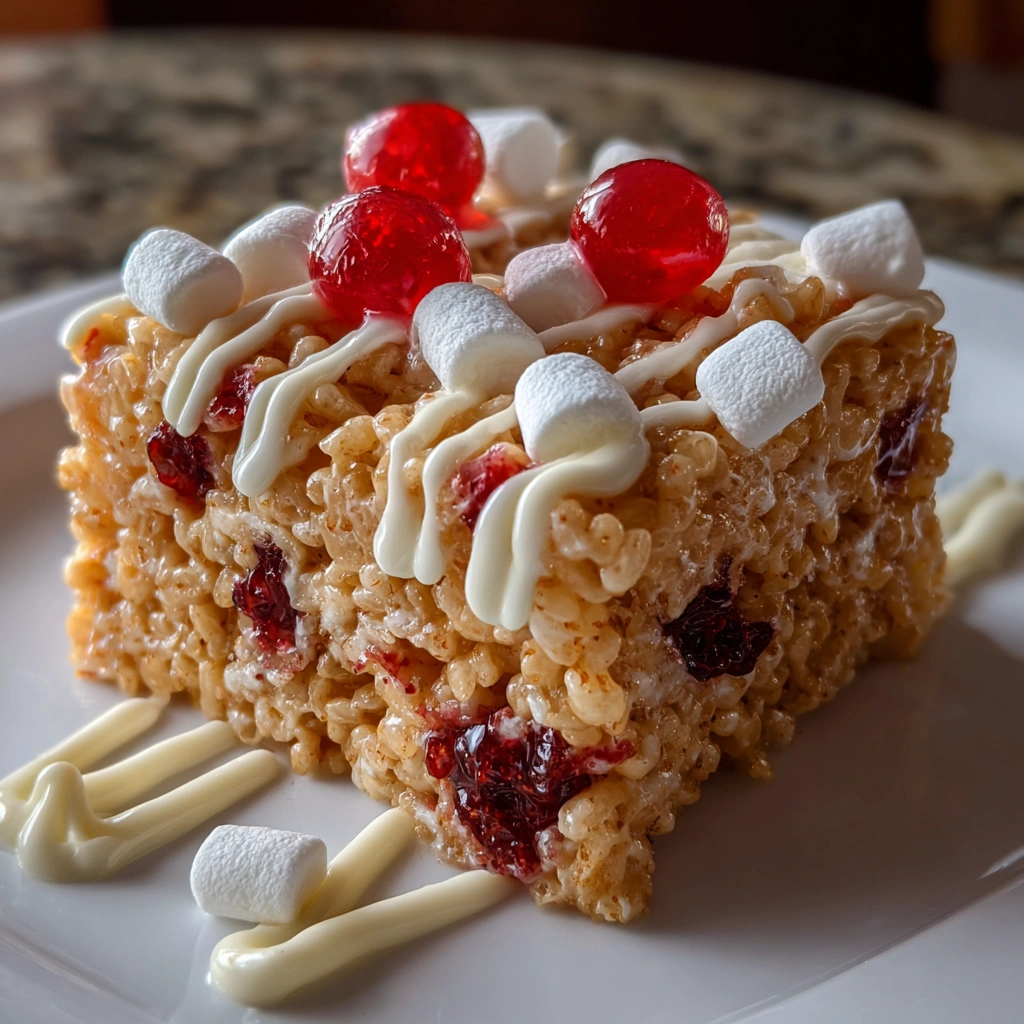
Imagine sinking your teeth into a soft, chewy Rice Krispie treat that bursts with the sweet and tangy flavor of cherries. The moment you take a bite, the delightful crunch of crispy rice cereal meets the gooey marshmallow, creating a symphony of textures that dance on your palate. This Cherry Rice Krispie Treats recipe is not just a dessert; it’s a nostalgic journey back to childhood, evoking memories of summer picnics and birthday parties filled with laughter and joy. Perfect for any occasion, whether it’s a casual family gathering or a festive celebration, these treats are sure to impress and satisfy your sweet tooth.
Why You’ll Love This Cherry Rice Krispie Treats
- Texture Contrast: The combination of chewy marshmallows, crunchy Rice Krispies, and soft dried cherries creates a delightful mouthfeel that keeps you coming back for more.
- Flavor Balance: The sweetness of the marshmallows is perfectly balanced by the tartness of the cherry preserves and dried cherries, making each bite a flavor explosion.
- Versatility: These treats can be customized with various mix-ins or toppings, allowing you to tailor them to your taste preferences or dietary needs.
- Ease of Preparation: With just a few simple steps and no baking required, these treats are quick and easy to whip up, making them a go-to dessert for busy days.
- Universal Appeal: Loved by kids and adults alike, Cherry Rice Krispie Treats are a crowd-pleaser that can brighten up any gathering or celebration.
Essential Tools & Preparation Strategy
- Large Saucepan: Essential for melting the butter and marshmallows evenly without burning.
- Spatula: Perfect for mixing the ingredients and pressing the mixture into the baking dish.
- 9×13 Inch Baking Dish: The ideal size for creating thick, chewy treats that hold their shape.
- Microwave-Safe Bowl: Necessary for melting white chocolate without the risk of burning it.
- Measuring Cups and Spoons: Important for accurate ingredient measurements to ensure the perfect balance of flavors.
- Cutting Board and Knife: Needed for chopping dried cherries and cutting the finished treats into squares.
- Parchment Paper (optional): Can be used to line the baking dish for easier removal of the treats.
Ingredients & Their Roles in This Cherry Rice Krispie Treats
Base Ingredients
- Rice Krispies Cereal (4 cups): Provides the crunchy base and structure of the treats.
- Unsalted Butter (1/4 cup): Adds richness and helps bind the ingredients together.
- Mini Marshmallows (10 oz): The key ingredient that gives the treats their gooey texture.
Cherry Flavor Ingredients
- Cherry Preserves (1/2 cup): Infuses the treats with a sweet and tangy cherry flavor.
- Dried Cherries (1/2 cup, chopped): Adds chewy texture and enhances the cherry flavor.
Decoration Ingredients
- White Chocolate Chips (1/2 cup): Drizzled on top for a creamy contrast and added sweetness.
- Fresh Cherries (1/4 cup, chopped): Used as a garnish for a pop of color and freshness.
Step-by-Step Guide to Perfect Cherry Rice Krispie Treats
- Melt the Butter: In a large saucepan, melt the unsalted butter over low heat until fully melted.
- Add Marshmallows: Stir in the mini marshmallows and continue to stir until completely melted and smooth, about 3-5 minutes.
- Incorporate Cherry Preserves: Remove the saucepan from heat and mix in the cherry preserves until well combined.
- Mix in Rice Krispies: Gradually add the Rice Krispies cereal, stirring gently until all the cereal is evenly coated with the marshmallow mixture.
- Fold in Dried Cherries: Gently fold in the chopped dried cherries to add texture and flavor.
- Press into Baking Dish: Transfer the mixture to a greased 9×13 inch baking dish, using a spatula to press it down evenly.
- Melt White Chocolate: In a microwave-safe bowl, melt the white chocolate chips in 30-second intervals, stirring until smooth.
- Drizzle and Garnish: Drizzle the melted white chocolate over the top of the treats and sprinkle with fresh cherry pieces.
- Cool and Cut: Allow the treats to cool completely for about 30 minutes before cutting them into squares.
Chef’s Notes & Pro Tips for Flawless Results
- Make-Ahead Instructions: These treats can be made up to 3 days in advance and stored in an airtight container.
- Storage Tips: Keep in a cool, dry place to maintain freshness; avoid refrigeration as it can make them hard.
- Substitutions: For a nutty flavor, use almond butter instead of unsalted butter, or swap dried cherries for cranberries for a different taste.
- Customization Options: Feel free to add nuts, sprinkles, or other dried fruits to personalize your treats.
Avoid These Common Cooking Mistakes
- Not Melting Marshmallows Completely: This can lead to a gritty texture; ensure they are fully melted and smooth.
- Overmixing the Cereal: This can make the treats tough; mix just until combined.
- Using Stale Cereal: Fresh Rice Krispies are crucial for the right texture; always check the expiration date.
- Not Greasing the Baking Dish: This can make it difficult to remove the treats; always grease or line with parchment paper.
- Cutting Too Soon: Allow at least 30 minutes for the treats to set before cutting.
- Using Too Much Butter: This can make the treats greasy; stick to the recommended amount.
- Not Pressing Firmly Enough: This can lead to crumbly treats; press down firmly but gently.
Creative Variations & Customizations
- Chocolate Cherry Treats: Add cocoa powder to the marshmallow mixture for a chocolatey twist.
- Nutty Cherry Treats: Incorporate chopped nuts like almonds or walnuts for added crunch.
- Seasonal Variations: Use seasonal fruits like strawberries or blueberries instead of cherries for a fresh take.
- Vegan Version: Substitute butter with coconut oil and use vegan marshmallows for a plant-based treat.
- Gluten-Free Option: Ensure the Rice Krispies are labeled gluten-free for a safe treat for those with gluten sensitivities.
Perfect Pairings: What to Serve With Cherry Rice Krispie Treats
- Vanilla Ice Cream: A scoop of creamy vanilla ice cream complements the sweetness of the treats.
- Cold Milk: A classic pairing that enhances the sweetness and balances the flavors.
- Fresh Fruit Salad: A refreshing contrast that adds a burst of freshness to the dessert.
- Birthday Parties: These colorful treats are perfect for celebrations and will delight guests of all ages.
- Hot Chocolate: A cozy pairing for winter evenings, creating a comforting snack experience.
- Picnic Spread: An easy and portable treat to include in your picnic basket.
- Coffee: Enjoy with a cup of coffee for a delightful afternoon pick-me-up.
- Dessert Platter: Include these treats on a platter with brownies and cookies for a variety of options.
Storage & Meal Prep Instructions
- Fridge Storage: Store in an airtight container at room temperature for up to 3 days. Avoid refrigeration to maintain texture.
- Freezer Storage: For longer storage, wrap individual squares in plastic wrap and place them in a freezer-safe bag for up to 2 months.
- Reheating Methods: If desired, microwave for a few seconds to soften before serving.
Nutrition Facts & Health Insights
| Nutrient | Amount per Serving (1 square) |
|---|---|
| Calories | 180 |
| Sugar | 12 grams |
| Sodium | 50 milligrams |
| Fat | 6 grams |
| Saturated Fat | 4 grams |
| Unsaturated Fat | 2 grams |
| Trans Fat | 0 grams |
| Carbohydrates | 30 grams |
| Fiber | 1 gram |
| Protein | 1 gram |
| Cholesterol | 10 milligrams |
Health Benefits of Key Ingredients
- Cherries: Rich in antioxidants and vitamins, cherries can help reduce inflammation and improve sleep quality.
- Rice Krispies: A low-fat cereal option that provides a satisfying crunch without excess calories.
Frequently Asked Questions
- Can I use regular marshmallows instead of mini marshmallows?Yes, you can use regular marshmallows; just adjust the melting time accordingly.
- What can I substitute for cherry preserves?You can use any fruit preserves or jams, such as raspberry or strawberry, for a different flavor.
- How long do these treats last?They can last up to 3 days at room temperature in an airtight container.
- Can I make these treats gluten-free?Yes, just ensure that the Rice Krispies are labeled gluten-free.
- What if I don’t have white chocolate chips?You can omit them or use dark chocolate chips for a richer flavor.
- Can I add more dried cherries?Absolutely! Feel free to adjust the amount to your liking.
- Is it necessary to grease the baking dish?Yes, greasing or lining the dish helps in easy removal of the treats.
- Can I freeze these treats?Yes, they can be frozen for up to 2 months; just wrap them well to prevent freezer burn.
Final Inspiration & Kitchen Confidence
As you embark on making these Cherry Rice Krispie Treats, remember that cooking is not just about following a recipe; it’s about creating memories and sharing joy with those you love. Celebrate your achievements in the kitchen, and don’t hesitate to experiment with flavors and textures. With each batch, you’ll gain more confidence and creativity. So gather your ingredients, roll up your sleeves, and let the sweet, chewy bliss of Cherry Rice Krispie Treats bring a smile to your face and those around you!
Print
Cherry Rice Krispie Treats: Chewy, Juicy Bliss Awaits!
- Total Time: 25 minutes
- Yield: 12 servings 1x
- Diet: Vegetarian
Description
These Cherry Rice Krispie Treats are a delightful twist on the classic dessert, featuring a chewy texture that melts in your mouth and bursts with the sweet, tangy flavor of cherries. Each bite offers a satisfying crunch from the crispy rice cereal, perfectly balanced by the gooey marshmallow and the vibrant cherry essence.
Ingredients
- Base:
- 4 cups Rice Krispies cereal
- 1/4 cup unsalted butter
- 10 oz mini marshmallows
- Cherry Flavor:
- 1/2 cup cherry preserves
- 1/2 cup dried cherries, chopped
- Decoration:
- 1/2 cup white chocolate chips
- 1/4 cup chopped fresh cherries (for garnish)
Instructions
- In a large saucepan, melt the butter over low heat.
- Add the mini marshmallows and stir until completely melted and smooth, about 3-5 minutes.
- Remove from heat and stir in the cherry preserves until well combined.
- Gradually add the Rice Krispies cereal, mixing until evenly coated.
- Fold in the chopped dried cherries for added texture.
- Press the mixture into a greased 9×13 inch baking dish, using a spatula to create an even layer.
- Melt the white chocolate chips in a microwave-safe bowl in 30-second intervals, stirring until smooth.
- Drizzle the melted white chocolate over the top of the treats and sprinkle with fresh cherry pieces.
- Let the treats cool completely before cutting into squares, about 30 minutes.
Notes
- Make-ahead: These treats can be made up to 3 days in advance and stored in an airtight container.
- Storage: Keep in a cool, dry place to maintain freshness; avoid refrigeration as it can make them hard.
- Substitutions: Use almond butter instead of butter for a nutty flavor or swap dried cherries for cranberries for a different taste.
- Prep Time: 15 minutes
- Cook Time: 10 minutes
- Category: desserts
- Method: no-bake
- Cuisine: American
Nutrition
- Serving Size: 1 square (approximately 2x2 inches)
- Calories: 180
- Sugar: 12 grams
- Sodium: 50 milligrams
- Fat: 6 grams
- Saturated Fat: 4 grams
- Unsaturated Fat: 2 grams
- Trans Fat: 0 grams
- Carbohydrates: 30 grams
- Fiber: 1 gram
- Protein: 1 gram
- Cholesterol: 10 milligrams
Keywords: Cherry Rice Krispie Treats, no-bake dessert, cherry treats, marshmallow treats, easy dessert recipe, sweet snacks, party treats, cherry desserts, kids treats, chewy snacks, summer desserts, fruity rice krispies, homemade treats
