

Sensory-Rich Introduction with Immediate Craving
Imagine biting into a Chicken Spring Roll—the moment your teeth sink into the golden-brown, crispy exterior, a satisfying crunch fills the air, followed by the explosion of juicy chicken mingling with vibrant vegetables. The aroma wafts through the kitchen, a tantalizing blend of garlic, ginger, and sesame oil that beckons everyone to gather around the table. Each roll is a delightful package of flavor, wrapped snugly in a thin, delicate shell that shatters beautifully with each bite.
One of my fondest memories is from a family gathering where my grandmother would lead the charge in making spring rolls. The kitchen was alive with laughter and chatter as we all took turns rolling the wrappers, each of us trying to perfect our technique. I remember the pride I felt when I finally managed to roll one without it bursting at the seams! Those moments of togetherness, the shared joy of cooking, and the delicious results made it a cherished tradition. It’s not just about the food; it’s about the love and memories we create around it.
There’s something incredibly comforting about homemade dishes, especially when they’re shared with loved ones. Whether it’s a casual weeknight dinner or a festive celebration, these Chicken Spring Rolls are the perfect addition to any occasion. They shine at family gatherings, where everyone can enjoy them as appetizers, or at parties, where they disappear faster than you can say “delicious.” And let’s not forget those cozy nights in, when a plate of these crispy delights can turn an ordinary evening into something special.
Why You’ll Love This Chicken Spring Rolls
Let me tell you, there’s a lot to love about these Chicken Spring Rolls. They’re not just a dish; they’re an experience that brings joy to your taste buds and warmth to your heart. Here’s why they’ll quickly become a staple in your kitchen:
- Texture Contrast: The moment you take a bite, you’ll be greeted by the satisfying crunch of the golden-brown wrapper, which gives way to a tender, juicy filling. It’s a delightful dance of textures that keeps you coming back for more!
- Flavor Balance: Each spring roll is a harmonious blend of savory chicken, fresh vegetables, and aromatic spices. The umami from the soy sauce, the warmth from the garlic and ginger, and the subtle nuttiness of sesame oil create a flavor profile that’s simply irresistible.
- Versatility: These spring rolls are incredibly versatile! Serve them as appetizers at your next gathering, enjoy them as a quick snack, or make them the star of your main meal. They fit seamlessly into any occasion.
- Ease of Preparation: Don’t worry if you’re not a seasoned chef! The steps to make these spring rolls are straightforward and easy to follow. With just a little practice, you’ll be rolling like a pro in no time.
- Universal Appeal: Whether you’re cooking for picky eaters or adventurous foodies, these spring rolls are a hit with everyone. Kids love the crispy exterior, while adults appreciate the flavorful filling, making them a true family favorite.
So, whether you’re hosting a party or just looking for a comforting meal, these Chicken Spring Rolls are sure to impress. Trust me, once you try them, you’ll understand why they hold a special place in my heart and on my dinner table!
Essential Tools & Preparation Strategy
Before diving into the delightful world of Chicken Spring Rolls, let’s gather our essential tools and set the stage for a smooth cooking experience. Trust me, having the right equipment makes all the difference, especially when you’re trying to achieve that perfect crispy texture!
- Skillet: This is essential for sautéing the filling evenly. A non-stick skillet works wonders here, allowing the chicken to brown beautifully without sticking.
- Deep Pan: A sturdy deep pan is necessary for frying the spring rolls to achieve that perfect golden-brown finish. Make sure it’s deep enough to hold the oil and the rolls comfortably.
- Spatula: A good spatula is your best friend for flipping the spring rolls while frying. Look for one with a slotted design to help drain excess oil.
- Measuring Cups: Accurate measurements are key to consistent results, so don’t skip this step! They ensure you get just the right amount of filling.
- Knife: A sharp knife is needed for chopping vegetables and herbs finely. Trust me, a dull knife can turn a simple task into a frustrating experience!
- Cutting Board: A stable surface for chopping is crucial. I always recommend using a separate board for vegetables to avoid cross-contamination.
- Tongs: These are useful for safely removing spring rolls from hot oil without burning your fingers. Plus, they give you a bit of flair in the kitchen!
- Thermometer: A deep-frying thermometer is a game-changer for checking oil temperature. Keeping the oil at 350°F (175°C) is essential for that crispy exterior.
With these tools in hand, you’re well on your way to creating Chicken Spring Rolls that will impress your family and friends. Remember, preparation is half the battle, and a little organization goes a long way in the kitchen!
Ingredients & Their Roles in This Chicken Spring Rolls
Understanding the ingredients that go into your Chicken Spring Rolls is key to mastering this dish. Each component plays a vital role in creating the perfect balance of flavor and texture. Let’s break it down:
For the Filling:
- Ground chicken: This is the main protein source, providing a rich flavor and moisture that keeps the filling juicy. I love using ground chicken because it absorbs the flavors of the spices and sauces beautifully.
- Shredded carrots: These add a touch of sweetness and a delightful crunch, making each bite more interesting. Plus, they bring a vibrant color that makes the filling visually appealing!
- Bean sprouts: These little gems contribute freshness and a satisfying crunch. They’re like tiny bursts of flavor that elevate the overall experience of the spring rolls.
- Green onions: Enhancing the flavor with a mild onion taste, green onions add a subtle sharpness that complements the other ingredients perfectly.
- Garlic and ginger: These aromatic powerhouses provide depth and warmth to the filling. The fragrant aroma that fills your kitchen while sautéing them is simply irresistible!
- Soy sauce: This ingredient adds umami and saltiness, tying all the flavors together. It’s a must-have for that authentic Asian taste.
- Sesame oil: Imparting a nutty flavor, sesame oil rounds out the filling with its rich aroma. Just a little goes a long way in enhancing the overall taste.
For the Wrappers:
- Spring roll wrappers: These delicate sheets encase the filling, providing the crispy exterior that we all love. Make sure to handle them gently to avoid tearing!
For Frying:
- Vegetable oil: Necessary for frying, it helps achieve that golden-brown finish that makes spring rolls so appealing. I recommend using a neutral oil with a high smoke point for the best results.
Substitutions:
If you’re looking for alternatives, don’t worry! You can easily swap out the ground chicken for ground turkey or even tofu for a vegetarian option. This flexibility allows you to cater to different dietary preferences while still enjoying the deliciousness of spring rolls.
Step-by-Step Guide to Perfect Chicken Spring Rolls
Now that we have our ingredients prepped and our tools ready, it’s time to dive into the fun part: making these Chicken Spring Rolls! Follow this step-by-step guide, and you’ll be on your way to creating a delicious batch that will impress everyone at the table.
- Heat the Oil: Start by heating 1 tablespoon of sesame oil in a large skillet over medium heat. The moment the oil shimmers, you know it’s ready for the next step.
- Sauté Aromatics: Add the minced garlic and ginger to the skillet, sautéing for 1-2 minutes until fragrant. The aroma will fill your kitchen, making it hard to resist sneaking a taste!
- Cook the Chicken: Next, add the ground chicken to the skillet. Cook it until it’s browned and fully cooked, which should take about 5-7 minutes. Make sure to break it up with your spatula for even cooking.
- Add Vegetables: Stir in the shredded carrots, bean sprouts, and green onions. Cook for an additional 2-3 minutes until the vegetables are tender yet still crisp. This is where the filling starts to come alive!
- Season the Filling: Pour in the soy sauce, mixing well to ensure every bite is packed with flavor. Once combined, remove the skillet from heat and let the filling cool. This step is crucial to prevent soggy wrappers!
- Wrap It Up: Lay a spring roll wrapper on a clean surface. Place 2-3 tablespoons of the cooled filling in the center. Roll tightly, folding in the sides as you go. It might take a few tries to get the technique just right, but don’t worry—practice makes perfect!
- Heat the Oil for Frying: In a deep pan, heat vegetable oil to 350°F (175°C). Use a thermometer to ensure the oil is at the right temperature; this is key for achieving that crispy exterior.
- Fry the Spring Rolls: Fry the spring rolls in batches for 3-4 minutes or until they are golden brown, turning occasionally for even cooking. The sound of sizzling oil is music to my ears!
- Drain and Serve: Once golden, remove the spring rolls and drain them on paper towels to absorb any excess oil. Serve them hot, and watch as everyone dives in!
And there you have it! A step-by-step guide to making perfect Chicken Spring Rolls. With a little practice, you’ll be rolling like a pro in no time. Enjoy the process, and don’t forget to share your delicious creations with family and friends!
Chef’s Notes & Pro Tips for Flawless Results
As you embark on your journey to create these delightful Chicken Spring Rolls, I want to share some of my favorite tips and tricks that will help you achieve flawless results every time. Trust me, a little extra attention to detail can elevate your spring rolls from good to absolutely amazing!
- Make-ahead instructions: If you’re short on time, consider preparing the filling a day in advance. Simply store it in an airtight container in the refrigerator. This not only saves you time on the day of cooking but also allows the flavors to meld beautifully, enhancing the overall taste!
- Storage: Once cooked, these spring rolls can be kept in an airtight container in the fridge for up to 3 days. Just be sure to let them cool completely before storing to maintain their crispiness. If you have leftovers, they make for a fantastic snack or quick meal!
- Equipment recommendations: For precise oil temperature, I highly recommend using a deep-frying thermometer. Maintaining the oil at 350°F (175°C) is crucial for achieving that perfect golden-brown exterior without making the rolls greasy. Trust me, this little gadget is worth its weight in gold!
- Customization options: Don’t hesitate to get creative! Feel free to experiment with different vegetables or proteins based on your personal preferences. You can add bell peppers for sweetness, mushrooms for earthiness, or even swap the chicken for shrimp or tofu. The possibilities are endless, and that’s what makes cooking so much fun!
With these tips in your back pocket, you’re well-equipped to make Chicken Spring Rolls that will impress everyone at your table. Remember, cooking is all about enjoying the process, so have fun and don’t be afraid to make it your own!
Avoid These Common Cooking Mistakes
Even the most seasoned cooks can run into a few hiccups when making Chicken Spring Rolls. But don’t worry! I’ve compiled a list of common mistakes and their solutions to help you navigate the process smoothly. With a little awareness, you can avoid these pitfalls and create spring rolls that are nothing short of perfection!
- Overfilling the wrappers: This can cause them to burst while frying, leading to a messy kitchen and sad spring rolls. Solution: Use only 2-3 tablespoons of filling per wrapper. It’s better to err on the side of caution!
- Not sealing the wrappers properly: If the edges aren’t sealed well, oil can seep in during frying, making your rolls soggy. Solution: Wet the edges of the wrapper with a little water and press firmly to seal. This little step makes a big difference!
- Using too low oil temperature: Frying at a low temperature results in greasy spring rolls that lack that desirable crunch. Solution: Maintain the oil temperature at 350°F (175°C). A thermometer is your best friend here!
- Frying too many at once: Overcrowding the pan lowers the oil temperature, leading to uneven cooking. Solution: Fry in small batches to ensure each roll gets the attention it deserves. Trust me, it’s worth the wait!
- Not cooling the filling: If the filling is too warm, it can make the wrappers soggy before you even fry them. Solution: Allow the filling to cool completely before wrapping. This step is crucial for achieving that perfect crispy texture!
- Using stale wrappers: Stale wrappers can lead to tearing and frustration. Solution: Always use fresh wrappers and check the expiration dates. A little diligence goes a long way!
- Not draining excess oil: If you skip this step, your spring rolls can end up soggy and unappetizing. Solution: Drain the fried spring rolls on paper towels immediately after frying to absorb any excess oil. This ensures they stay crispy until served!
By keeping these common mistakes in mind, you’ll be well on your way to mastering the art of making Chicken Spring Rolls. Remember, every cooking experience is a learning opportunity, so don’t be discouraged if things don’t go perfectly the first time. Happy cooking!
Creative Variations & Customizations
One of the best things about Chicken Spring Rolls is their versatility! You can easily customize them to suit your taste preferences or dietary needs. Here are some creative variations that will keep your spring roll game exciting:
- Vegetarian Spring Rolls: For a meat-free option, simply substitute the ground chicken with tofu. You can also amp up the vegetable content by adding bell peppers, mushrooms, or even some finely chopped spinach. This variation is not only delicious but also packed with nutrients!
- Spicy Chicken Spring Rolls: If you like a little heat, consider incorporating chili paste or sriracha into the filling. Just a teaspoon or two can elevate the flavor profile and give your spring rolls a delightful kick. Your taste buds will thank you!
- Herbed Spring Rolls: For a fragrant twist, add fresh herbs like cilantro or basil to the filling. These herbs not only enhance the flavor but also add a burst of freshness that complements the savory chicken beautifully. It’s like a garden party in every bite!
- Baked Spring Rolls: If you’re looking for a healthier alternative, brush the spring rolls with a little oil and bake them at 400°F (200°C) for about 15-20 minutes, or until golden brown. This method gives you that satisfying crunch without the extra oil from frying.
- Seasonal Variations: Take advantage of seasonal produce by using vegetables that are at their peak. Zucchini, bell peppers, or even sweet potatoes can add unique flavors and textures to your spring rolls. It’s a great way to keep things fresh and exciting!
Feel free to mix and match these ideas to create your own signature spring rolls. The beauty of cooking is in the experimentation, so don’t hesitate to let your creativity shine in the kitchen!
Perfect Pairings: What to Serve With Chicken Spring Rolls
When it comes to enjoying Chicken Spring Rolls, the right accompaniments can elevate your dining experience to new heights. Here are some delightful pairings that will complement the flavors and textures of your spring rolls:
- Sweet Chili Sauce: This sauce offers a perfect spicy-sweet contrast that enhances the flavors of the spring rolls. The sticky sweetness combined with a hint of heat makes every bite even more enjoyable.
- Soy Sauce: A classic dipping option, soy sauce complements the savory filling beautifully. Its umami richness adds depth to the overall flavor profile, making it a must-have on your table.
- Cucumber Salad: A refreshing side that balances the richness of the spring rolls. The crispness of the cucumbers, combined with a light dressing, provides a delightful contrast that cleanses the palate.
- Pickled Vegetables: These add tanginess and crunch to the meal, enhancing the overall flavor experience. The acidity of pickled veggies cuts through the richness of the fried rolls, creating a harmonious balance.
- Hot and Sour Soup: This soup complements the spring rolls perfectly, creating a complete meal experience. The bold flavors of the soup pair wonderfully with the crispy rolls, making for a satisfying combination.
- Asian-Inspired Slaw: Providing additional crunch and freshness, a slaw made with cabbage, carrots, and a tangy dressing is a fantastic side that adds texture and flavor to your meal.
- Cold Beer or Iced Tea: Refreshing drink options that pair well with the dish. A light beer or a chilled iced tea can cleanse your palate and enhance the overall dining experience.
- Peanut Sauce: This nutty sauce adds a rich flavor that enhances the overall taste of the spring rolls. It’s a delicious option for those who enjoy a little extra creaminess with their bites.
With these perfect pairings, your Chicken Spring Rolls will shine even brighter on the table. Whether you’re hosting a gathering or enjoying a cozy night in, these accompaniments will take your meal to the next level!
Storage & Meal Prep Instructions
Once you’ve made your delicious Chicken Spring Rolls, you might be wondering how to store them or if you can prepare them in advance. Don’t worry! I’ve got you covered with some handy tips to ensure your spring rolls stay fresh and tasty.
Fridge Storage:
Store your cooked spring rolls in an airtight container in the refrigerator. They will stay fresh for up to 3 days. Just make sure they are completely cooled before sealing them up to maintain their crispiness. Trust me, there’s nothing worse than soggy spring rolls!
Freezer Storage:
If you want to make a big batch ahead of time, freezing is a fantastic option! Lay the uncooked spring rolls in a single layer on a baking sheet and freeze them until solid. Once frozen, transfer them to a freezer bag for up to 2 months. This way, you can enjoy homemade spring rolls anytime the craving strikes!
Reheating Methods:
When it’s time to enjoy your stored spring rolls, you’ll want to reheat them properly to retain that delightful crunch. Here are two effective methods:
- Oven: Preheat your oven to 375°F (190°C). Place the spring rolls on a baking sheet and reheat for 10-15 minutes, or until they are heated through and crispy.
- Air Fryer: For an even crispier finish, use an air fryer! Preheat it to 375°F (190°C) and cook the spring rolls for about 5-7 minutes, checking halfway through to ensure they don’t overcook.
With these storage and reheating tips, you can enjoy your Chicken Spring Rolls at their best, whether you’re snacking on leftovers or pulling out a batch from the freezer for a quick meal. Happy cooking!
Nutrition Facts & Health Insights
When it comes to enjoying Chicken Spring Rolls, it’s always good to know what you’re putting into your body. These delightful bites not only satisfy your cravings but also offer some nutritional benefits. Let’s break down the nutrition facts and explore the health insights of this delicious dish!
Nutrition Table
| Nutrient | Per Serving (1 spring roll) |
|---|---|
| Calories | 150 |
| Fat | 8 grams |
| Saturated Fat | 1 gram |
| Unsaturated Fat | 6 grams |
| Trans Fat | 0 grams |
| Cholesterol | 40 milligrams |
| Sodium | 300 milligrams |
| Carbohydrates | 15 grams |
| Fiber | 1 gram |
| Sugar | 2 grams |
| Protein | 8 grams |
Health Benefits
These Chicken Spring Rolls are not just a tasty treat; they also come packed with nutritional advantages:
- Lean Protein: Ground chicken is a fantastic source of lean protein, which is essential for muscle repair and growth. It helps keep you feeling full and satisfied, making it a great choice for a balanced meal.
- Vibrant Vegetables: The inclusion of shredded carrots, bean sprouts, and green onions adds a wealth of vitamins and minerals. Carrots are rich in beta-carotene, which supports eye health, while bean sprouts provide fiber and antioxidants that promote digestive health.
- Low in Sugar: With only 2 grams of sugar per serving, these spring rolls are a great option for those looking to reduce their sugar intake without sacrificing flavor.
- Customizable for Dietary Needs: You can easily make these spring rolls gluten-free by using gluten-free wrappers, making them accessible for those with dietary restrictions.
- Healthy Fats: The use of sesame oil and the option to include healthy fats from ingredients like avocado or nuts can enhance the nutritional profile, providing essential fatty acids that are beneficial for heart health.
With these nutrition facts and health insights, you can enjoy your Chicken Spring Rolls with confidence, knowing that they not only taste great but also contribute to a balanced diet. So go ahead, indulge in these crispy delights and feel good about it!
Frequently Asked Questions
- Can I use different proteins in the filling?Absolutely! You can substitute ground chicken with ground turkey, pork, or even tofu for a vegetarian option. Each protein brings its own unique flavor and texture, so feel free to experiment!
- How do I prevent the wrappers from tearing?To avoid tearing, make sure to handle the wrappers gently and keep them covered with a damp cloth while you work. If they dry out, they become brittle and more prone to tearing. Also, ensure your filling is cooled before wrapping to prevent moisture buildup.
- What is the best way to store leftover spring rolls?Store cooked spring rolls in an airtight container in the refrigerator for up to 3 days. If you have uncooked spring rolls, freeze them in a single layer on a baking sheet, then transfer to a freezer bag for up to 2 months.
- Can I bake the spring rolls instead of frying them?Yes, you can! For a healthier option, brush the spring rolls with a little oil and bake them at 400°F (200°C) for about 15-20 minutes, or until golden brown. This method gives you a crispy texture without the extra oil from frying.
- How long can I keep the filling in the fridge?The filling can be stored in an airtight container in the refrigerator for up to 2 days. Just make sure it’s completely cooled before storing to maintain its freshness.
- What dipping sauces pair well with spring rolls?Some popular dipping sauces include sweet chili sauce, soy sauce, and peanut sauce. You can also try a tangy vinegar-based sauce or a spicy sriracha for an extra kick!
- Can I make these spring rolls gluten-free?Yes! Simply use gluten-free spring roll wrappers, which are widely available in stores. This way, you can enjoy the deliciousness of spring rolls without the gluten.
- How do I know when the oil is hot enough for frying?The oil is ready when it reaches 350°F (175°C). You can test it by dropping a small piece of bread into the oil; if it sizzles and turns golden brown in about 60 seconds, the oil is hot enough!
- What vegetables can I add to the filling?You can add a variety of vegetables such as bell peppers, zucchini, mushrooms, or even spinach. Feel free to get creative and use whatever you have on hand!
- Can I prepare the spring rolls in advance?Yes, you can prepare the spring rolls in advance! Assemble them and store them in the refrigerator for a few hours before frying. Just make sure to cover them with a damp cloth to prevent drying out.
Final Inspiration & Kitchen Confidence
As you wrap up your adventure in making Chicken Spring Rolls, I want to take a moment to remind you that cooking is truly a journey. Each time you step into the kitchen, you’re not just preparing a meal; you’re honing your skills, exploring new flavors, and creating memories. Every attempt, whether it turns out perfectly or not, is a valuable step towards mastery. So, don’t be discouraged by any bumps along the way—embrace them as part of your culinary growth!
And let’s celebrate your achievements! Whether you’ve made your first batch of spring rolls or perfected your rolling technique, take pride in what you’ve created. Food has a magical way of bringing people together, so don’t hesitate to share your delicious spring roll creations with friends and family. I can guarantee that the smiles and compliments you receive will make all your efforts worthwhile!
Now, I invite you to dive into this recipe with enthusiasm. Try it out, experiment with different variations, and make it your own. Whether you add a spicy twist, swap in your favorite veggies, or even try a baked version, the possibilities are endless. And please, share your experiences! I’d love to hear about your culinary adventures and any tips you discover along the way. Happy cooking, and may your kitchen be filled with joy and delicious aromas!
Print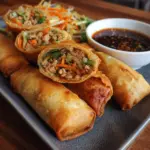
Chicken Spring Rolls: Crispy, Juicy, and Irresistibly Delicious!
- Total Time: 45 minutes
- Yield: 12 spring rolls 1x
- Diet: Gluten-Free (if using gluten-free wrappers)
Description
These Chicken Spring Rolls are a delightful fusion of crispy, golden-brown wrappers and juicy, flavorful chicken filling. Each bite offers a satisfying crunch followed by a burst of savory flavors, enhanced by fresh vegetables and aromatic herbs.
Ingredients
- For the Filling:
- 1 lb ground chicken
- 1 cup shredded carrots
- 1 cup bean sprouts
- 1/2 cup chopped green onions
- 2 cloves garlic, minced
- 1 tablespoon ginger, minced
- 2 tablespoons soy sauce
- 1 tablespoon sesame oil
- For the Wrappers:
- 12 spring roll wrappers
- For Frying:
- Vegetable oil (for frying)
Instructions
- In a large skillet, heat 1 tablespoon of sesame oil over medium heat.
- Add minced garlic and ginger, sautéing for 1-2 minutes until fragrant.
- Add ground chicken, cooking until browned and fully cooked, about 5-7 minutes.
- Stir in shredded carrots, bean sprouts, and green onions, cooking for an additional 2-3 minutes.
- Pour in soy sauce, mixing well, and remove from heat to cool the filling.
- Lay a spring roll wrapper on a clean surface, place 2-3 tablespoons of filling in the center, and roll tightly, folding in the sides.
- Heat vegetable oil in a deep pan to 350°F (175°C).
- Fry the spring rolls in batches for 3-4 minutes or until golden brown, turning occasionally for even cooking.
- Remove and drain on paper towels before serving.
Notes
- Make-ahead: The filling can be prepared a day in advance and stored in the refrigerator.
- Storage: Cooked spring rolls can be stored in an airtight container in the fridge for up to 3 days.
- Substitutions: Ground turkey or tofu can be used as alternatives to chicken.
- Prep Time: 30 minutes
- Cook Time: 15 minutes
- Category: appetizers
- Method: frying
- Cuisine: Asian
Nutrition
- Serving Size: 1 spring roll
- Calories: 150
- Sugar: 2 grams
- Sodium: 300 milligrams
- Fat: 8 grams
- Saturated Fat: 1 gram
- Unsaturated Fat: 6 grams
- Trans Fat: 0 grams
- Carbohydrates: 15 grams
- Fiber: 1 gram
- Protein: 8 grams
- Cholesterol: 40 milligrams
Keywords: Chicken Spring Rolls, crispy spring rolls, Asian appetizers, fried spring rolls, chicken recipes, easy spring rolls, homemade spring rolls, savory snacks, party appetizers, healthy spring rolls, quick recipes, delicious spring rolls, Asian cuisine, finger food, gluten-free options
