
Introduction to Chocolate-Dipped Coconut Bars
Ah, chocolate-dipped coconut bars! Just the thought of them brings a smile to my face. I remember the first time I tasted one at a local bakery. The moment I bit into that sweet, chewy coconut, coated in rich chocolate, it felt like a little piece of heaven melting in my mouth. I was instantly hooked! Since then, I’ve made it my mission to recreate that delightful experience in my own kitchen.
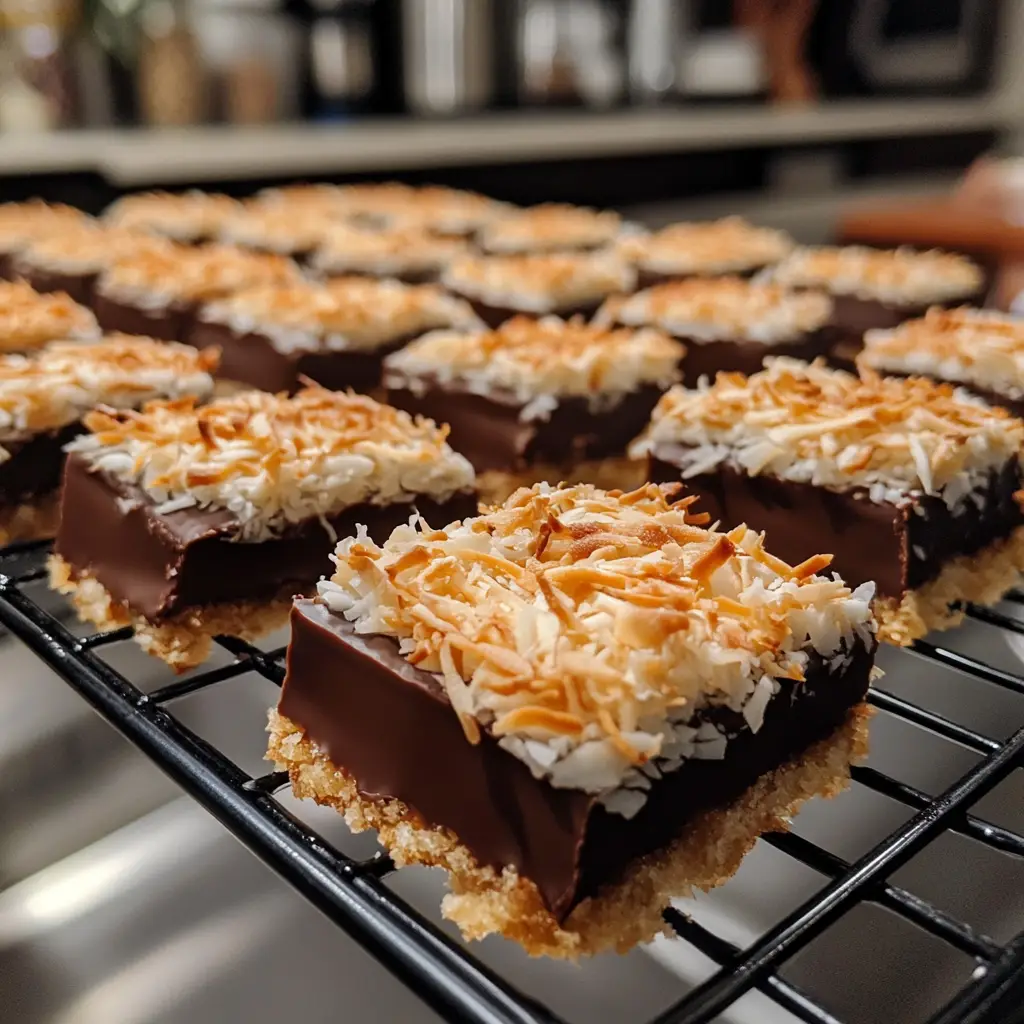
These bars are not just a treat; they are a celebration of flavors and textures. The combination of the soft, chewy coconut and the smooth, luscious chocolate creates a symphony of taste that dances on your palate. They are perfect for any occasion, whether you’re hosting a gathering, celebrating a special moment, or simply indulging in a sweet craving after a long day.
What I love most about making chocolate-dipped coconut bars is how simple and fun the process is. It’s a great way to get the kids involved, too! I can still hear their giggles as they help me shape the bars and dip them in chocolate. It’s these little moments that make cooking so special. Plus, the aroma that fills the kitchen while they chill is simply irresistible!
In this article, I’ll share my favorite recipe for chocolate-dipped coconut bars, along with tips and tricks that I’ve learned along the way. Whether you’re a seasoned baker or a beginner, I promise you’ll find joy in making these delightful treats. So, let’s roll up our sleeves and dive into the world of chocolate-dipped coconut bars!
Ingredients for Chocolate-Dipped Coconut Bars
Before we embark on our delicious journey of making chocolate-dipped coconut bars, let’s gather our ingredients. Having everything ready makes the process smoother and more enjoyable. Trust me, there’s nothing worse than realizing you’re missing an ingredient halfway through! Here’s what you’ll need:
Main Ingredients
- 2 cups unsweetened shredded coconut
- 1 cup sweetened condensed milk
- 1 teaspoon vanilla extract
- 1/4 teaspoon salt
- 8 ounces semi-sweet chocolate chips
- 1 tablespoon coconut oil (optional, for a smoother chocolate)
When it comes to the shredded coconut, I always opt for unsweetened. It allows me to control the sweetness of the bars. Plus, the texture is just perfect! As for the sweetened condensed milk, I recommend using a high-quality brand. It makes a world of difference in flavor. And don’t skimp on the chocolate! A good semi-sweet chocolate will elevate your bars to a whole new level.
Optional Add-ons
- 1/2 cup chopped nuts (like almonds or walnuts)
- 1/4 cup dried fruit (like cranberries or apricots)
- 1/2 teaspoon almond extract (for a nutty twist)
- Sea salt flakes (for a touch of saltiness on top)
These optional add-ons can add a delightful crunch or a burst of flavor to your bars. I love tossing in some chopped nuts for that extra texture. And if you’re feeling adventurous, a sprinkle of sea salt on top of the chocolate adds a lovely contrast to the sweetness. It’s like a little surprise with every bite!
Now that we have our ingredients ready, let’s move on to the fun part—preparing our chocolate-dipped coconut bars!
How to Prepare Chocolate-Dipped Coconut Bars
Now that we have our ingredients all lined up, it’s time to roll up our sleeves and get to work! Making chocolate-dipped coconut bars is a delightful process that fills your kitchen with sweet aromas and happy memories. Let’s dive into the steps!
Step 1: Prepare the Coconut Mixture
First things first, we need to create that delicious coconut base. In a large mixing bowl, combine the shredded coconut, sweetened condensed milk, vanilla extract, and salt. Mix everything together until the coconut is well-coated and the mixture is sticky.
Tips for Step 1
- Use your hands! Sometimes, getting in there with your fingers helps to mix everything more thoroughly.
- If the mixture feels too dry, add a splash more of sweetened condensed milk. You want it to be sticky but not runny.
Step 2: Shape the Bars
Once your coconut mixture is ready, it’s time to shape it into bars. I like to use a small baking dish lined with parchment paper for this. Scoop out a portion of the mixture and press it firmly into the dish, creating an even layer. You can also roll them into small logs if you prefer a more rustic look!
Tips for Step 2
- Wet your hands slightly to prevent the mixture from sticking to your fingers.
- Make sure to pack the mixture tightly; this helps the bars hold their shape when you cut them.
Step 3: Chill the Bars
Now that our bars are shaped, it’s time to chill them. Place the baking dish in the refrigerator for at least 30 minutes. This step is crucial as it helps the bars firm up, making them easier to dip in chocolate later.
Tips for Step 3
- If you’re in a hurry, you can pop them in the freezer for about 15 minutes instead.
- While they chill, you can clean up your workspace and prepare for the next steps!
Step 4: Melt the Chocolate
While the bars are chilling, let’s melt the chocolate. You can do this using a double boiler or in the microwave. If using the microwave, heat the chocolate in 30-second intervals, stirring in between until it’s smooth and melted. If you’re using coconut oil, add it in at this stage for a silky texture.
Tips for Step 4
- Be careful not to overheat the chocolate; it can seize up and become grainy.
- Using a high-quality chocolate will make a big difference in flavor!
Step 5: Dip the Bars in Chocolate
Now comes the fun part—dipping! Remove the chilled bars from the refrigerator. Using a fork or a dipping tool, dip each bar into the melted chocolate, ensuring it’s fully coated. Let the excess chocolate drip off before placing them back on the parchment paper.
Tips for Step 5
- For a decorative touch, sprinkle some chopped nuts or sea salt on top of the chocolate before it sets.
- Work quickly, as the chocolate will start to set as it cools!
Step 6: Let the Chocolate Set
After dipping, it’s time to let the chocolate set. You can leave the bars at room temperature or place them back in the refrigerator for about 15-20 minutes. Once the chocolate is firm, your chocolate-dipped coconut bars are ready to be enjoyed!
Tips for Step 6
- Store any leftovers in an airtight container in the fridge. They’ll stay fresh for up to a week!
- These bars also freeze well, so feel free to make a big batch and save some for later!
Equipment Needed for Chocolate-Dipped Coconut Bars
Before we dive into the kitchen, let’s gather the essential tools for making our chocolate-dipped coconut bars. Having the right equipment on hand makes the process smoother and more enjoyable. Here’s what you’ll need:
- Mixing Bowl: A large bowl is perfect for combining the coconut mixture. If you don’t have one, any deep dish will do!
- Baking Dish: A small baking dish lined with parchment paper works best for shaping the bars. If you don’t have one, a plate or tray can also work in a pinch.
- Fork or Dipping Tool: This is essential for dipping the bars into the melted chocolate. If you don’t have a dipping tool, a fork or even a skewer can do the trick!
- Microwave-Safe Bowl or Double Boiler: You’ll need this for melting the chocolate. If you don’t have a double boiler, a heatproof bowl over a pot of simmering water works just as well.
- Spatula: A spatula is handy for scraping the coconut mixture into the baking dish and for stirring the melted chocolate.
With these tools ready, you’re all set to create your delicious chocolate-dipped coconut bars! Remember, cooking is all about improvisation, so feel free to use what you have on hand. Let’s get started!
Variations of Chocolate-Dipped Coconut Bars
While the classic chocolate-dipped coconut bars are absolutely delightful, I love to experiment with different flavors and textures. It’s like a culinary adventure every time I step into the kitchen! Here are a few variations that I’ve tried and absolutely adore:
- Dark Chocolate Delight: Swap out the semi-sweet chocolate for dark chocolate. The rich, intense flavor pairs beautifully with the sweetness of the coconut.
- Minty Fresh: Add a few drops of peppermint extract to the coconut mixture for a refreshing twist. It’s like a tropical vacation in every bite!
- Peanut Butter Bliss: Mix in a couple of tablespoons of creamy peanut butter into the coconut mixture. The combination of coconut and peanut butter is simply heavenly!
- Fruit Fusion: Incorporate dried fruits like mango or pineapple into the coconut mixture. This adds a burst of tropical flavor that’s sure to brighten your day.
- Spiced Coconut: Add a pinch of cinnamon or nutmeg to the coconut mixture for a warm, cozy flavor. It’s perfect for those chilly evenings!
These variations not only keep things exciting but also allow you to tailor the bars to your taste preferences. I encourage you to get creative and make these chocolate-dipped coconut bars your own. Who knows? You might just discover a new favorite flavor combination!
Cooking Notes for Chocolate-Dipped Coconut Bars
As I’ve journeyed through the delightful world of chocolate-dipped coconut bars, I’ve picked up a few cooking notes that can make your experience even better. These little nuggets of wisdom can help you avoid common pitfalls and enhance your baking adventure!
- Fresh Ingredients: Always use fresh coconut and high-quality chocolate. The flavor of your bars will shine through when you start with the best ingredients.
- Room Temperature: Make sure your sweetened condensed milk is at room temperature. This helps it blend more easily with the coconut, creating a smoother mixture.
- Chill Time: Don’t rush the chilling process! Allowing the bars to set properly ensures they hold their shape when dipped in chocolate.
- Chocolate Tempering: If you want a glossy finish on your chocolate, consider tempering it. This involves melting and cooling the chocolate to specific temperatures, giving it a beautiful sheen.
- Storage Tips: Store your chocolate-dipped coconut bars in an airtight container. They can be kept in the fridge for up to a week or frozen for longer storage. Just make sure to separate layers with parchment paper to prevent sticking!
These cooking notes are like little treasures I’ve gathered over time. They help me create the perfect chocolate-dipped coconut bars every time. I hope they guide you on your own delicious journey!
Serving Suggestions for Chocolate-Dipped Coconut Bars
Now that our chocolate-dipped coconut bars are ready, it’s time to think about how to serve them! Presentation can elevate your treats from simple snacks to show-stopping desserts. Here are some of my favorite serving suggestions that add a little flair:
- On a Platter: Arrange the bars on a beautiful serving platter. You can garnish with fresh mint leaves or a sprinkle of shredded coconut for a pop of color.
- With a Dip: Serve the bars alongside a small bowl of melted chocolate or a rich caramel sauce for dipping. It adds an interactive element that everyone will love!
- As a Dessert Board: Create a dessert board with an assortment of treats. Pair the chocolate-dipped coconut bars with fruits, nuts, and other sweets for a delightful spread.
- With Coffee or Tea: These bars make a perfect companion to a warm cup of coffee or tea. The rich flavors complement each other beautifully, making for a cozy afternoon treat.
- Gift-Worthy: Wrap the bars in decorative cellophane and tie them with a ribbon. They make wonderful homemade gifts for friends and family!
These serving suggestions not only enhance the experience but also make your chocolate-dipped coconut bars a delightful centerpiece for any occasion. Whether it’s a casual gathering or a festive celebration, these bars are sure to impress!
Tips for Making Chocolate-Dipped Coconut Bars
As I’ve whipped up countless batches of chocolate-dipped coconut bars, I’ve gathered a treasure trove of tips that can make your baking experience even more enjoyable. Here are some of my favorite nuggets of wisdom to help you create the perfect bars:
- Prep Ahead: If you’re short on time, you can prepare the coconut mixture a day in advance. Just store it in the fridge until you’re ready to shape and dip the bars.
- Experiment with Chocolate: Don’t be afraid to try different types of chocolate! Milk chocolate, dark chocolate, or even white chocolate can give your bars a unique twist.
- Use Quality Tools: A good quality spatula and a sturdy baking dish can make a world of difference. They help ensure that your mixture is evenly spread and your bars hold their shape.
- Chill Between Steps: If you find the chocolate getting too thick while dipping, pop it back in the microwave for a few seconds. Keeping everything at the right temperature is key!
- Have Fun with Toppings: Get creative with toppings! Chopped nuts, sprinkles, or even a drizzle of contrasting chocolate can add a fun flair to your bars.
These tips are like little guiding stars in my kitchen. They help me navigate the sweet adventure of making chocolate-dipped coconut bars. I hope they inspire you to create your own delicious masterpieces!
Breakdown of Time for Chocolate-Dipped Coconut Bars
When it comes to making chocolate-dipped coconut bars, timing is everything! I’ve found that knowing how long each step takes helps me plan my baking sessions better. Here’s a quick breakdown of the time you’ll need:
- Prep Time: 15 minutes – This includes gathering your ingredients, mixing the coconut mixture, and shaping the bars.
- Chill Time: 30 minutes – Allowing the bars to chill is crucial for achieving the perfect texture.
- Cooking Time: 10 minutes – This is the time it takes to melt the chocolate and dip the bars.
- Total Time: 55 minutes – In just under an hour, you’ll have delicious chocolate-dipped coconut bars ready to enjoy!
Knowing this breakdown helps me stay organized and makes the whole process feel less overwhelming. Plus, it’s always exciting to see how quickly these delightful treats come together! So, gather your ingredients and let’s get started on this sweet adventure!
Nutritional Information for Chocolate-Dipped Coconut Bars
As a passionate home cook, I always find it helpful to know the nutritional content of the treats I make. It allows me to enjoy them mindfully while also sharing the information with family and friends. Here’s a general breakdown of the nutritional information for one chocolate-dipped coconut bar, assuming the recipe yields about 12 bars:
- Calories: Approximately 150 calories
- Protein: 2 grams
- Fat: 8 grams
- Carbohydrates: 18 grams
- Fiber: 2 grams
- Sugar: 10 grams
Keep in mind that these values can vary based on the specific ingredients you use, especially the type of chocolate and any optional add-ons. If you’re looking to make these bars a bit healthier, consider using dark chocolate or reducing the amount of sweetened condensed milk. It’s all about finding that perfect balance between indulgence and nutrition!
Enjoying a chocolate-dipped coconut bar can be a delightful treat, and knowing the nutritional information helps me savor each bite even more. So, whether you’re treating yourself or sharing with loved ones, these bars are sure to bring joy to your taste buds!
Frequently Asked Questions about Chocolate-Dipped Coconut Bars
As I’ve shared my love for chocolate-dipped coconut bars, I’ve often received questions from fellow home cooks eager to try their hand at this delightful treat. I love answering these queries because it shows just how much excitement there is around these bars! Here are some of the most frequently asked questions, along with my personal insights:
Can I use sweetened shredded coconut instead of unsweetened?
Absolutely! While I prefer unsweetened shredded coconut for better control over sweetness, using sweetened coconut is perfectly fine. Just keep in mind that it will make your bars a bit sweeter, so you might want to adjust the amount of sweetened condensed milk accordingly.
How do I store leftover chocolate-dipped coconut bars?
To keep your bars fresh, store them in an airtight container in the refrigerator. They can last up to a week. If you want to keep them longer, you can freeze them! Just make sure to separate layers with parchment paper to prevent sticking.
Can I make these bars vegan?
Yes, you can! To make vegan chocolate-dipped coconut bars, simply substitute the sweetened condensed milk with a vegan alternative, like coconut cream or a homemade cashew cream. For the chocolate, look for dairy-free chocolate chips. It’s a delicious way to enjoy these bars without compromising on flavor!
What can I use instead of chocolate chips?
If you don’t have chocolate chips on hand, you can use chopped chocolate bars or even chocolate melts. Just make sure they’re of good quality for the best flavor. You can also experiment with white chocolate or dark chocolate for a different taste!
Can I add more flavors to the coconut mixture?
Definitely! I love adding different flavors to the coconut mixture. You can try almond extract, citrus zest, or even spices like cinnamon or nutmeg. It’s a fun way to customize your bars and make them uniquely yours!
These questions reflect the curiosity and creativity that come with making chocolate-dipped coconut bars. I hope my answers inspire you to dive into this sweet adventure with confidence. Remember, cooking is all about experimenting and having fun, so don’t hesitate to make these bars your own!
Conclusion on Chocolate-Dipped Coconut Bars
In conclusion, chocolate-dipped coconut bars are more than just a sweet treat; they are a delightful experience that brings joy to both the maker and the eater. The combination of chewy coconut and rich chocolate creates a flavor profile that is simply irresistible. I love how versatile this recipe is, allowing for endless variations and personal touches. Whether you’re making them for a special occasion or just to satisfy a sweet craving, these bars are sure to impress.
What truly makes these chocolate-dipped coconut bars special is the love and creativity you pour into them. From selecting high-quality ingredients to experimenting with flavors, each step is an opportunity to express yourself in the kitchen. Plus, they are a fantastic way to bond with family and friends, creating memories that will last a lifetime.
So, roll up your sleeves, gather your ingredients, and embark on this sweet adventure. I promise you’ll find joy in every bite, and who knows? You might just create a new family favorite that will be cherished for years to come!
