
Introduction to Classic New Orleans Beignets Recipe
Ah, beignets! Just the thought of these fluffy, pillowy delights transports me straight to the vibrant streets of New Orleans. I can almost hear the jazz music playing in the background as I savor the sweet, sugary goodness of a freshly made beignet. My love for these treats began during a family trip to the Big Easy, where I first tasted them at a quaint little café. The moment I took a bite, I was hooked! The warm dough, dusted with powdered sugar, melted in my mouth, and I knew I had to recreate that magic in my own kitchen.
Beignets are more than just a dessert; they are a symbol of New Orleans culture and hospitality. Traditionally served with a cup of café au lait, these little squares of joy are perfect for breakfast, brunch, or even a late-night snack. The beauty of making beignets at home is that you can enjoy them fresh out of the fryer, still warm and fluffy, with a generous dusting of powdered sugar that makes them look like they’ve just come from a fairy tale.
In this recipe, I’ll share my tried-and-true method for crafting the perfect classic New Orleans beignets. I’ll guide you through each step, sharing tips and tricks that I’ve learned along the way. Whether you’re a seasoned home cook or just starting your culinary journey, I promise you’ll find joy in making these delightful treats. So, roll up your sleeves, and let’s dive into the world of beignets together!
Ingredients for Classic New Orleans Beignets Recipe
Before we embark on this delicious journey, let’s gather our ingredients. Having everything ready makes the cooking process smoother and more enjoyable. I always find that the quality of ingredients can make a world of difference in the final product. So, let’s make sure we’re using the best!
Main Ingredients
- 2 cups all-purpose flour, plus extra for dusting
- 1/4 cup granulated sugar
- 1 packet (2 1/4 teaspoons) active dry yeast
- 1/2 cup warm milk (about 110°F or 43°C)
- 1 large egg, beaten
- 1/4 cup unsalted butter, melted
- 1/4 teaspoon salt
- Vegetable oil, for frying
- Powdered sugar, for dusting
When I first made beignets, I learned that using fresh yeast is key to achieving that perfect rise. I always check the expiration date on the packet. Also, using whole milk instead of skim adds a lovely richness to the dough. Trust me, it’s worth it!
Optional Add-ons
- 1 teaspoon vanilla extract for a hint of sweetness
- 1/2 teaspoon cinnamon for a warm, spicy flavor
- Chocolate chips or fruit preserves for a fun twist
Sometimes, I like to add a splash of vanilla extract to the dough. It gives the beignets a lovely aroma that fills the kitchen. If you’re feeling adventurous, try adding chocolate chips or a dollop of fruit preserves in the center before frying. It’s like a surprise waiting to be discovered!
Now that we have our ingredients ready, we can move on to the fun part—preparing our beignets! Get ready to roll up your sleeves and create something magical.
How to Prepare Classic New Orleans Beignets Recipe
Now that we have our ingredients all lined up like eager little soldiers, it’s time to dive into the preparation! Making beignets is a delightful process that fills your kitchen with warmth and sweet aromas. I remember the first time I made them; I was a bit nervous, but as I followed each step, my confidence grew. Let me guide you through the process, step by step, so you can create your own batch of these heavenly treats!
Step 1: Mixing the Dough
First things first, let’s mix our dough. In a large mixing bowl, combine the warm milk and active dry yeast. Let it sit for about 5 minutes until it becomes frothy. This is a sign that your yeast is alive and ready to work its magic!
Tips for Mixing the Dough
- Make sure your milk is warm, not hot. Too hot can kill the yeast!
- Use a whisk to combine the ingredients well, ensuring no lumps remain.
Step 2: Letting the Dough Rise
Once your dough is mixed, cover the bowl with a clean kitchen towel and let it rise in a warm place for about 1 to 2 hours. You want it to double in size, which is a beautiful sight to behold!
Tips for Proper Rising
- Find a cozy spot in your kitchen, like near the oven while it’s preheating.
- Don’t rush this step; the longer it rises, the fluffier your beignets will be!
Step 3: Rolling and Cutting the Dough
After the dough has risen, it’s time to roll it out. On a floured surface, roll the dough to about 1/4 inch thick. Then, using a sharp knife or a pizza cutter, cut it into squares or rectangles. The shapes don’t have to be perfect; they’ll puff up beautifully when fried!
Tips for Rolling and Cutting
- Keep your surface well-floured to prevent sticking.
- Use a ruler if you want uniform sizes, but I love the rustic look of uneven shapes!
Step 4: Frying the Beignets
Now comes the exciting part—frying! Heat vegetable oil in a deep pot or fryer to about 350°F (175°C). Carefully drop a few pieces of dough into the hot oil, making sure not to overcrowd the pot. Fry them for about 2-3 minutes on each side until they turn golden brown.
Tips for Frying
- Use a thermometer to keep an eye on the oil temperature.
- Turn them gently with a slotted spoon to ensure even cooking.
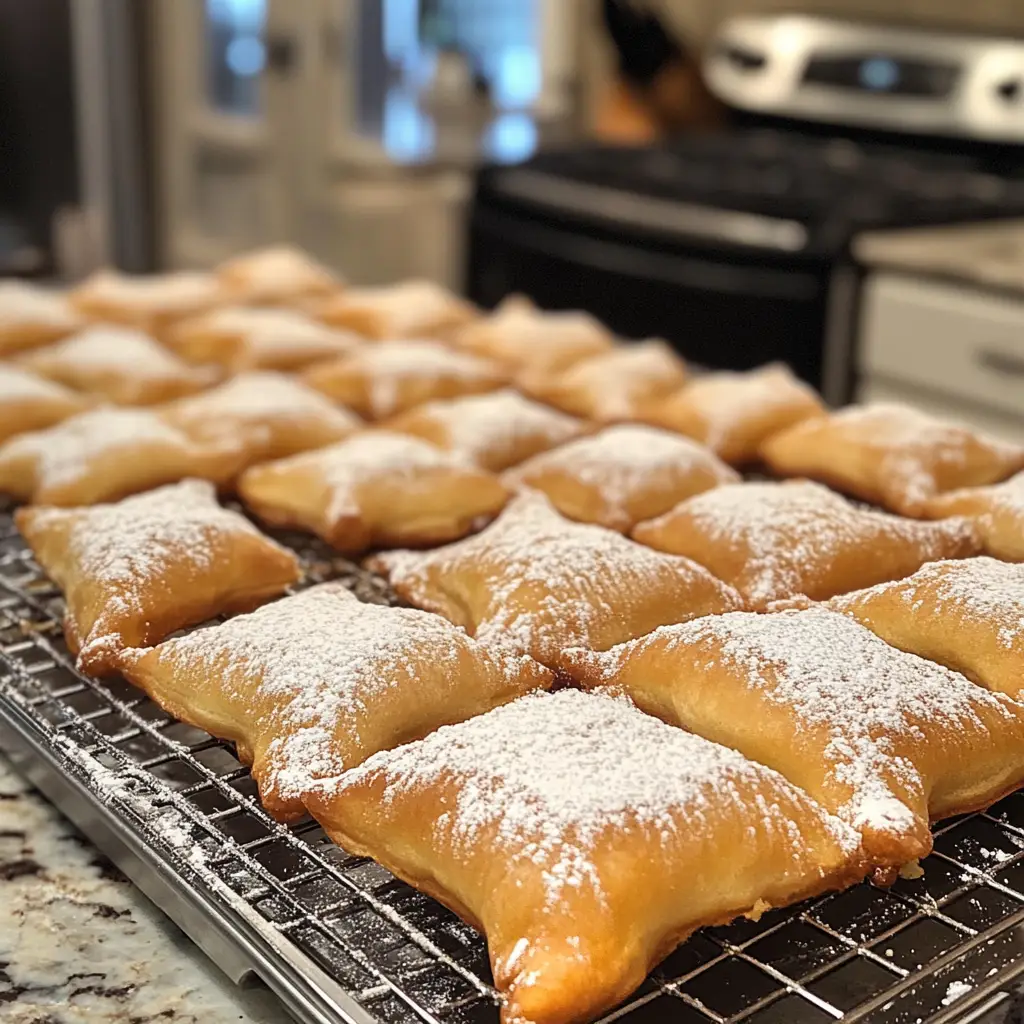
Step 5: Dusting with Powdered Sugar
Once your beignets are golden and crispy, remove them from the oil and place them on a paper towel-lined plate to drain excess oil. While they’re still warm, dust them generously with powdered sugar. The more, the merrier!
Tips for Dusting
- Use a fine mesh sieve for an even dusting.
- Serve immediately for the best experience; they’re best enjoyed fresh!
And there you have it! Your very own batch of classic New Orleans beignets, ready to be devoured. I can’t wait for you to experience the joy of making and sharing these delightful treats with your loved ones!
How to Prepare Classic New Orleans Beignets Recipe
Now that we have our ingredients all lined up like eager little soldiers, it’s time to dive into the preparation! Making beignets is a delightful process that fills your kitchen with warmth and sweet aromas. I remember the first time I made them; I was a bit nervous, but as I followed each step, my confidence grew. Let me guide you through the process, step by step, so you can create your own batch of these heavenly treats!
Step 1: Mixing the Dough
First things first, let’s mix our dough. In a large mixing bowl, combine the warm milk and active dry yeast. Let it sit for about 5 minutes until it becomes frothy. This is a sign that your yeast is alive and ready to work its magic!
Tips for Mixing the Dough
- Make sure your milk is warm, not hot. Too hot can kill the yeast!
- Use a whisk to combine the ingredients well, ensuring no lumps remain.
Step 2: Letting the Dough Rise
Once your dough is mixed, cover the bowl with a clean kitchen towel and let it rise in a warm place for about 1 to 2 hours. You want it to double in size, which is a beautiful sight to behold!
Tips for Proper Rising
- Find a cozy spot in your kitchen, like near the oven while it’s preheating.
- Don’t rush this step; the longer it rises, the fluffier your beignets will be!
Step 3: Rolling and Cutting the Dough
After the dough has risen, it’s time to roll it out. On a floured surface, roll the dough to about 1/4 inch thick. Then, using a sharp knife or a pizza cutter, cut it into squares or rectangles. The shapes don’t have to be perfect; they’ll puff up beautifully when fried!
Tips for Rolling and Cutting
- Keep your surface well-floured to prevent sticking.
- Use a ruler if you want uniform sizes, but I love the rustic look of uneven shapes!
Step 4: Frying the Beignets
Now comes the exciting part—frying! Heat vegetable oil in a deep pot or fryer to about 350°F (175°C). Carefully drop a few pieces of dough into the hot oil, making sure not to overcrowd the pot. Fry them for about 2-3 minutes on each side until they turn golden brown.
Tips for Frying
- Use a thermometer to keep an eye on the oil temperature.
- Turn them gently with a slotted spoon to ensure even cooking.
Step 5: Dusting with Powdered Sugar
Once your beignets are golden and crispy, remove them from the oil and place them on a paper towel-lined plate to drain excess oil. While they’re still warm, dust them generously with powdered sugar. The more, the merrier!
Tips for Dusting
- Use a fine mesh sieve for an even dusting.
- Serve immediately for the best experience; they’re best enjoyed fresh!
And there you have it! Your very own batch of classic New Orleans beignets, ready to be devoured. I can’t wait for you to experience the joy of making and sharing these delightful treats with your loved ones!
Equipment Needed for Classic New Orleans Beignets Recipe
Before we dive into the frying frenzy, let’s make sure we have the right tools at our disposal. Having the right equipment can make the process smoother and more enjoyable. Here’s what you’ll need to whip up those delightful classic New Orleans beignets!
- Mixing Bowl: A large mixing bowl is essential for combining your ingredients. If you don’t have one, any deep bowl will do!
- Whisk: A whisk helps to mix the dough smoothly. If you don’t have a whisk, a fork can work in a pinch.
- Rolling Pin: This is key for rolling out your dough. If you don’t have one, a clean wine bottle can serve as a great alternative!
- Sharp Knife or Pizza Cutter: You’ll need this for cutting the dough into squares. A pizza cutter makes it super easy, but a knife will do just fine.
- Deep Pot or Fryer: A deep pot is necessary for frying the beignets. If you have a deep fryer, that’s even better! Just make sure it’s deep enough to hold the oil safely.
- Slotted Spoon: This handy tool is perfect for turning the beignets and removing them from the oil. If you don’t have one, a regular spoon can work, but be careful!
- Thermometer: A kitchen thermometer is great for checking the oil temperature. If you don’t have one, you can drop a small piece of dough into the oil; if it sizzles and rises, you’re good to go!
- Paper Towels: These are essential for draining excess oil from your beignets after frying.
With these tools in hand, you’re all set to create your own batch of classic New Orleans beignets. I remember the first time I gathered all my equipment; it felt like I was preparing for a culinary adventure! So, let’s get ready to fry up some magic!
Variations of Classic New Orleans Beignets Recipe
While the classic New Orleans beignet is a treasure on its own, there’s always room for a little creativity in the kitchen! I love experimenting with different flavors and fillings to keep things exciting. Here are a few delightful variations that you might want to try:
- Chocolate Beignets: For the chocolate lovers out there, try adding chocolate chips to the dough or filling the beignets with a rich chocolate ganache before frying. It’s like a sweet surprise in every bite!
- Cinnamon Sugar Beignets: Instead of dusting with powdered sugar, toss your warm beignets in a mixture of cinnamon and granulated sugar. The warm spices add a cozy touch that’s perfect for chilly mornings.
- Fruit-Filled Beignets: Get adventurous by filling your beignets with fruit preserves or pie filling. Strawberry, raspberry, or even lemon curd can add a burst of flavor that pairs beautifully with the fluffy dough.
- Savory Beignets: If you’re in the mood for something different, try making savory beignets by adding herbs and cheese to the dough. Think of a cheesy herb blend that can be a delightful appetizer!
These variations not only add a twist to the classic recipe but also allow you to showcase your personality as a home cook. I’ve had so much fun trying out these different flavors, and I encourage you to let your imagination run wild. Who knows? You might just create a new family favorite!
Cooking Notes for Classic New Orleans Beignets Recipe
As I’ve learned through my culinary adventures, a few cooking notes can make all the difference when it comes to perfecting classic New Orleans beignets. Here are some tips that I always keep in mind while whipping up these delightful treats:
- Fresh Ingredients: Always use fresh yeast for the best rise. If your yeast doesn’t foam when mixed with warm milk, it’s time to get a new packet!
- Temperature Matters: Keep an eye on the oil temperature while frying. Too hot, and your beignets will burn; too cool, and they’ll absorb too much oil. A steady 350°F (175°C) is ideal.
- Don’t Rush the Rise: Allowing the dough to rise properly is crucial. Patience is key here; the longer it rises, the fluffier your beignets will be!
- Serving Fresh: Beignets are best enjoyed fresh out of the fryer. If you have leftovers, reheat them in the oven for a few minutes to regain their crispiness.
- Experiment with Flavors: Don’t hesitate to try different flavor combinations or fillings. Each batch can be a new adventure in taste!
These little notes have helped me elevate my beignet game, and I hope they do the same for you. Remember, cooking is all about having fun and enjoying the process. So, let your creativity shine as you make these classic New Orleans beignets!
Serving Suggestions for Classic New Orleans Beignets Recipe
Now that you’ve crafted a batch of classic New Orleans beignets, it’s time to think about how to serve them! The way you present these delightful treats can elevate the experience even further. Here are some of my favorite serving suggestions that will make your beignets shine:
- With Café au Lait: Nothing pairs better with beignets than a steaming cup of café au lait. The rich coffee complements the sweetness of the beignets perfectly, creating a match made in heaven!
- On a Beautiful Platter: Arrange your beignets on a colorful platter, dusted with powdered sugar. Add a few fresh berries or mint leaves for a pop of color and freshness.
- With Dipping Sauces: Serve your beignets with a side of chocolate sauce, caramel, or fruit preserves for dipping. It adds an interactive element that everyone will love!
- As a Dessert Bar: Create a mini dessert bar with various toppings like whipped cream, chocolate drizzle, or even a sprinkle of nuts. Let your guests customize their beignets for a fun twist!
These serving suggestions not only enhance the visual appeal but also create a delightful experience for everyone at the table. I love to gather my family and friends around, sharing stories and laughter over a plate of warm beignets. It’s all about creating memories, one delicious bite at a time!
Tips for Perfecting Classic New Orleans Beignets Recipe
As I’ve spent time perfecting my classic New Orleans beignets, I’ve gathered a treasure trove of tips that can help you achieve that dreamy, fluffy texture and delightful flavor. Here are some of my favorite nuggets of wisdom to ensure your beignets turn out just right:
- Use High-Quality Ingredients: The better the ingredients, the better the beignets! Opt for fresh, high-quality flour and butter for the best flavor.
- Don’t Skip the Yeast Proofing: Always let your yeast sit in warm milk until it’s frothy. This step is crucial for a good rise!
- Keep the Dough Cool: If your kitchen is warm, consider chilling the dough for a bit before rolling it out. This helps maintain the structure and prevents it from becoming too sticky.
- Fry in Batches: Frying too many beignets at once can lower the oil temperature. Fry in small batches to keep that perfect golden color.
- Dust Generously: Don’t be shy with the powdered sugar! A generous dusting not only looks beautiful but also adds that sweet touch that makes beignets irresistible.
With these tips in your back pocket, you’ll be well on your way to creating the most delightful classic New Orleans beignets. I can’t wait for you to experience the joy of sharing these treats with your loved ones!
Breakdown of Time for Classic New Orleans Beignets Recipe
As a passionate home cook, I know that timing can make or break a recipe. When it comes to classic New Orleans beignets, understanding the time commitment is essential for a smooth cooking experience. Here’s a quick breakdown of the time you’ll need to whip up these delightful treats:
- Prep Time: 20 minutes
- Rising Time: 1 to 2 hours (this can vary based on your kitchen temperature)
- Cooking Time: 15 minutes (for frying in batches)
- Total Time: Approximately 1 hour and 35 minutes to 2 hours and 35 minutes (including rising time)
While the rising time may seem lengthy, it’s the secret to achieving those fluffy, airy beignets we all love. I often use this time to clean up my kitchen or prepare a delicious café au lait to enjoy alongside my freshly made beignets. Trust me, the wait is worth it!
Nutritional Information for Classic New Orleans Beignets Recipe
As a home cook, I always find it helpful to know the nutritional information of the dishes I prepare. While classic New Orleans beignets are a delightful treat, they are best enjoyed in moderation. Here’s a general breakdown of the nutritional content for one beignet (based on a standard recipe serving size):
- Calories: Approximately 150-200 calories
- Fat: 8-10 grams
- Carbohydrates: 20-25 grams
- Protein: 2-3 grams
- Sugar: 5-7 grams
- Sodium: 100-150 milligrams
Keep in mind that these values can vary based on the specific ingredients used and the size of your beignets. If you decide to add fillings or toppings, such as chocolate or fruit preserves, the nutritional content will change accordingly. I always remind myself that while beignets are a sweet indulgence, they can be part of a balanced diet when enjoyed occasionally. So, savor each bite and share the joy with friends and family!
Frequently Asked Questions about Classic New Orleans Beignets Recipe
As I’ve shared my love for classic New Orleans beignets, I’ve often encountered a few common questions from fellow home cooks. It’s always exciting to see others eager to dive into this delicious adventure! Here are some frequently asked questions that might help you on your beignet-making journey:
Can I make the dough ahead of time?
Absolutely! You can prepare the dough in advance and let it rise in the refrigerator overnight. Just make sure to bring it back to room temperature before rolling it out. This way, you can enjoy fresh beignets whenever the craving strikes!
What type of oil is best for frying beignets?
I recommend using vegetable oil or canola oil for frying. They have a high smoke point, which is perfect for achieving that golden, crispy exterior. Avoid using olive oil, as it has a lower smoke point and can impart a strong flavor.
How do I store leftover beignets?
If you happen to have any leftovers (which is rare in my house!), store them in an airtight container at room temperature for up to a day. For longer storage, you can freeze them. Just reheat in the oven to restore their crispiness before serving!
Can I bake beignets instead of frying them?
While traditional beignets are deep-fried for that signature texture, you can bake them if you prefer a lighter option. Just shape the dough into squares, place them on a baking sheet, and bake at 375°F (190°C) for about 10-12 minutes. They won’t be quite the same, but they’ll still be delicious!
What can I serve with beignets?
Beignets are delightful on their own, but they pair wonderfully with a cup of café au lait, hot chocolate, or even a fruit compote. You can also serve them with various dipping sauces for a fun twist!
These questions reflect the curiosity and excitement that comes with making classic New Orleans beignets. I hope my answers help you feel more confident as you embark on this sweet culinary adventure. Remember, cooking is all about experimenting and having fun, so don’t hesitate to make the recipe your own!
Conclusion on Classic New Orleans Beignets Recipe
As I wrap up this delightful journey into the world of classic New Orleans beignets, I can’t help but feel a sense of joy and nostalgia. These fluffy, sweet treats are not just a recipe; they are a celebration of culture, family, and the simple pleasures of life. The process of making beignets is filled with love, laughter, and a sprinkle of magic that transforms basic ingredients into something truly special.
Whether you’re enjoying them with a steaming cup of café au lait or sharing them with friends and family, beignets have a way of bringing people together. They are perfect for any occasion, from cozy breakfasts to festive gatherings. Plus, the variations you can create allow for endless creativity in the kitchen!
So, I encourage you to roll up your sleeves, gather your loved ones, and embark on this culinary adventure. With each bite of your homemade beignets, you’ll not only savor the deliciousness but also create cherished memories that will last a lifetime. Happy cooking, and may your beignets always be fluffy and sweet!
