
Sensory-Rich Introduction with Immediate Craving
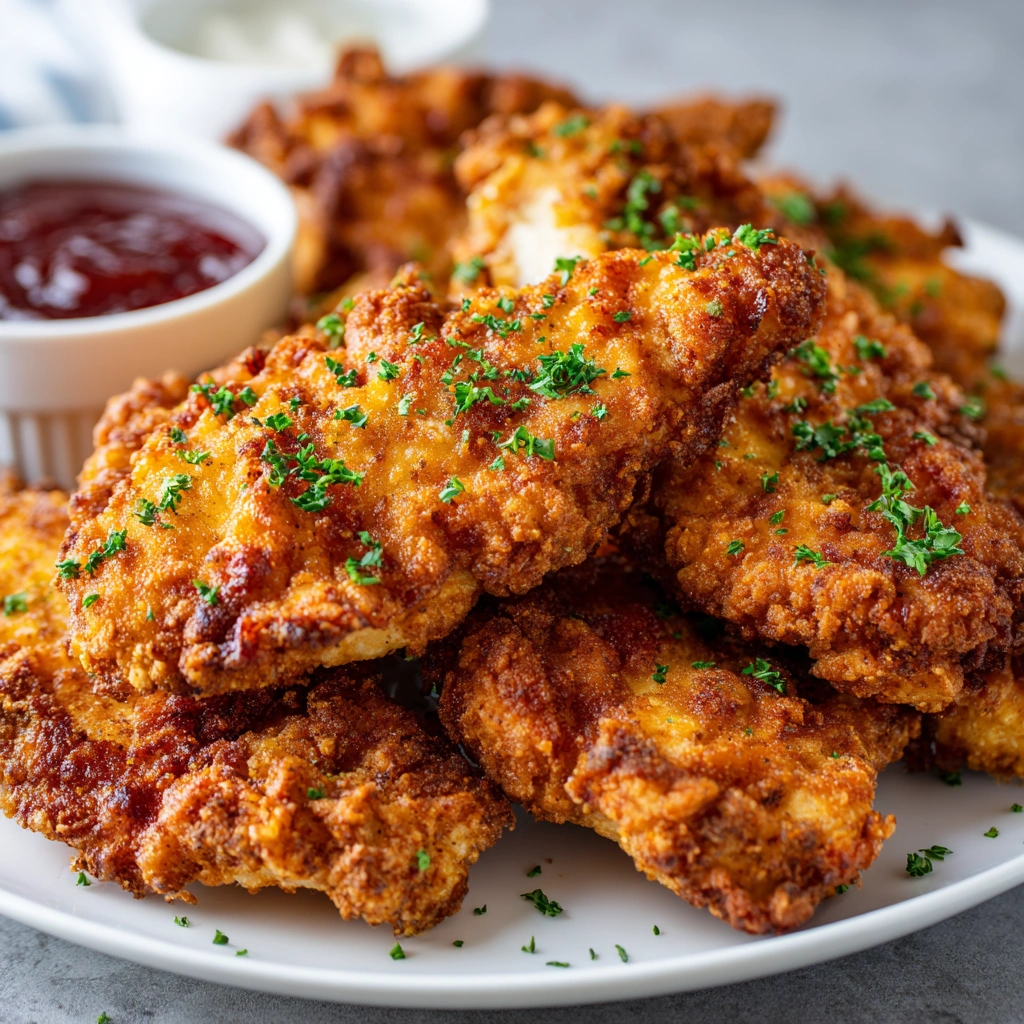
Imagine this: a plate of fried chicken, its golden-brown crust glistening under the kitchen light, beckoning you closer. As you take a bite, the crispy exterior shatters delightfully, revealing a juicy, tender interior that practically melts in your mouth. The aroma wafts through the air, a tantalizing blend of spices and savory goodness that instantly makes your stomach rumble with anticipation.
This Fried Chicken Breast Recipe is not just a meal; it’s a cherished memory from my childhood. I remember standing beside my grandmother in her cozy kitchen, the air thick with the scent of frying chicken and the sound of laughter. She would always say, “A good fried chicken brings everyone together.” And she was right! Whether it was a Sunday family dinner or a summer picnic, her fried chicken was the star of the show, bringing smiles and satisfied bellies to all who gathered around the table.
Fried chicken holds a special place in my heart, evoking feelings of warmth and nostalgia. It’s the kind of dish that wraps you in a comforting embrace, reminding you of home and the love that goes into cooking. Perfect for family gatherings, game days, or cozy dinners, this recipe is sure to create lasting memories just like it did for me. So, roll up your sleeves and let’s dive into this delicious journey together!
Why You’ll Love This Fried Chicken Breast Recipe
Let me tell you, this Fried Chicken Breast Recipe is a true crowd-pleaser, and here’s why you’ll fall head over heels for it!
- Texture Contrast: Picture this: you take a bite, and the satisfying crunch of the golden-brown breading gives way to the tender, juicy chicken inside. It’s a delightful dance of textures that keeps you coming back for more!
- Flavor Balance: The savory spices in the breading are like a warm hug for your taste buds, perfectly complementing the rich, juicy chicken. Each bite is a harmonious blend of flavors that makes your mouth water.
- Versatility: This recipe is a culinary chameleon! Whether you want to serve it as a classic main dish, pile it high on a sandwich, or toss it into a salad, the possibilities are endless. It adapts to any occasion, making it a staple in my kitchen.
- Ease: With simple ingredients and straightforward steps, this recipe is accessible for cooks of all skill levels. Even if you’re short on time or experience, you can whip up this delicious dish without breaking a sweat!
- Universal Appeal: Let’s be honest—who doesn’t love fried chicken? It’s a dish that transcends generations, loved by both kids and adults alike. It’s the kind of comfort food that brings everyone together, making it a go-to for family dinners and gatherings.
So, whether you’re cooking for a special occasion or just craving something delicious, this fried chicken breast recipe is sure to impress. Trust me, once you try it, you’ll understand why it’s a beloved classic!
Essential Tools & Preparation Strategy
Before diving into the delicious world of fried chicken, let’s gather our tools and set the stage for success. Having the right equipment not only makes the process smoother but also enhances the final result. Trust me, a well-prepared kitchen is half the battle won!
- Meat Mallet: This handy tool is essential for pounding chicken breasts to an even thickness. It ensures uniform cooking, so you won’t end up with dry edges and a raw center.
- Mixing Bowls: You’ll need a couple of these for marinating the chicken and mixing the breading ingredients. I recommend using glass or stainless steel for easy cleanup.
- Deep Skillet or Dutch Oven: A heavy-bottomed skillet or Dutch oven is crucial for frying. It allows for even heat distribution, which is key to achieving that perfect golden-brown crust.
- Thermometer: A meat thermometer is your best friend in the kitchen. It ensures your chicken reaches a safe internal temperature of 165°F (74°C), so you can enjoy your meal without worry.
- Wire Rack: After frying, transferring the chicken to a wire rack over a baking sheet allows excess oil to drain off, keeping your chicken crispy and not soggy.
- Slotted Spoon: This tool is perfect for safely removing the chicken from hot oil without losing that beautiful breading.
- Tongs: Use these for flipping and handling the chicken during frying. They give you a good grip and keep your hands safe from splattering oil.
- Paper Towels: Keep these handy for blotting excess oil after frying. A little extra care here goes a long way in keeping your chicken crispy!
With these tools at your disposal, you’re well on your way to frying up some mouthwatering chicken. Remember, preparation is key! Take a moment to gather everything before you start, and you’ll find the cooking process much more enjoyable.
Ingredients & Their Roles in This Fried Chicken Breast Recipe
Every great dish starts with quality ingredients, and this Fried Chicken Breast Recipe is no exception. Each component plays a vital role in creating that crispy, juicy perfection we all crave. Let’s break down the ingredients and their contributions to this mouthwatering meal!
- Chicken: We’re using 4 boneless, skinless chicken breasts, which provide a lean and juicy protein source. Pounding them to an even thickness ensures they cook uniformly, resulting in tender bites every time.
- Marinade: The magic begins with a marinade of buttermilk, hot sauce, garlic powder, onion powder, and salt. The buttermilk not only tenderizes the chicken but also infuses it with flavor. The hot sauce adds a subtle kick, while the garlic and onion powders enhance the savory profile.
- Breading: Our breading consists of all-purpose flour, paprika, black pepper, cayenne pepper, and baking powder. The flour serves as the base, while paprika gives that beautiful color and a hint of sweetness. Black pepper adds depth, cayenne brings the heat, and baking powder ensures a light, crispy texture.
- Frying Oil: We’ll use vegetable oil for frying, which has a neutral flavor and a high smoke point, making it perfect for achieving that golden-brown crust without burning.
- Substitutions: If you’re looking for a gluten-free option, simply swap the all-purpose flour with a gluten-free flour blend. Additionally, feel free to experiment with different marinades—think yogurt, pickle juice, or even a spicy Asian-inspired blend for a unique twist!
With these ingredients in hand, you’re well on your way to creating a fried chicken masterpiece that will have everyone asking for seconds. Let’s get cooking!
Step-by-Step Guide to Perfect Fried Chicken Breast
Now that we have our ingredients and tools ready, it’s time to dive into the heart of the process! Follow these steps closely, and you’ll be rewarded with fried chicken that’s crispy on the outside and juicy on the inside. Let’s get started!
- Marinate the Chicken: In a large bowl, combine 1 cup of buttermilk, 1 teaspoon of hot sauce, 1 teaspoon of garlic powder, 1 teaspoon of onion powder, and 1 teaspoon of salt. Whisk until well blended. Submerge the 4 boneless, skinless chicken breasts in the marinade, ensuring they are fully coated. Cover the bowl and refrigerate for at least 2 hours, or for the best flavor, overnight. This step is crucial as it tenderizes the chicken and infuses it with flavor.
- Prepare the Breading: In a separate bowl, mix together 1 cup of all-purpose flour, 1 teaspoon of paprika, 1 teaspoon of black pepper, 1 teaspoon of cayenne pepper, and 1 teaspoon of baking powder. This blend will create a flavorful and crispy coating that’s simply irresistible!
- Heat the Oil: In a deep skillet or Dutch oven, pour enough vegetable oil to fill it about 2 inches deep. Heat the oil over medium-high heat until it reaches 350°F (175°C). To test if the oil is ready, drop a small amount of the flour mixture into the oil; it should sizzle immediately. If it doesn’t, give it a few more minutes to heat up.
- Dredge the Chicken: Remove the chicken from the marinade, allowing any excess to drip off. Take each piece and dredge it in the flour mixture, pressing lightly to ensure the coating adheres well. This step is key to achieving that crunchy crust we all love!
- Fry the Chicken: Carefully place the breaded chicken breasts into the hot oil, making sure not to overcrowd the pan. Fry in batches if necessary. Cook for 6-8 minutes on each side, or until the chicken is golden brown and the internal temperature reaches 165°F (74°C). Use a meat thermometer to check for doneness—this is the best way to ensure perfectly cooked chicken!
- Drain and Rest: Once cooked, transfer the chicken to a wire rack set over a baking sheet to drain excess oil. This helps keep the chicken crispy. Let it rest for at least 5 minutes before serving. This resting period allows the juices to redistribute, ensuring each bite is juicy and flavorful.
And there you have it! Follow these steps, and you’ll be well on your way to serving up a plate of fried chicken that will have everyone asking for your secret recipe. Trust me, the satisfaction of biting into that crispy, juicy chicken is worth every moment spent in the kitchen!
Chef’s Notes & Pro Tips for Flawless Results
As someone who has spent countless hours perfecting the art of fried chicken, I’m excited to share some of my best tips to ensure your chicken turns out absolutely flawless every time. These little nuggets of wisdom can make a world of difference in your cooking journey!
- Make-Ahead Instructions: If you want to take your fried chicken to the next level, consider marinating the chicken overnight. This not only deepens the flavor but also ensures that the chicken remains incredibly tender and juicy. Trust me, the extra time is worth it!
- Storage: If you happen to have leftovers (which is rare in my house!), store them in an airtight container in the fridge for up to 3 days. To reheat, pop them in the oven at 350°F (175°C) for about 10-15 minutes to restore that crispy texture.
- Equipment Recommendations: For the best frying experience, I highly recommend using a cast-iron skillet. It retains heat beautifully, ensuring even cooking and that perfect golden crust. Plus, it adds a bit of rustic charm to your kitchen!
- Customization Options: Don’t be afraid to get creative! Experiment with different spices in the breading or try out various marinades. A touch of smoked paprika, some dried herbs, or even a splash of lemon juice can elevate your fried chicken to new heights. The kitchen is your playground—have fun with it!
With these pro tips in your back pocket, you’re well-equipped to tackle any fried chicken challenge that comes your way. Remember, cooking is all about enjoying the process and learning along the way. Happy frying!
Avoid These Common Cooking Mistakes
Even the most seasoned cooks can run into a few hiccups when making fried chicken. But don’t worry! I’ve been there, and I’m here to help you avoid these common pitfalls. Let’s dive into the mistakes to watch out for and how to sidestep them for perfectly crispy, juicy fried chicken every time!
- Not Marinating Long Enough: One of the biggest mistakes is not allowing the chicken to marinate long enough. This can result in bland chicken that lacks flavor. To avoid this, make sure to marinate for at least 2 hours, but if you can, let it sit overnight for the best results. Trust me, your taste buds will thank you!
- Overcrowding the Pan: It’s tempting to fry all the chicken at once, but overcrowding the pan leads to uneven cooking and soggy chicken. Fry in batches to maintain the oil temperature and ensure each piece gets that beautiful golden crust.
- Not Using a Thermometer: Cooking chicken without checking the internal temperature is a risky game. You run the risk of undercooked chicken, which can be unsafe. Always use a meat thermometer to ensure your chicken reaches an internal temperature of 165°F (74°C) for safe and delicious results.
- Skipping the Resting Period: After frying, it’s crucial to let the chicken rest for at least 5 minutes. Skipping this step can cause moisture loss, leaving you with dry chicken. This resting period allows the juices to redistribute, ensuring each bite is juicy and flavorful.
- Using Cold Oil: If you start frying in cold oil, you’ll end up with greasy chicken that’s not crispy. Always ensure your oil is preheated to 350°F (175°C) before adding the chicken. A quick test is to drop a small amount of the flour mixture into the oil; it should sizzle immediately!
- Inadequate Breading: A common mistake is not applying enough breading, which can lead to a soggy crust. Make sure to press the flour mixture firmly onto the chicken to create a thick, crispy coating that holds up during frying.
- Not Draining Excess Oil: After frying, if you don’t drain the excess oil, you’ll end up with greasy chicken. Always transfer your fried chicken to a wire rack set over a baking sheet to allow the oil to drain off. This keeps your chicken crispy and delicious!
By keeping these common mistakes in mind, you’ll be well on your way to mastering the art of fried chicken. Remember, every cooking experience is a chance to learn and improve, so don’t be discouraged if things don’t go perfectly the first time. Happy frying!
Creative Variations & Customizations
One of the best things about this Fried Chicken Breast Recipe is its versatility! Once you master the basics, feel free to get creative and put your own spin on this classic dish. Here are some delicious variations and customizations that will keep your fried chicken exciting and fresh!
- Spicy Fried Chicken: If you love a kick of heat, consider adding more cayenne pepper to the breading or using a spicy marinade. You can even experiment with different hot sauces to find your perfect level of spice. Trust me, your taste buds will thank you!
- Herb-Infused Chicken: For a fragrant twist, incorporate fresh herbs like thyme, rosemary, or even dill into the marinade. These herbs will infuse the chicken with a delightful aroma and flavor that elevates the dish to a whole new level.
- Asian-Inspired Fried Chicken: Take a trip to the East by using soy sauce and ginger in your marinade. For an extra crunch, sprinkle sesame seeds into the breading mixture. This fusion will give your fried chicken a unique flavor profile that’s sure to impress!
- Crispy Baked Chicken: If you’re looking for a healthier option, try baking instead of frying. Use the same breading technique, but place the chicken on a baking sheet lined with parchment paper. Bake at 425°F (220°C) for about 25-30 minutes, or until golden brown and cooked through. You’ll still get that crispy texture without the extra oil!
- Seasonal Flavors: Embrace the seasons by adding seasonal spices to your chicken. For a fall twist, mix in some pumpkin spice to the breading. In the summer, a touch of lemon zest can brighten up the flavor and give your chicken a refreshing taste.
These creative variations not only keep things interesting but also allow you to tailor the dish to your personal preferences and the ingredients you have on hand. So, don’t hesitate to experiment and make this fried chicken your own!
Perfect Pairings: What to Serve With Fried Chicken Breast
Now that you’ve mastered the art of frying chicken, let’s talk about the perfect accompaniments to elevate your meal. Fried chicken is a versatile dish that pairs beautifully with a variety of sides, each adding its own unique flavor and texture. Here are my top recommendations for what to serve alongside your crispy, juicy fried chicken!
- Creamy Coleslaw: This refreshing crunch is the perfect counterbalance to the richness of the chicken. The cool, tangy flavors of coleslaw provide a delightful contrast that brightens up each bite.
- Mashed Potatoes and Gravy: You can’t go wrong with this classic comfort food combination. The creamy potatoes and savory gravy complement the crispy chicken beautifully, creating a hearty and satisfying meal.
- Cornbread: A slice of warm cornbread is perfect for soaking up all those delicious flavors. Its slight sweetness pairs wonderfully with the savory notes of the fried chicken.
- Tangy Pickles: Adding a few tangy pickles on the side cuts through the richness of the chicken and adds a zesty contrast that brightens the palate.
- Light Salad: A simple salad dressed in vinaigrette offers a refreshing balance to the meal. The crisp greens and light dressing provide a nice contrast to the fried chicken’s heaviness.
- Sweet Potato Fries: These delicious fries add a sweet and savory contrast in flavors and textures. Their natural sweetness complements the savory chicken perfectly.
- Mac and Cheese: For those indulgent days, a side of creamy mac and cheese is a hearty addition that pairs beautifully with fried chicken, making for a truly comforting meal.
- Fried Chicken Sandwich: If you’re feeling adventurous, serve your fried chicken on a bun with fresh lettuce and tomato for a satisfying sandwich that’s perfect for lunch or dinner.
- Refreshing Lemonade: A glass of refreshing lemonade balances the savory flavors of the chicken with its sweet and tart notes, making it a perfect drink choice.
- Dipping Sauces: Don’t forget to offer a selection of dipping sauces like honey mustard or ranch. These add an extra layer of flavor and allow everyone to customize their meal to their liking!
With these perfect pairings, your fried chicken dinner will be a hit at any gathering. Each side brings something special to the table, ensuring a well-rounded and satisfying meal that everyone will love. So, gather your loved ones, serve up that fried chicken, and enjoy the deliciousness together!
Storage & Meal Prep Instructions
Now that you’ve created a delicious batch of fried chicken, it’s important to know how to store and reheat it properly to maintain that crispy, juicy perfection. Whether you have leftovers or want to meal prep for the week, these tips will help you enjoy your fried chicken at its best!
- Fridge Storage: If you find yourself with leftover fried chicken (which is rare in my house!), store it in an airtight container. This will keep it fresh for up to 3 days. Just make sure to let the chicken cool completely before sealing it up to prevent moisture buildup, which can lead to sogginess.
- Freezer Storage: For longer storage, you can freeze your cooked chicken. Place the fried chicken in a single layer on a baking sheet and freeze until solid. Once frozen, transfer the chicken to a freezer bag, removing as much air as possible. This method will keep your chicken good for up to 3 months. Just remember to label the bag with the date so you can keep track!
- Reheating Methods: When it’s time to enjoy your leftovers, the best way to reheat fried chicken is in the oven. Preheat your oven to 350°F (175°C) and place the chicken on a wire rack set over a baking sheet. This allows the hot air to circulate around the chicken, keeping it crispy. Heat for about 10-15 minutes, or until warmed through. Avoid the microwave if you can; it tends to make the chicken soggy instead of crispy!
With these storage and reheating tips, you can savor your fried chicken long after it’s been cooked. Whether you’re enjoying it fresh or reheated, you’ll be reminded of that delightful crunch and juicy flavor with every bite!
Nutrition Facts & Health Insights
Understanding the nutritional value of your food is essential, especially when it comes to enjoying a delicious dish like fried chicken. This Fried Chicken Breast Recipe not only satisfies your cravings but also provides some health benefits worth noting. Let’s break down the nutrition facts and explore the health insights associated with this beloved comfort food!
| Nutrient | Per Serving (1 fried chicken breast, about 6 ounces) |
|---|---|
| Calories | 400 |
| Fat | 22 grams |
| Saturated Fat | 5 grams |
| Unsaturated Fat | 15 grams |
| Trans Fat | 0 grams |
| Cholesterol | 100 milligrams |
| Sodium | 800 milligrams |
| Carbohydrates | 30 grams |
| Fiber | 1 gram |
| Sugar | 1 gram |
| Protein | 30 grams |
Now, let’s talk about some of the health benefits associated with this fried chicken recipe:
- High Protein Content: Chicken breast is an excellent source of lean protein, which is essential for muscle growth, repair, and overall health. Each serving provides about 30 grams of protein, making it a satisfying option for those looking to maintain or build muscle.
- Benefits of Buttermilk: The buttermilk marinade not only tenderizes the chicken but also offers digestive benefits. It contains probiotics that can aid in gut health, making your fried chicken not just delicious but also a bit healthier!
- Spices for Metabolism: The spices used in the breading, such as paprika and cayenne pepper, can boost metabolism and add flavor without extra calories. Spices are known for their antioxidant properties, which can contribute to overall health.
While this Fried Chicken Breast Recipe is undeniably indulgent, it also offers nutritional benefits that can be enjoyed as part of a balanced diet. So, go ahead and savor every crispy, juicy bite, knowing that you’re treating yourself to something both delicious and nourishing!
Frequently Asked Questions
As you embark on your fried chicken journey, you might have a few questions along the way. Don’t worry; I’ve got you covered! Here are some of the most common queries I’ve encountered, along with my expert answers to help you achieve fried chicken perfection.
- Can I use chicken thighs instead of breasts?
Absolutely! Chicken thighs are a fantastic alternative. They tend to be juicier and more flavorful than breasts, making them a great choice for frying. Just keep in mind that cooking times may vary slightly, so be sure to check the internal temperature to ensure they reach 165°F (74°C). - What can I substitute for buttermilk?
If you don’t have buttermilk on hand, no worries! You can easily make a substitute by mixing 1 cup of milk with 1 tablespoon of vinegar or lemon juice. Let it sit for about 5-10 minutes until it thickens slightly. This will mimic the acidity of buttermilk and work perfectly in the marinade. - How do I know when the chicken is done?
The best way to ensure your chicken is cooked through is to use a meat thermometer. Insert it into the thickest part of the chicken; it should read 165°F (74°C) for safe consumption. If you don’t have a thermometer, you can also cut into the chicken to check that the juices run clear and there’s no pink meat. - Can I bake this recipe instead of frying?
Yes, you can! For a healthier option, you can bake the chicken instead of frying. Preheat your oven to 425°F (220°C) and place the breaded chicken on a wire rack set over a baking sheet. Bake for about 25-30 minutes, or until golden brown and cooked through. This method will still give you a crispy texture without the extra oil. - What is the best oil for frying?
I recommend using vegetable oil, canola oil, or peanut oil for frying. These oils have high smoke points, which means they can withstand the heat needed for frying without burning. They also have a neutral flavor that won’t overpower the chicken. - How can I make this recipe gluten-free?
To make this fried chicken gluten-free, simply substitute the all-purpose flour with a gluten-free flour blend. There are many great options available that will still give you that crispy coating. Just be sure to check the labels to ensure they are certified gluten-free! - Can I use frozen chicken?
While it’s best to use fresh chicken for optimal flavor and texture, you can use frozen chicken if needed. Just make sure to thaw it completely in the refrigerator before marinating and frying. Cooking from frozen can lead to uneven cooking and a soggy crust. - What are some good dipping sauces?
The possibilities are endless! Some popular dipping sauces to serve with fried chicken include honey mustard, ranch dressing, barbecue sauce, and hot sauce. You can also get creative and whip up a spicy aioli or a tangy garlic sauce for a unique twist! - How do I store leftovers?
To store leftover fried chicken, place it in an airtight container and refrigerate for up to 3 days. Make sure to let it cool completely before sealing to prevent moisture buildup. For longer storage, you can freeze the chicken in a single layer, then transfer it to a freezer bag for up to 3 months. - Can I marinate the chicken for longer than overnight?
While marinating overnight is ideal, you can marinate the chicken for up to 24 hours. Just be cautious not to exceed this time, as the acidity in the buttermilk can start to break down the chicken too much, resulting in a mushy texture.
With these FAQs answered, you’re now equipped with the knowledge to tackle any fried chicken challenge that comes your way. Happy cooking!
Final Inspiration & Kitchen Confidence
As we wrap up this delicious journey into the world of fried chicken, I want to take a moment to celebrate the joy of cooking. There’s something truly magical about creating a beloved dish that not only fills the belly but also warms the heart. Each time you step into the kitchen, you’re not just preparing a meal; you’re crafting memories, sharing love, and embracing the art of culinary expression.
Mastering this Fried Chicken Breast Recipe is no small feat! You’ve learned the techniques, gathered the tools, and navigated the steps to achieve that perfect crispy, juicy chicken. Take a moment to acknowledge your achievement—this is a skill that will serve you well for years to come. Whether you’re cooking for family, friends, or just treating yourself, you can now confidently whip up a dish that’s sure to impress.
So, I encourage you to dive into this recipe with enthusiasm! Try it out, share your results with loved ones, and don’t hesitate to put your own spin on it. Cooking is a journey, and every dish is an opportunity to learn and grow. Remember, the kitchen is a place of creativity and joy, so enjoy the process and savor every bite of your delicious creation. Happy frying!
Print
Fried Chicken Breast Recipe: Crispy, Juicy Perfection!
- Total Time: 135 minutes
- Yield: 4 servings
- Diet: Gluten-Free (with substitutions)
Description
This Fried Chicken Breast Recipe delivers a delightful crunch with every bite, enveloping juicy, tender chicken that bursts with flavor. The golden-brown crust is seasoned to perfection, providing a satisfying contrast to the moist interior, making it an irresistible dish for any occasion.
Ingredients
- Chicken: 4 boneless, skinless chicken breasts (about 1.5 pounds), pounded to an even thickness
- Marinade: 1 cup buttermilk, 1 teaspoon hot sauce, 1 teaspoon garlic powder, 1 teaspoon onion powder, 1 teaspoon salt
- Breading: 1 cup all-purpose flour, 1 teaspoon paprika, 1 teaspoon black pepper, 1 teaspoon cayenne pepper, 1 teaspoon baking powder
- Frying: Vegetable oil for frying (enough to fill a deep skillet about 2 inches deep)
Instructions
- In a large bowl, combine buttermilk, hot sauce, garlic powder, onion powder, and salt. Add the chicken breasts, ensuring they are fully submerged. Cover and refrigerate for at least 2 hours or overnight for best results.
- In a separate bowl, mix together flour, paprika, black pepper, cayenne pepper, and baking powder.
- Heat vegetable oil in a deep skillet over medium-high heat until it reaches 350°F (175°C). You can test the oil by dropping a small amount of batter into it; it should sizzle immediately.
- Remove chicken from the marinade, allowing excess to drip off, then dredge each piece in the flour mixture, pressing lightly to adhere.
- Carefully place the breaded chicken breasts in the hot oil, cooking in batches if necessary to avoid overcrowding. Fry for 6-8 minutes on each side or until golden brown and the internal temperature reaches 165°F (74°C).
- Once cooked, transfer the chicken to a wire rack set over a baking sheet to drain excess oil. Let rest for 5 minutes before serving.
Notes
- This recipe can be made ahead by marinating the chicken overnight for enhanced flavor.
- Store leftover fried chicken in an airtight container in the refrigerator for up to 3 days.
- For a gluten-free option, substitute all-purpose flour with a gluten-free flour blend.
- Prep Time: 120 minutes
- Cook Time: 15 minutes
- Category: Main Dishes
- Method: Frying
- Cuisine: American
Nutrition
- Serving Size: 1 fried chicken breast (about 6 ounces)
- Calories: 400
- Sugar: 1 gram
- Sodium: 800 milligrams
- Fat: 22 grams
- Saturated Fat: 5 grams
- Unsaturated Fat: 15 grams
- Trans Fat: 0 grams
- Carbohydrates: 30 grams
- Fiber: 1 gram
- Protein: 30 grams
- Cholesterol: 100 milligrams
Keywords: Fried Chicken Breast Recipe, Crispy Fried Chicken, Southern Fried Chicken, Buttermilk Chicken, Easy Fried Chicken, Chicken Dinner, Comfort Food, Homemade Fried Chicken, Chicken Breast Recipe, Fried Chicken Marinade, Classic Fried Chicken, Juicy Fried Chicken, Fried Chicken Coating, Best Fried Chicken, Chicken Recipe
