
Introduction to Fruit-Topped Brownie Squares
As a passionate home cook, I find joy in creating desserts that not only taste amazing but also look beautiful. One of my all-time favorites is the Fruit-Topped Brownie Squares. These delightful treats are a perfect blend of rich, fudgy brownies and vibrant, fresh fruit. Every time I make them, I’m reminded of sunny afternoons spent in my grandmother’s kitchen, where the aroma of baked goods mingled with laughter and love.
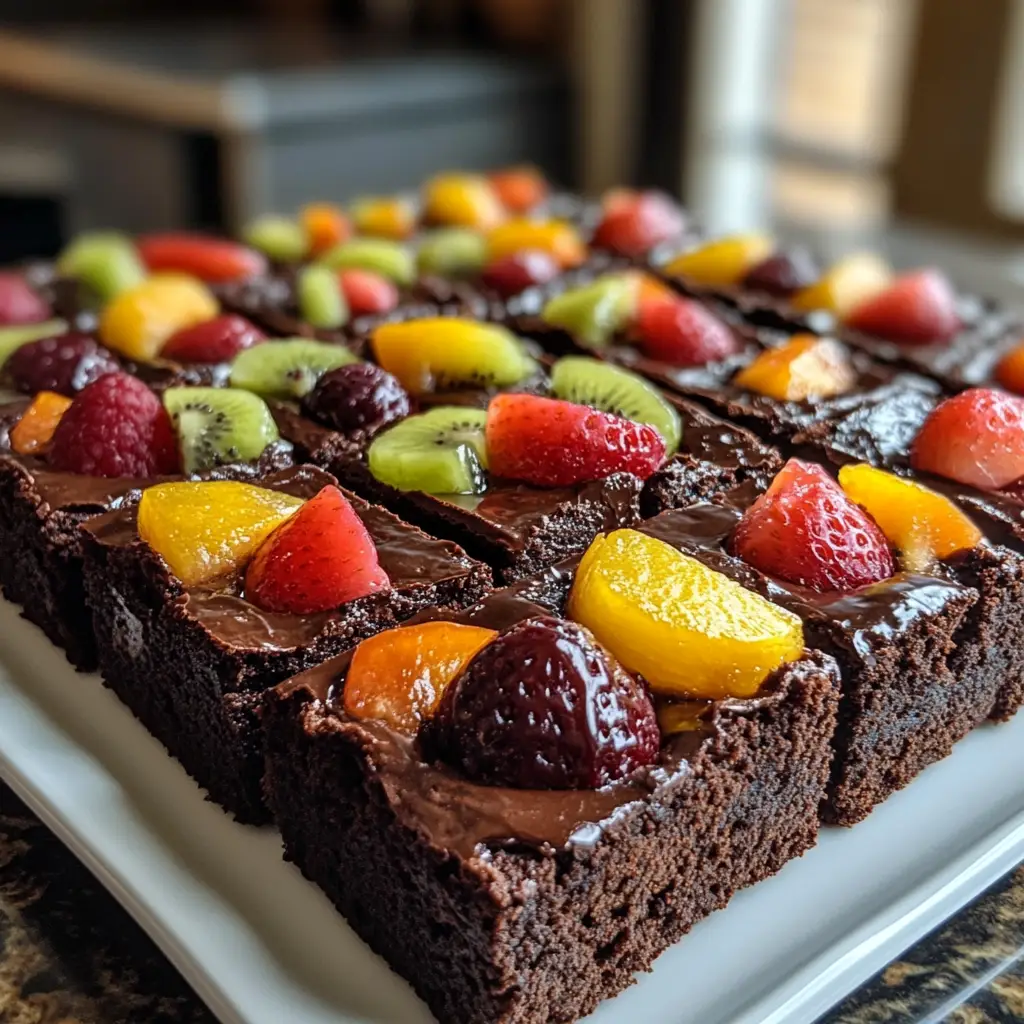
What I adore about these brownie squares is their versatility. You can use any fruit you have on hand, whether it’s juicy strawberries, tangy kiwis, or sweet blueberries. Each bite is a burst of flavor, and the colorful topping makes them a feast for the eyes. I often whip these up for family gatherings or casual get-togethers with friends. They never fail to impress!
Not only are these brownies a treat for the taste buds, but they also offer a fun way to incorporate fruit into dessert. It’s like a little celebration of nature’s candy on top of a chocolatey base. Plus, they’re easy to make, which means I can spend less time in the kitchen and more time enjoying the company of my loved ones.
So, if you’re ready to embark on a delicious adventure, grab your apron, and let’s dive into the world of Fruit-Topped Brownie Squares. I promise you, these will become a staple in your dessert repertoire!
Error: Request failed for https://api.openai.com returned code 502. Truncated server response:
502 Bad Gateway
<… (use muteHttpExceptions option to examine full response)
How to Prepare Fruit-Topped Brownie Squares
Now that we’ve set the stage, it’s time to roll up our sleeves and get cooking! Making Fruit-Topped Brownie Squares is a delightful journey that I can’t wait to share with you. Follow these simple steps, and you’ll be on your way to creating a dessert that will have everyone asking for seconds!
Step 1: Preheat the Oven and Prepare the Baking Dish
First things first, let’s get that oven preheating to 350°F (175°C). This is crucial because a hot oven ensures that our brownies bake evenly and come out perfectly fudgy. While the oven warms up, grab an 8×8-inch baking dish and grease it with butter or line it with parchment paper. This will make it super easy to lift the brownies out later.
Tips for Step 1
- For an extra touch, dust the greased dish with a little cocoa powder. It adds flavor and helps prevent sticking!
- Make sure your oven is fully preheated before putting the brownies in. A cold oven can lead to uneven baking.
Step 2: Mix the Brownie Batter
Next, let’s whip up that rich brownie batter! In a large mixing bowl, combine melted butter, sugar, and eggs. I love using a whisk for this part; it really gets everything nice and fluffy. Then, gently fold in the flour, cocoa powder, and a pinch of salt. The batter should be thick and glossy, like a chocolatey dream!
Tips for Step 2
- Don’t overmix the batter! Just stir until the ingredients are combined. Overmixing can lead to tough brownies.
- If you want to add a little extra flavor, consider mixing in a teaspoon of vanilla extract or a splash of coffee. It enhances the chocolate taste beautifully!
Step 3: Bake the Brownies
Now it’s time to bake! Pour the brownie batter into your prepared baking dish and spread it evenly. Pop it into the preheated oven and let it bake for about 20-25 minutes. The edges should look set, but the center might still be a bit soft. That’s perfect!
Tips for Step 3
- To check for doneness, insert a toothpick into the center. If it comes out with a few moist crumbs, they’re ready!
- Don’t be tempted to overbake. Brownies continue to cook a bit after you take them out of the oven.
Step 4: Prepare the Fruit Topping
While the brownies are baking, let’s prepare the fruit topping! Wash and slice your favorite fruits. I often use strawberries, blueberries, and kiwi for a colorful mix. The freshness of the fruit adds a lovely contrast to the rich brownies.
Tips for Step 4
- Choose fruits that are in season for the best flavor. Fresh, ripe fruit makes all the difference!
- If you want to add a little sweetness, toss the fruit with a sprinkle of sugar and let it sit for a few minutes. This creates a delicious syrup!
Step 5: Assemble the Fruit-Topped Brownie Squares
Once the brownies have cooled completely, it’s time to assemble! Cut them into squares and arrange the fruit on top. You can get creative here—layer the fruit in patterns or just pile it on for a more rustic look. Drizzle with a bit of chocolate sauce or a dusting of powdered sugar for that extra wow factor!
Tips for Step 5
- For a fun twist, consider adding a dollop of whipped cream or a scoop of ice cream on the side!
- Serve them immediately for the best texture, but they can be stored in the fridge for a couple of days.
Equipment Needed for Fruit-Topped Brownie Squares
Before we dive into the delicious world of Fruit-Topped Brownie Squares, let’s gather our tools! Having the right equipment makes the process smoother and more enjoyable. Here’s what you’ll need:
- 8×8-inch Baking Dish: This is perfect for baking your brownies. If you don’t have one, a 9×9-inch dish will work too; just keep an eye on the baking time.
- Mixing Bowls: A large bowl for mixing the brownie batter and a smaller one for preparing the fruit topping. If you’re in a pinch, any bowl will do!
- Whisk or Spoon: I love using a whisk for the batter, but a sturdy spoon works just as well. It’s all about what you have on hand!
- Spatula: A rubber spatula is great for scraping down the sides of the bowl and spreading the batter evenly in the dish.
- Knife and Cutting Board: You’ll need these for slicing your fresh fruit. A sharp knife makes the job easier and safer.
- Toothpick: This handy tool is essential for checking if your brownies are done. If you don’t have one, a fork can work in a pinch!
With these tools ready, you’re all set to create your Fruit-Topped Brownie Squares. Remember, cooking is about being resourceful, so feel free to adapt based on what you have in your kitchen!
Variations of Fruit-Topped Brownie Squares
One of the things I love most about Fruit-Topped Brownie Squares is their adaptability. You can easily switch things up to suit your taste or the season. Here are a few fun variations that I’ve tried and absolutely adored:
- Tropical Twist: Swap out the traditional berries for tropical fruits like mango, pineapple, and coconut flakes. It’s like a mini vacation on a plate!
- Berry Medley: Use a mix of different berries—raspberries, blackberries, and strawberries. The combination of flavors is simply delightful!
- Chocolate-Covered Fruit: For an indulgent treat, dip your fruit in melted chocolate before placing it on the brownies. It adds an extra layer of decadence!
- Nutty Delight: Sprinkle some chopped nuts, like walnuts or pecans, on top of the fruit for added crunch and flavor. It’s a great way to enhance the texture!
- Seasonal Specials: In the fall, try using sliced apples or pears with a sprinkle of cinnamon. It gives a cozy, warm vibe that’s perfect for chilly days.
These variations not only keep things exciting but also allow you to experiment with flavors and textures. I encourage you to get creative and make these brownie squares your own!
Cooking Notes for Fruit-Topped Brownie Squares
As I’ve learned through my culinary adventures, a few cooking notes can make all the difference when preparing Fruit-Topped Brownie Squares. Here are some insights that I’ve gathered over time:
- Cooling Time: Allow the brownies to cool completely before adding the fruit topping. This prevents the fruit from wilting and keeps everything looking fresh and vibrant.
- Storage: If you have leftovers (which is rare in my house!), store them in an airtight container in the fridge. They’ll stay delicious for a couple of days, but the fruit is best enjoyed fresh.
- Serving Temperature: These brownie squares are delightful at room temperature. If you prefer a warm treat, you can gently reheat them in the microwave for a few seconds before serving.
- Experiment with Flavors: Don’t hesitate to play around with different flavor combinations. A hint of orange zest or a splash of almond extract can elevate the taste to new heights!
- Presentation: For a stunning presentation, consider using a variety of fruits with different colors and shapes. It makes the dessert not only tasty but also a feast for the eyes!
These cooking notes are just a few tips I’ve picked up along the way. They help ensure that your Fruit-Topped Brownie Squares turn out perfectly every time. Happy baking!
Serving Suggestions for Fruit-Topped Brownie Squares
When it comes to serving Fruit-Topped Brownie Squares, I love to get a little creative! Presentation can elevate the experience, making it even more enjoyable for everyone. Here are some of my favorite serving suggestions that I think you’ll love:
- With Whipped Cream: A dollop of freshly whipped cream on the side adds a light and airy contrast to the rich brownies. It’s like a cloud of sweetness!
- Ice Cream Delight: Serve the brownie squares warm with a scoop of vanilla or chocolate ice cream on top. The melting ice cream creates a deliciously gooey combination!
- Chocolate Drizzle: Drizzle some melted chocolate or chocolate sauce over the fruit topping for an extra indulgent touch. It’s a chocolate lover’s dream!
- Fresh Mint Garnish: A sprig of fresh mint on top not only adds a pop of color but also a refreshing flavor that complements the fruit beautifully.
- Fruit Compote: Serve with a side of fruit compote made from simmered berries. It adds a lovely sauce that enhances the overall flavor.
These serving suggestions not only make the Fruit-Topped Brownie Squares look stunning but also enhance the taste experience. Whether it’s a casual family dinner or a special occasion, these ideas will surely impress your guests!
Tips for Making the Best Fruit-Topped Brownie Squares
As I’ve baked my fair share of Fruit-Topped Brownie Squares, I’ve gathered some golden tips that can help you achieve brownie perfection. These little nuggets of wisdom can make a big difference in your baking journey!
- Use Quality Ingredients: The better the ingredients, the better the brownies! Opt for high-quality cocoa powder and fresh, ripe fruit. It truly elevates the flavor.
- Don’t Rush the Cooling: Patience is key! Allow the brownies to cool completely before adding the fruit. This keeps the topping fresh and prevents any sogginess.
- Experiment with Textures: Mix in some chocolate chips or nuts into the brownie batter for added texture. It creates a delightful contrast with the soft fruit topping!
- Mind the Baking Time: Keep an eye on your brownies as they bake. Every oven is different, so check for doneness a few minutes early to avoid overbaking.
- Layer the Fruit: When arranging the fruit, think about color and shape. Layering different fruits not only looks beautiful but also creates a symphony of flavors in every bite!
With these tips in your back pocket, you’re well on your way to creating the most delicious and visually stunning Fruit-Topped Brownie Squares. Happy baking, and enjoy every moment of this sweet adventure!
Breakdown of Time for Fruit-Topped Brownie Squares
When it comes to baking, timing is everything! I’ve found that knowing how long each step takes can help you plan your baking adventure better. Here’s a quick breakdown of the time you’ll need to whip up these delightful Fruit-Topped Brownie Squares:
- Prep Time: Approximately 15-20 minutes. This includes gathering your ingredients, mixing the brownie batter, and preparing the fruit topping.
- Cooking Time: About 20-25 minutes. This is the time your brownies will spend in the oven, baking to fudgy perfection.
- Total Time: Roughly 40-45 minutes. This includes both prep and cooking time, plus a little extra for cooling before you add the fruit topping.
With this time breakdown, you can easily fit these Fruit-Topped Brownie Squares into your day. Whether you’re making them for a special occasion or just because, you’ll be enjoying these sweet treats in no time!
Nutritional Information for Fruit-Topped Brownie Squares
As a home cook, I always find it helpful to know the nutritional value of the dishes I prepare. It allows me to enjoy my creations while being mindful of what I’m eating. Here’s a general breakdown of the nutritional information for a serving of Fruit-Topped Brownie Squares (one square, assuming the recipe yields 16 squares):
- Calories: Approximately 180-200 calories
- Protein: 2-3 grams
- Fat: 8-10 grams
- Carbohydrates: 25-30 grams
- Fiber: 1-2 grams
- Sugar: 12-15 grams
Keep in mind that these values can vary based on the specific ingredients you use, especially the type of fruit and any optional add-ons. For instance, using dark chocolate or adding nuts can change the nutritional profile. I love to think of these brownie squares as a treat that balances indulgence with a touch of fruit goodness. Enjoying them in moderation is key!
Frequently Asked Questions about Fruit-Topped Brownie Squares
As I’ve shared my love for Fruit-Topped Brownie Squares, I often get questions from fellow home cooks eager to try this delightful dessert. Here are some of the most common queries I’ve encountered, along with my answers to help you on your baking journey!
Can I use frozen fruit for the topping?
Absolutely! While fresh fruit is always my first choice, frozen fruit can work in a pinch. Just make sure to thaw and drain any excess moisture before adding it to your brownies. This helps prevent sogginess and keeps everything looking fresh!
How do I store leftover brownie squares?
If you happen to have any leftovers (which is rare in my house!), store them in an airtight container in the fridge. They’ll stay delicious for a couple of days. Just remember, the fruit is best enjoyed fresh, so try to add it just before serving!
Can I make these brownies gluten-free?
<pYes, you can! Simply substitute regular flour with a gluten-free flour blend. I’ve had great success using almond flour or a store-bought gluten-free mix. Just keep an eye on the baking time, as it may vary slightly.
What’s the best way to cut the brownies?
To get clean cuts, I recommend using a sharp knife. For an even better result, run the knife under hot water, then dry it before slicing. This helps prevent the brownies from crumbling and gives you those perfect squares!
Can I add nuts to the brownie batter?
Definitely! Adding nuts like walnuts or pecans can enhance the texture and flavor of your brownies. Just fold them in gently after mixing the batter. It’s a delightful way to add a little crunch!
These FAQs should help clear up any uncertainties you might have about making Fruit-Topped Brownie Squares. Remember, baking is all about experimenting and having fun, so don’t hesitate to make this recipe your own!
Conclusion on Fruit-Topped Brownie Squares
In conclusion, Fruit-Topped Brownie Squares are more than just a dessert; they are a delightful experience that brings joy to both the baker and the eater. The combination of rich, fudgy brownies topped with vibrant, fresh fruit creates a beautiful balance of flavors and textures. Each bite is a celebration of sweetness, making them perfect for any occasion, from casual family dinners to festive gatherings.
What I love most about these brownie squares is their versatility. You can customize them with your favorite fruits, add a splash of creativity, and even experiment with different flavors. Plus, they are easy to make, allowing you to spend less time in the kitchen and more time enjoying the company of loved ones.
So, whether you’re a seasoned baker or just starting your culinary journey, I encourage you to give these Fruit-Topped Brownie Squares a try. They are sure to become a cherished recipe in your home, bringing smiles and sweet memories for years to come. Happy baking!
