
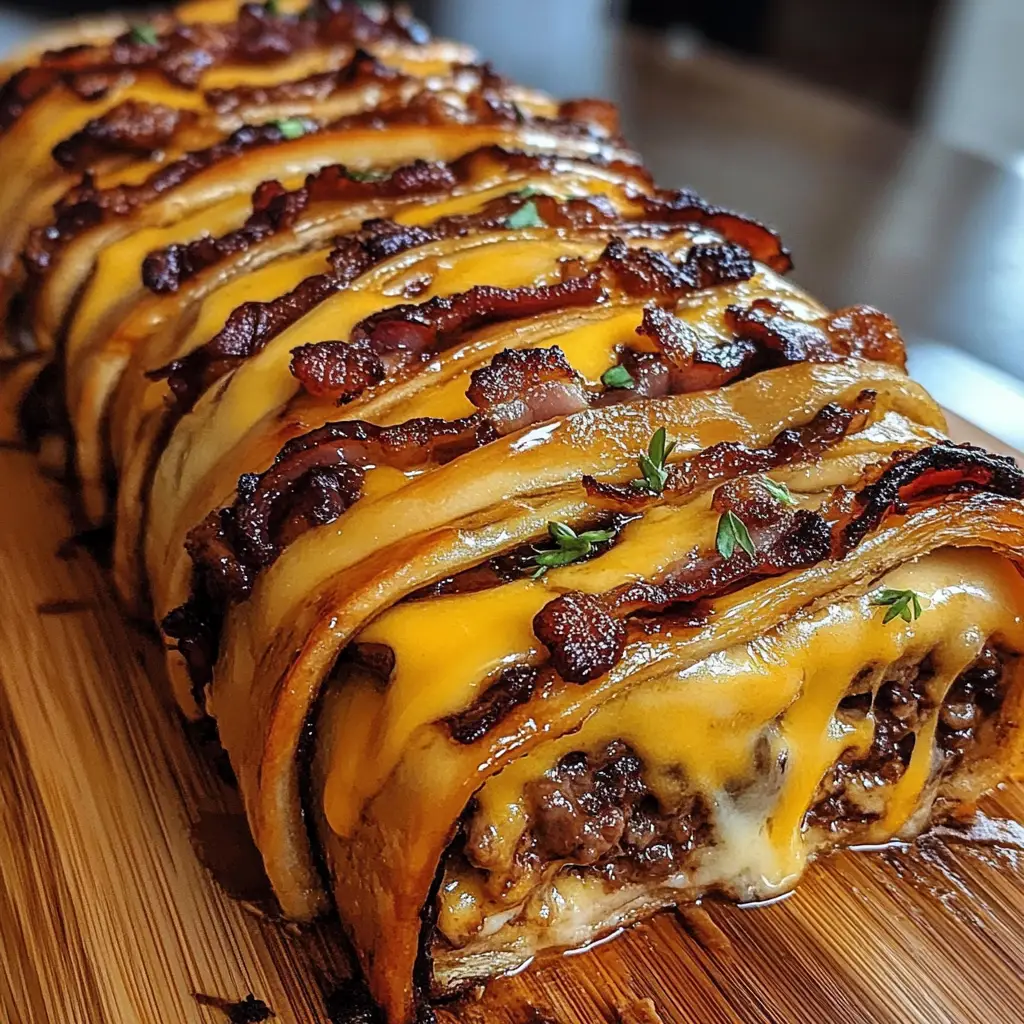
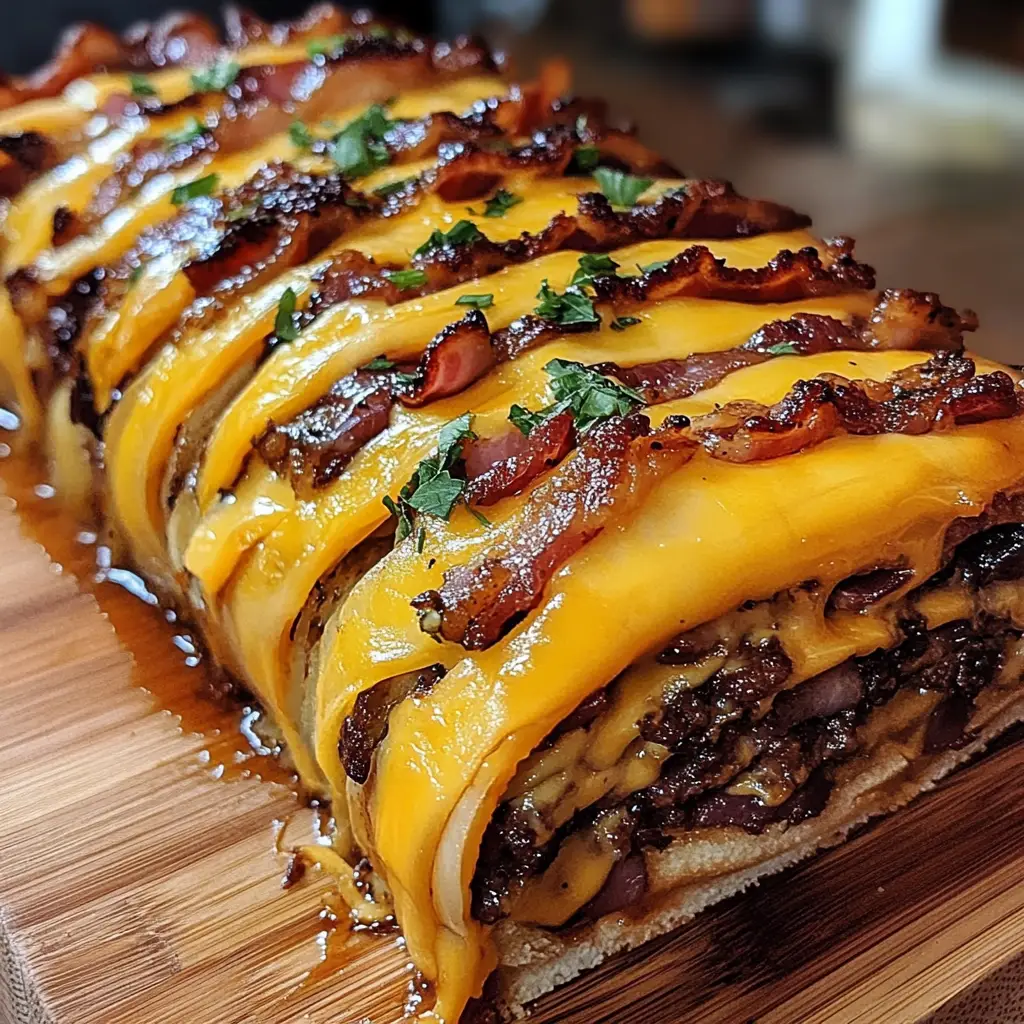
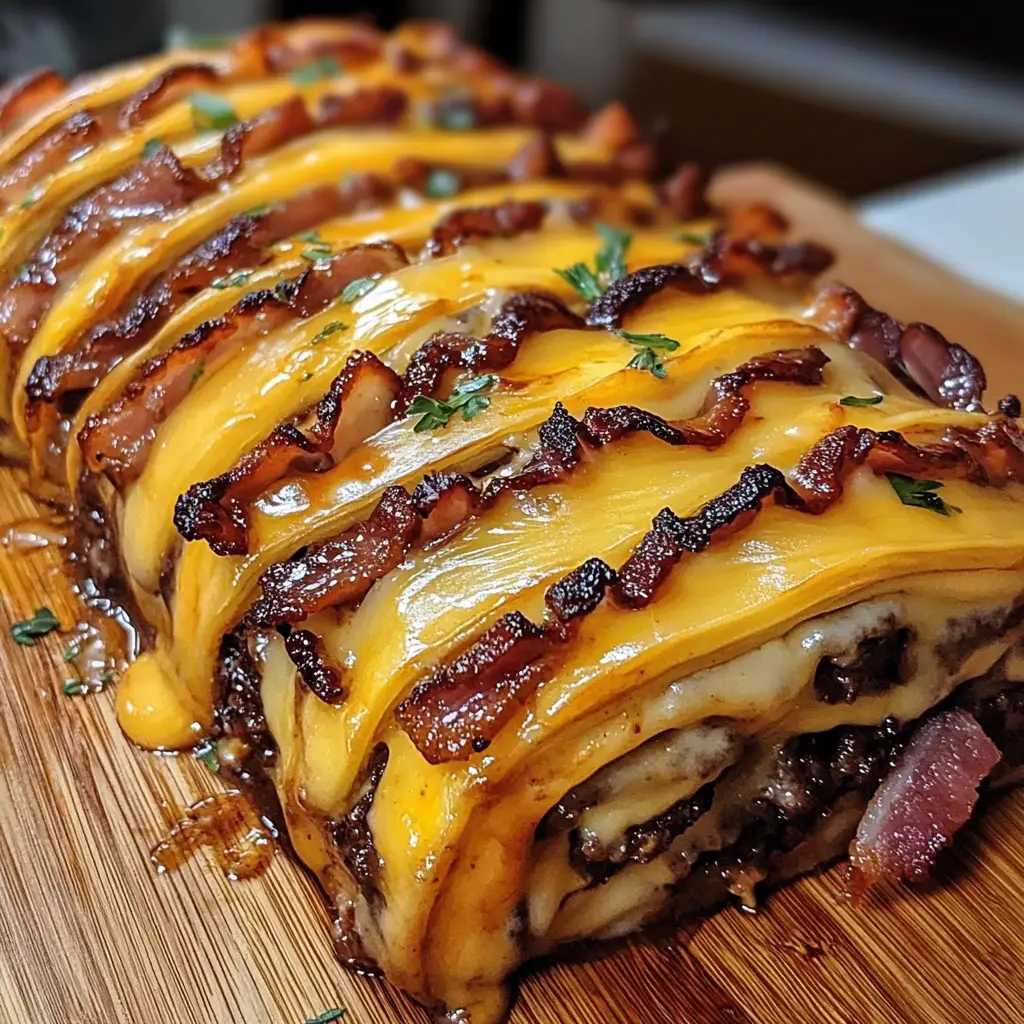
Craving all the bold, comforting flavors of a classic cheeseburger—juicy beef, crispy bacon, tangy cheese, and rich garlic butter—but with a creative, hand-held twist? Look no further than these Garlic Butter Bacon Cheeseburger Rollups. This inventive appetizer-slash-dinner combines the irresistible allure of bacon cheeseburgers with the buttery, flaky texture of crescent roll dough to deliver a flavor-packed dish that works for game days, parties, or a fun family meal. Think of it as a fusion between your favorite bacon cheeseburger and a buttery pinwheel pastry—all wrapped up in golden brown goodness.
Whether you’re whipping up a batch for a crowd or want to surprise your family with something new and delicious, these rollups are sure to impress. The filling is creamy, cheesy, and loaded with savory beef and smoky bacon, while the outer layer bakes to perfection under a garlicky butter glaze. It’s a truly mouthwatering bite that’s both indulgent and comforting.
Why is this recipe so popular?
Why You’ll Love This Recipe
-
Classic Flavors, Creative Form: Everything you love about a cheeseburger—beef, cheese, bacon, and condiments—wrapped up in flaky crescent dough.
-
Easy to Make: With simple ingredients and step-by-step instructions, this recipe is beginner-friendly and ideal for busy cooks.
-
Crowd-Pleasing: These rollups are great for parties, potlucks, game nights, or family dinners—everyone loves them!
-
Versatile: Add your own spin by using different cheeses, swapping condiments, or even incorporating pickles or jalapeños.
-
Great for Meal Prep: Make ahead and refrigerate or freeze—just reheat and enjoy when ready!
Ingredients
For the Filling:
-
1 lb ground beef
-
Salt, pepper, garlic powder, onion powder (to taste)
-
8 oz cream cheese, softened
-
1 cup shredded cheddar cheese
-
½ cup cooked and crumbled bacon (about 6 strips)
For the Dough:
-
1 tube refrigerated crescent dough sheet (or crescent rolls, seams pinched together)
-
Optional: 1 tbsp Dijon mustard or ketchup (for spreading on dough)
For the Garlic Butter:
-
3 tbsp melted butter
-
1 tsp garlic powder
-
1 tbsp chopped parsley
-
1 tbsp grated Parmesan (optional)
Preparation
1. Preheat and Prep
Preheat your oven to 375°F (190°C). Line a large baking sheet with parchment paper or a silicone baking mat to ensure the rollups won’t stick and will bake evenly.
2. Cook the Beef
In a medium skillet over medium heat, add the ground beef. Break it up with a spatula and cook until browned and no longer pink, about 7–9 minutes. Drain any excess fat carefully.
Once drained, season the beef generously with salt, pepper, garlic powder, and onion powder to enhance its savory base flavor. Mix well, then remove the skillet from heat and allow it to cool slightly, about 5 minutes—this will help prevent the cheese from melting too early in the next step.
3. Mix the Filling
In a large mixing bowl, combine the cooked ground beef, softened cream cheese, shredded cheddar cheese, and crumbled cooked bacon. Stir until the mixture is smooth, cheesy, and well combined. The cream cheese binds everything together into a spreadable, luscious filling.
4. Roll Out the Dough
Unroll the crescent dough sheet onto a lightly floured surface. If using crescent rolls, pinch the seams to form a solid rectangle. You’re aiming for a rough 9×13 inch rectangle, which allows enough space to spread the filling and roll.
Optional Step: Lightly spread Dijon mustard or ketchup over the dough to add that extra burger-like tanginess. This layer acts as a subtle nod to traditional burger condiments.
5. Fill and Roll
Spoon the cheeseburger filling onto the dough, and spread it evenly, leaving a ½-inch border on all sides. This space helps the filling stay inside when you roll.
Starting from the long edge, roll up the dough tightly like a jelly roll, being careful not to press too hard to prevent filling from squeezing out. Pinch the edge to seal.
Using a sharp knife or serrated blade, slice the roll into 1-inch pieces. You should get about 10–12 rollups.
6. Arrange and Brush with Garlic Butter
Carefully transfer each slice onto the prepared baking sheet, spacing them out evenly. Flatten slightly with your fingers if needed.
In a small bowl, melt the butter, then stir in the garlic powder and chopped parsley. Brush this fragrant garlic butter generously over the tops of each rollup. If you want a cheesier finish, sprinkle grated Parmesan on top.
7. Bake to Perfection
Place the baking sheet into your preheated oven and bake for 15 to 18 minutes, or until the tops are golden brown, the cheese is bubbling, and the centers are cooked through.
8. Serve Warm
Let the rollups cool slightly before serving—they’ll be hot straight from the oven! Serve with ketchup, ranch, burger sauce, or any favorite dip for the ultimate indulgence.
Variation
-
Spicy Kick: Add diced jalapeños or a sprinkle of crushed red pepper flakes to the beef mixture for a spicy version.
-
Pickle Power: Finely chop dill pickles and fold into the filling for that iconic burger tang.
-
Tex-Mex Style: Swap cheddar for pepper jack, add taco seasoning to the beef, and top with cilantro.
-
Pizza-Style: Use mozzarella and marinara in place of cheddar and ketchup for a pizza-flavored twist.
-
Breakfast Version: Replace ground beef with scrambled eggs and sausage, and use breakfast cheese like Colby or American.
Cooking Note
Letting the cooked beef cool slightly before mixing it with cream cheese helps preserve the texture and prevents the filling from becoming too runny. Likewise, keeping the dough cold while filling makes it easier to roll and slice. If your dough becomes too soft, pop it in the fridge for 5–10 minutes before rolling.
Serving Suggestions
These rollups shine as a stand-alone snack or appetizer, but can also be paired with:
-
French fries or sweet potato wedges
-
Crispy onion rings
-
A fresh side salad with ranch or honey mustard dressing
-
Tomato soup or cheesy dipping sauce
Serve them for:
-
Game day spreads
-
Casual dinner nights
-
Lunchboxes
-
Potluck gatherings
-
Kids’ birthday parties
Tips
-
Chill before slicing: For cleaner cuts, chill the filled dough for 10 minutes before slicing.
-
Use parchment paper: Prevent sticking and ensure even browning.
-
Double the batch: These disappear fast! Make two rolls and freeze one for later.
-
Reheat like a pro: Warm leftovers in the oven or air fryer for crispy results—avoid the microwave for best texture.
-
Customize toppings: Add sesame seeds, extra cheese, or chopped herbs for a gourmet touch.
Prep Time: 15 minutes
Cooking Time: 18 minutes
Total Time: 33 minutes
Nutritional Information** (Per 1 Rollup, Approximate)
-
Calories: 270
-
Protein: 11g
-
Fat: 21g
-
Carbohydrates: 9g
-
Sodium: 410mg
FAQs
Can I use puff pastry instead of crescent dough?
Yes! Puff pastry will create a flakier, more buttery texture. Just follow the same rolling and slicing method, and add a few extra minutes of baking time.
Can I make these ahead of time?
Absolutely. Assemble and slice the rollups, then cover and refrigerate up to 24 hours in advance. Brush with garlic butter right before baking.
How do I store leftovers?
Store cooled rollups in an airtight container in the fridge for up to 4 days. Reheat in the oven or air fryer until warmed through.
Can I freeze them?
Yes—freeze unbaked slices on a baking sheet, then transfer to a freezer-safe bag. Bake from frozen, adding 5–7 extra minutes to the cook time.
What dipping sauces go best with these?
Try ketchup, burger sauce, chipotle mayo, ranch dressing, or even sriracha aioli for a spicy twist.
Conclusion
These Garlic Butter Bacon Cheeseburger Rollups are the perfect fusion of savory indulgence and shareable fun. Whether you’re preparing a party platter, a family dinner, or just a batch for yourself, they hit all the right notes—creamy, crispy, cheesy, garlicky, and packed with flavor. The classic bacon cheeseburger just got an upgrade, and it’s easier than ever to enjoy in every bite. Try them once, and they’ll become a favorite in your recipe rotation.
Print
Garlic Butter Bacon Cheeseburger Rollups
- Total Time: 33 minutes
Ingredients
For the Filling:
-
1 lb ground beef
-
Salt, pepper, garlic powder, onion powder (to taste)
-
8 oz cream cheese, softened
-
1 cup shredded cheddar cheese
-
½ cup cooked and crumbled bacon (about 6 strips)
For the Dough:
-
1 tube refrigerated crescent dough sheet (or crescent rolls, seams pinched together)
-
Optional: 1 tbsp Dijon mustard or ketchup (for spreading on dough)
For the Garlic Butter:
-
3 tbsp melted butter
-
1 tsp garlic powder
-
1 tbsp chopped parsley
-
1 tbsp grated Parmesan (optional)
Instructions
1. Preheat and Prep
Preheat your oven to 375°F (190°C). Line a large baking sheet with parchment paper or a silicone baking mat to ensure the rollups won’t stick and will bake evenly.
2. Cook the Beef
In a medium skillet over medium heat, add the ground beef. Break it up with a spatula and cook until browned and no longer pink, about 7–9 minutes. Drain any excess fat carefully.
Once drained, season the beef generously with salt, pepper, garlic powder, and onion powder to enhance its savory base flavor. Mix well, then remove the skillet from heat and allow it to cool slightly, about 5 minutes—this will help prevent the cheese from melting too early in the next step.
3. Mix the Filling
In a large mixing bowl, combine the cooked ground beef, softened cream cheese, shredded cheddar cheese, and crumbled cooked bacon. Stir until the mixture is smooth, cheesy, and well combined. The cream cheese binds everything together into a spreadable, luscious filling.
4. Roll Out the Dough
Unroll the crescent dough sheet onto a lightly floured surface. If using crescent rolls, pinch the seams to form a solid rectangle. You’re aiming for a rough 9×13 inch rectangle, which allows enough space to spread the filling and roll.
Optional Step: Lightly spread Dijon mustard or ketchup over the dough to add that extra burger-like tanginess. This layer acts as a subtle nod to traditional burger condiments.
5. Fill and Roll
Spoon the cheeseburger filling onto the dough, and spread it evenly, leaving a ½-inch border on all sides. This space helps the filling stay inside when you roll.
Starting from the long edge, roll up the dough tightly like a jelly roll, being careful not to press too hard to prevent filling from squeezing out. Pinch the edge to seal.
Using a sharp knife or serrated blade, slice the roll into 1-inch pieces. You should get about 10–12 rollups.
6. Arrange and Brush with Garlic Butter
Carefully transfer each slice onto the prepared baking sheet, spacing them out evenly. Flatten slightly with your fingers if needed.
In a small bowl, melt the butter, then stir in the garlic powder and chopped parsley. Brush this fragrant garlic butter generously over the tops of each rollup. If you want a cheesier finish, sprinkle grated Parmesan on top.
7. Bake to Perfection
Place the baking sheet into your preheated oven and bake for 15 to 18 minutes, or until the tops are golden brown, the cheese is bubbling, and the centers are cooked through.
8. Serve Warm
Let the rollups cool slightly before serving—they’ll be hot straight from the oven! Serve with ketchup, ranch, burger sauce, or any favorite dip for the ultimate indulgence.
Notes
Letting the cooked beef cool slightly before mixing it with cream cheese helps preserve the texture and prevents the filling from becoming too runny. Likewise, keeping the dough cold while filling makes it easier to roll and slice. If your dough becomes too soft, pop it in the fridge for 5–10 minutes before rolling.
- Prep Time: 15 minutes
- Cook Time: 18 minutes
Nutrition
- Calories: 270
- Sodium: 410mg
- Fat: 21g
- Carbohydrates: 9g
- Protein: 11g
