
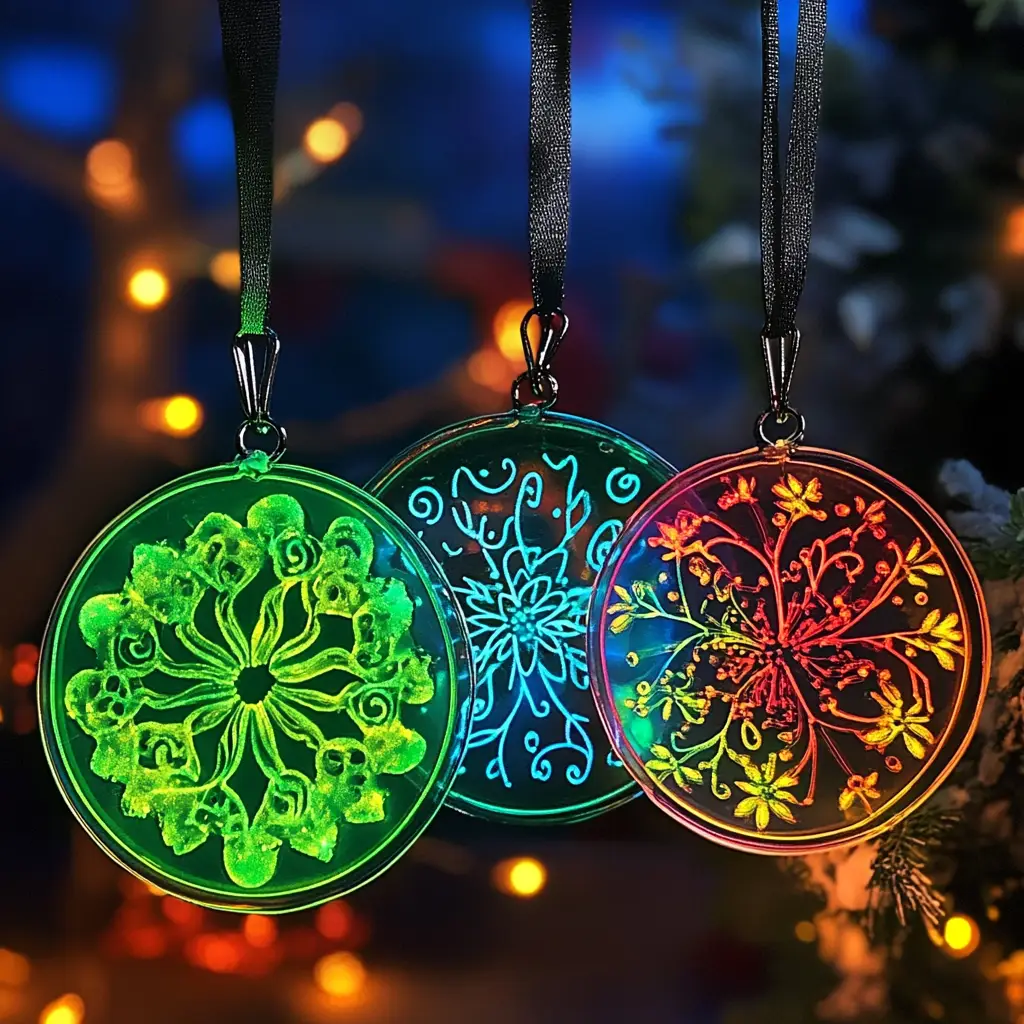
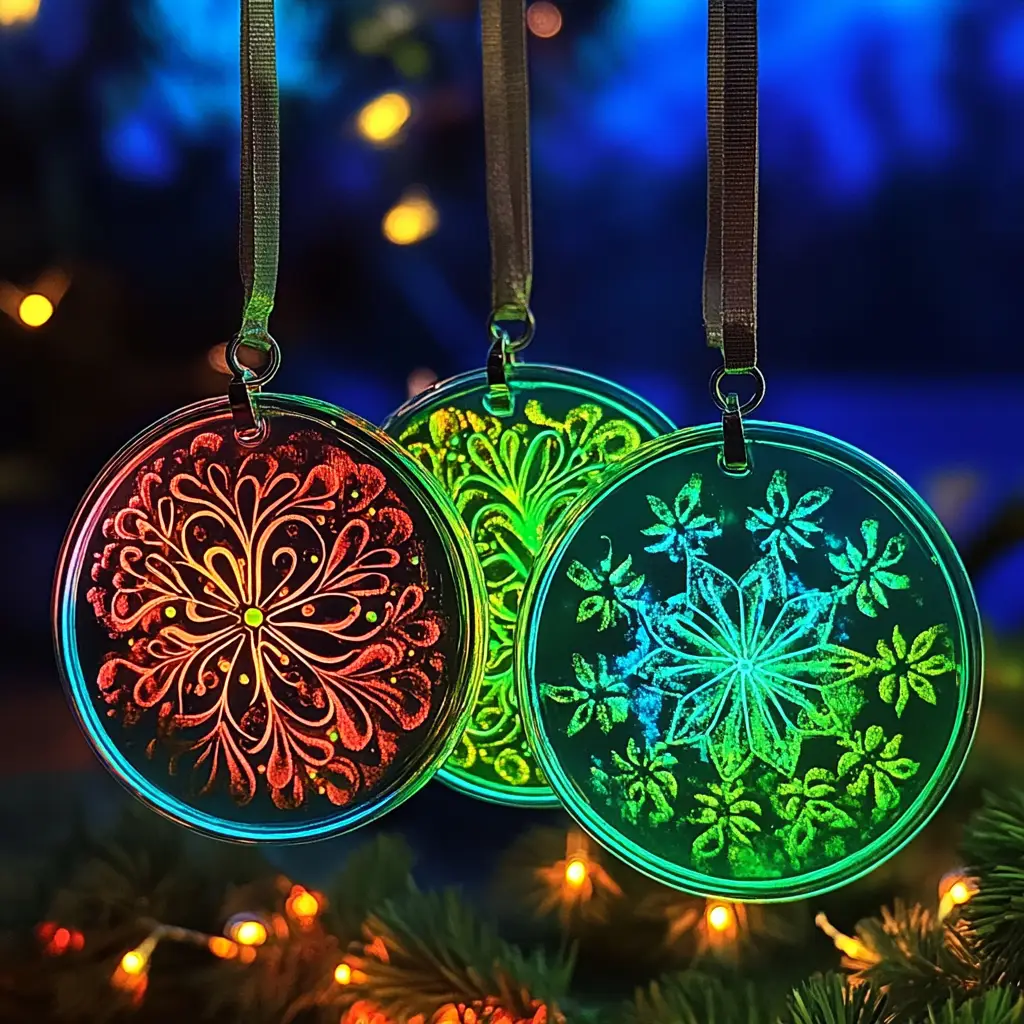
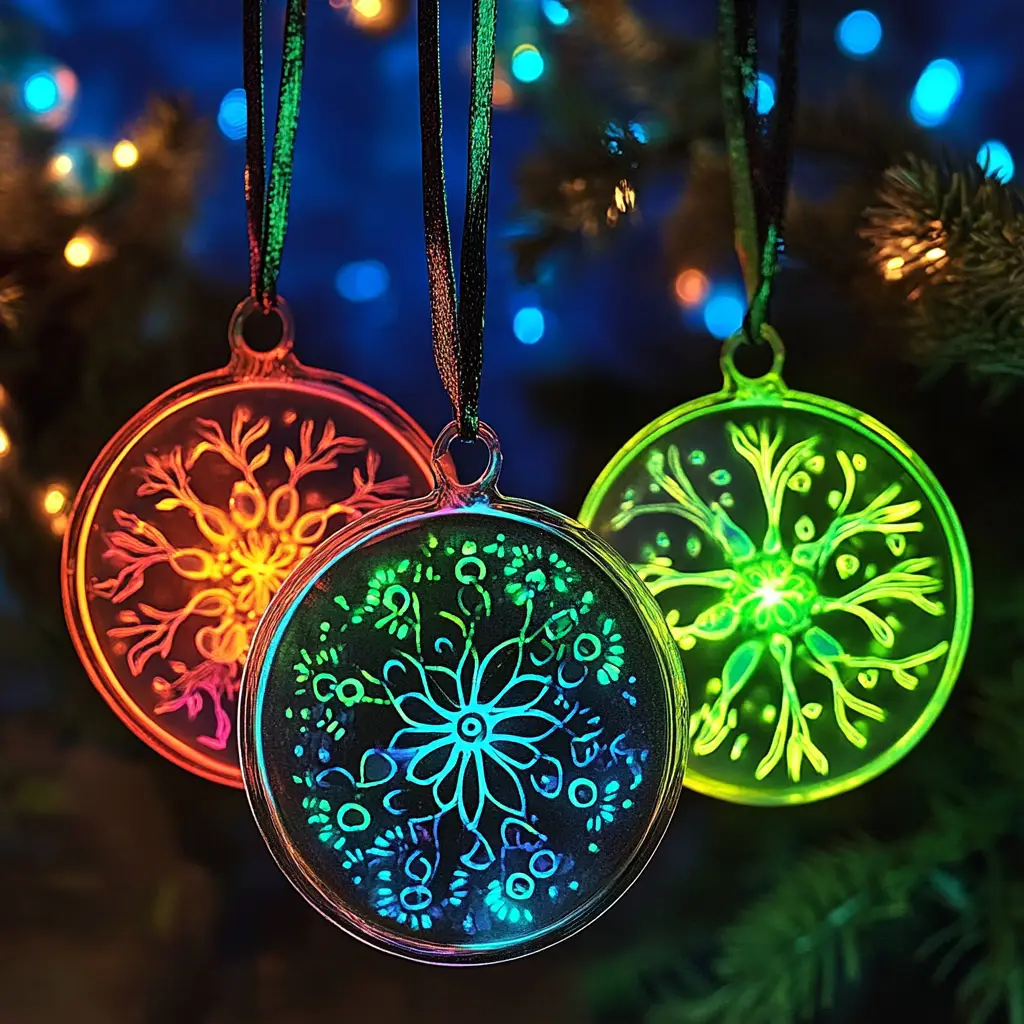
There’s something undeniably magical about sunlight streaming through colorful designs—especially when those designs glow after the sun goes down. Glow-in-the-dark suncatchers offer the perfect combination of vibrant daylight beauty and whimsical nighttime wonder. This DIY project is easy, affordable, and endlessly customizable, making it ideal for kids, teens, families, or even solo crafters looking to brighten up their space with handmade art that literally shines.
Whether you’re looking for a rainy-day activity, a classroom project, or a unique party craft, these glowing suncatchers are sure to spark creativity and joy. The best part? They’re made from everyday items like plastic lids or contact paper, tissue paper scraps, and a touch of glow-in-the-dark paint.
Why Is This Recipe So Popular?
1. Dual Appeal: Daytime Beauty + Nighttime Magic
These suncatchers aren’t just pretty—they glow in the dark, giving them a two-in-one appeal. During the day, they catch and scatter light in a rainbow of colors. At night, they softly glow, adding a sense of wonder and enchantment. This dual functionality makes them feel extra special and interactive.
2. Fun for All Ages
The craft is easy enough for kids to enjoy but also creative and customizable enough for teens and adults. It works well in:
-
Classrooms
-
After-school programs
-
Summer camps
-
At-home family craft sessions
-
Creative therapy or senior art groups
3. Inexpensive & Eco-Friendly
Using recycled plastic lids or leftover tissue paper makes this a low-cost and eco-conscious project. It’s a great way to repurpose items that would otherwise go to waste—ideal for classrooms, budget-conscious parents, and sustainability advocates.
4. Customizable for Any Occasion
The design possibilities are endless. You can adapt them for:
-
Seasons (e.g., fall leaves, winter snowflakes)
-
Holidays (e.g., glowing pumpkins, Easter eggs)
-
Themes (e.g., space, nature, underwater)
-
Personal Messages (e.g., names, inspirational words)
This versatility makes them a go-to craft for events, parties, or decor updates throughout the year.
5. Encourages Creativity and Fine Motor Skills
Cutting, arranging, and gluing tissue pieces helps children develop fine motor skills. For all ages, it’s a relaxing and mindful activity that encourages artistic expression and spatial thinking.
6. Teaches Science Through Art
Glow-in-the-dark materials naturally spark curiosity. Kids often ask:
-
“Why does it glow?”
-
“How does light charge it?”
-
“Can I make it glow more?”
It becomes a fun educational opportunity about phosphorescence, light energy, and color theory—making it a hit in STEAM (Science, Technology, Engineering, Art, and Math) programs.
7. Instant Gratification, Long-Lasting Enjoyment
Unlike some crafts that require days of drying or curing, these suncatchers are ready within hours and can be enjoyed immediately—charging up and glowing the very same night. Once made, they last for months or even years with proper care.
8. Social Media Friendly
They photograph beautifully in both natural light and in the dark, making them perfect for sharing on Instagram, Pinterest, and craft blogs. This online visibility helps the craft trend and spread across DIY communities and classrooms.
9. Safe and Low-Mess
With non-toxic glue and paint, and minimal mess compared to paint-heavy or resin crafts, this project is kid-safe and parent-approved. Clean-up is easy, and the materials are easy to handle, even for little ones.
10. Emotional and Decorative Value
Beyond being a fun activity, these suncatchers often become sentimental keepsakes—a child’s first window art, a themed craft from a party, or a bonding project made during family time. They brighten up spaces, and their glow becomes a comforting feature at bedtime.
In Summary:
The Glow-in-the-Dark Suncatcher craft is popular because it’s simple, stunning, and versatile. It combines creativity, education, and fun in a package that’s affordable, sustainable, and joyful. Whether you’re five or fifty, there’s something magical about crafting a piece of light that dances in the day and glows at night.
Why You’ll Love This Craft
-
Budget-friendly: Uses common household and craft items—no fancy tools required.
-
Mess-friendly: Great for kids, but equally enjoyable for adults. The steps are simple, and the cleanup is minimal.
-
Creative freedom: Endless customization with colors, shapes, and designs.
-
Two-in-one decor: Beautiful during the day, magical at night.
-
Educational twist: Teaches about light, color, and how glow-in-the-dark materials work.
-
Perfect for events: Ideal for birthday parties, sleepovers, classrooms, summer camps, and seasonal decorating.
Materials Needed
To create your own glow-in-the-dark suncatchers, gather the following supplies:
-
Glow-in-the-dark paint (found at craft stores or online)
-
Clear plastic lids (recycled from yogurt, margarine, or deli containers)
or
Clear contact paper (available at dollar stores or stationery shops) -
Paintbrushes
-
Tissue paper (variety of bright or pastel colors)
-
Scissors
-
Glue (white school glue, clear glue, or Mod Podge)
-
Hole punch
-
Ribbon or string
-
Markers (optional for decorating edges or adding designs)
Preparation & Crafting: Step-by-Step Instructions
Let’s break down the process so you can enjoy every colorful, glowing moment of this fun DIY.
Step 1: Prepare the Base
Plastic lids:
Wash and dry thoroughly to ensure the paint and glue stick properly. Remove any labels or sticky residue using a bit of dish soap and warm water.
Contact paper:
Cut into your desired shapes—circles, hearts, stars, or custom designs—and peel off the paper backing to expose the sticky side. Place sticky side up on a clean surface.
Craft tip: Place contact paper on a non-stick surface like wax paper to keep it flat while working.
Step 2: Paint the Base
Use your glow-in-the-dark paint to create an outline, border, or even a full background on your base. This sets the stage for the glow effect when the lights go down.
-
For plastic lids: Paint directly onto the surface. You can go for a full wash of glow paint or paint just the rim for a soft glowing halo.
-
For contact paper: Paint the sticky side. Be careful not to overload it—just a thin layer works best.
Let the paint dry fully according to the instructions—usually a few hours.
Step 3: Cut the Tissue Paper
While waiting for the paint to dry, prep your tissue paper. You can cut it into:
-
Squares
-
Triangles
-
Hearts, stars, flowers
-
Random torn shapes for a mosaic effect
Mix and match colors for a vibrant, rainbow-like result or stick to a color scheme for a themed suncatcher (e.g., sunset tones or ocean blues).
Step 4: Apply the Tissue Paper
Once the paint has dried:
-
Spread a thin layer of glue over the surface of your base (or work directly on the sticky side of contact paper).
-
Press tissue pieces gently onto the glue or contact paper, layering and overlapping for a stained-glass look.
Let the glue dry completely. Depending on the humidity and the glue used, this could take anywhere from 30 minutes to a few hours.
Step 5: Add Optional Decoration
Want to add a personal touch?
-
Use markers to draw designs around the edge or over the dried tissue paper.
-
Try glow-in-the-dark pens or metallic markers for an added pop when the lights go out.
Step 6: Punch a Hole
Use a hole punch to make a hole near the top of the lid or contact paper shape for hanging.
If you’re using contact paper and it’s too flimsy, reinforce it by attaching it to a second layer of paper or trimming the edge with washi tape before punching the hole.
Step 7: Add Ribbon or String
Cut a length of ribbon or string, thread it through the hole, and tie it into a loop or bow. This is your hanger.
Tip: Use glow-in-the-dark or metallic thread for extra style points!
Step 8: Display and Enjoy
Hang your finished suncatcher in a sunny window or bright light area to charge the glow-in-the-dark paint. At night, watch your design softly glow, adding a dreamy ambiance to any space.
Craft Variations
Customize your glow-in-the-dark suncatchers for different seasons, holidays, or moods.
-
Halloween: Use orange, black, and green tissue with spider or pumpkin designs.
-
Christmas: Red and green tissue with star shapes or snowflakes.
-
Summer themes: Think sunshine yellows, tropical blues, and beachy patterns.
-
Galaxy vibes: Use navy, purple, and silver with star and moon shapes for a cosmic look.
-
Names or messages: Cut letters from tissue or use markers to personalize with names, quotes, or dates.
Craft Note
Glow-in-the-dark paint needs light to charge—natural sunlight works best, but indoor lights can also do the job. The brighter and longer the exposure, the stronger the nighttime glow.
Display Suggestions
-
Hang them in windows to catch both sunlight and moonlight.
-
String several together to make a glow suncatcher garland.
-
Use mini versions as party favors or gift tags.
-
Attach to a mobile for a glowing, kinetic display in a child’s room.
-
Decorate outdoor spaces like patios for twilight garden charm (use waterproof materials).
Tips for Best Results
-
Don’t overload with glue—too much can make the paper soggy or warp the base.
-
Let everything dry thoroughly before moving to the next step.
-
Use sharp scissors for detailed shapes.
-
Test the glow paint on scrap material before applying to your final base.
-
Use clear-drying glue like Mod Podge for the neatest finish.
-
Encourage kids to plan their design before gluing—it helps with composition.
Time Required
-
Prep time: 10–15 minutes
-
Crafting time: 30–45 minutes
-
Drying time: 1–4 hours (depending on paint and glue used)
-
Total time: Around 2–5 hours (including drying)
Safety & Supervision
-
This project is safe for kids, but young children should be supervised, especially when using scissors, paint, or glue.
-
Ensure proper ventilation when using paint.
-
Use non-toxic, kid-safe materials if working with toddlers or preschoolers.
-
Keep small materials like hole punches or scissors out of reach when not in use.
FAQs
Q: Can I use regular paint instead of glow-in-the-dark paint?
Yes, but the nighttime glowing effect will be lost. You can still create beautiful daytime suncatchers using acrylic or water-based paints.
Q: What if I don’t have plastic lids?
Clear contact paper, transparency film, or recycled clear packaging also work great. Just make sure the surface holds glue and is easy to cut or punch.
Q: How long does the glow effect last?
It varies depending on the paint brand and amount of light exposure. Most glow-in-the-dark paints shine for 30 minutes to several hours after full charging.
Q: Can I layer glow paint over the tissue paper?
Yes! Once the glue dries, you can add accents of glow paint on top for extra glow zones.
Q: Are these waterproof for outdoor use?
Only if you use waterproof glue and paint. Consider sealing with clear spray sealer if displaying outdoors.
Conclusion
Glow-in-the-dark suncatchers are a delightful blend of art, science, and imagination. With simple materials and easy steps, this DIY project allows creators of all ages to experiment with color, shape, and glow. Whether you’re brightening your home, crafting with your kids, or just looking for a hands-on, heartwarming way to spend an afternoon, these radiant suncatchers deliver beauty by day—and a touch of enchantment by night.
So gather your supplies, channel your inner artist, and let your windows sparkle and glow with handmade magic!
