

No-Bake Biscuit Cake: Creamy, Decadent Indulgence!
Sensory-Rich Introduction with Immediate Craving
Imagine a dessert that combines the satisfying crunch of biscuits with a velvety, rich cream filling that melts in your mouth. This No-Bake Biscuit Cake is not just a treat; it’s an experience that evokes memories of family gatherings and celebrations. Picture a warm summer evening, laughter filling the air, and this cake taking center stage on the dessert table, its glossy chocolate topping glistening under the soft glow of fairy lights. Each slice is a perfect balance of sweetness and texture, making it an indulgent delight that everyone will crave. Whether it’s a birthday party, a holiday feast, or a simple weeknight treat, this cake is sure to impress and satisfy.
Why You’ll Love This No-Bake Biscuit Cake
- Texture Contrast: The crunchy biscuit base perfectly complements the creamy filling, creating a delightful mouthfeel that keeps you coming back for more.
- Flavor Balance: The sweetness of the cream filling is beautifully offset by the slight bitterness of dark chocolate, making each bite a harmonious blend of flavors.
- Versatility: This cake can be customized with various toppings and fillings, allowing you to tailor it to your taste or the occasion.
- Ease of Preparation: With no baking required, this recipe is straightforward and quick, making it perfect for novice bakers or those short on time.
- Universal Appeal: Loved by both kids and adults, this dessert is a crowd-pleaser that fits into any gathering or celebration.
Essential Tools & Preparation Strategy
- Springform Pan: Essential for easy removal of the cake without damaging it, ensuring a beautiful presentation.
- Mixing Bowls: Needed for efficiently combining ingredients; opt for different sizes for various components.
- Electric Mixer: Helps achieve a smooth and fluffy cream filling, saving time and effort compared to manual mixing.
- Spatula: Useful for spreading the cream filling evenly over the biscuit base, ensuring a professional finish.
- Measuring Cups and Spoons: Ensures accurate ingredient quantities for best results, crucial for achieving the right texture and flavor.
- Refrigerator: Critical for setting the cake properly before serving; make sure there’s enough space for the springform pan.
- Parchment Paper (optional): Can be used to line the bottom of the springform pan for easier removal.
- Whisk: Handy for mixing the cream filling if you don’t have an electric mixer.
Ingredients & Their Roles in This No-Bake Biscuit Cake
For the Cake:
- Digestive Biscuits (200g): Provide the crunchy base that holds the cake together.
- Unsalted Butter (100g): Binds the biscuits and adds richness to the base.
- Granulated Sugar (50g): Sweetens the base and enhances the overall flavor.
For the Cream Filling:
- Cream Cheese (400g): Forms the creamy, rich filling that is the star of the cake.
- Heavy Cream (200ml): Adds lightness and a luxurious texture to the filling.
- Powdered Sugar (100g): Sweetens the filling and helps achieve a smooth consistency.
- Vanilla Extract (1 tsp): Enhances the flavor profile of the cream filling.
For the Topping:
- Dark Chocolate (50g): Adds a decadent touch and a slight bitterness that balances the sweetness.
- Fresh Berries (optional): Provide a fresh, fruity contrast and a pop of color.
Substitutions:
- For a gluten-free version, use gluten-free biscuits.
- Substitute cream cheese with mascarpone for a different flavor profile.
Step-by-Step Guide to Perfect No-Bake Biscuit Cake
- Prepare the Base: In a large bowl, combine the crushed digestive biscuits with melted butter and granulated sugar until well mixed.
- Form the Base: Press the biscuit mixture firmly into the bottom of a 9-inch springform pan to create a solid base. Refrigerate for 30 minutes to set.
- Make the Cream Filling: In another bowl, beat the cream cheese until smooth. Gradually add the heavy cream, powdered sugar, and vanilla extract, mixing until fluffy.
- Spread the Filling: Once the biscuit base is set, spread the cream filling evenly over the chilled base.
- Add Toppings: Sprinkle grated dark chocolate on top and add fresh berries if desired for a burst of color and flavor.
- Chill the Cake: Cover and refrigerate for at least 4 hours, or overnight for best results, allowing the cake to firm up.
- Serve: Once set, carefully remove the sides of the springform pan and slice to serve.
Chef’s Notes & Pro Tips for Flawless Results
- Make-Ahead Instructions: This cake can be made up to 2 days in advance and stored in the refrigerator, making it perfect for parties.
- Storage: Keep the cake covered in the fridge to maintain freshness. It can also be frozen for up to a month; just thaw in the fridge before serving.
- Equipment Recommendations: A high-quality electric mixer will yield the best results for the cream filling.
- Customization Options: Experiment with different toppings like caramel sauce, nuts, or seasonal fruits to suit your taste.
Avoid These Common Cooking Mistakes
- Not Chilling Long Enough: The cake may not hold its shape if not set properly. Always refrigerate for at least 4 hours.
- Overmixing the Cream: This can lead to a grainy texture. Mix just until combined and fluffy.
- Using Warm Butter: This can make the biscuit base too soft. Ensure butter is melted but not hot.
- Not Pressing the Base Firmly: A loose base can crumble when sliced. Press down firmly to compact.
- Skipping the Springform Pan: Using a regular pan can make removal difficult. Always use a springform for no-bake cakes.
- Not Using Enough Sugar: This can result in a bland filling. Adjust sugar to taste.
- Using Low-Fat Cream Cheese: This can affect the texture and flavor. Full-fat is recommended for best results.
Creative Variations & Customizations
- Chocolate Biscuit Base: Use chocolate digestive biscuits for a richer base.
- Fruit-Infused Cream: Add pureed fruits like strawberries or mango to the cream filling for a fruity twist.
- Nutty Addition: Incorporate crushed nuts into the biscuit base for added crunch and flavor.
- Seasonal Flavors: Experiment with pumpkin spice in the fall or peppermint extract during the winter holidays.
- Vegan Version: Substitute cream cheese with a vegan alternative and use coconut cream for the filling.
Perfect Pairings: What to Serve With No-Bake Biscuit Cake
- Whipped Cream: A dollop adds richness and complements the cake’s creaminess.
- Coffee or Tea: Balances the sweetness and enhances the dessert experience.
- Seasonal Fruits: Fresh strawberries or raspberries add a refreshing touch.
- Chocolate Sauce: Drizzling this on top elevates the indulgence factor.
- Vanilla Ice Cream: Provides a delightful contrast in temperature and texture.
- Dessert Wine: A glass of sweet dessert wine pairs beautifully with the cake.
- Mint Leaves: Garnishing with mint adds a refreshing finish.
- Light Fruit Salad: A side of fruit salad offers a balanced dessert option.
Storage & Meal Prep Instructions
- Refrigeration: Store the cake in the fridge for up to 2 days, covered to maintain freshness.
- Freezing: The cake can be frozen for up to a month. Wrap it tightly in plastic wrap and foil before freezing.
- Reheating: Thaw in the refrigerator overnight before serving; no reheating is necessary.
Nutrition Facts & Health Insights
| Nutrient | Amount per Serving (1 slice) |
|---|---|
| Calories | 350 |
| Sugar | 25 grams |
| Sodium | 150 milligrams |
| Fat | 25 grams |
| Saturated Fat | 15 grams |
| Unsaturated Fat | 5 grams |
| Trans Fat | 0 grams |
| Carbohydrates | 30 grams |
| Fiber | 1 gram |
| Protein | 4 grams |
| Cholesterol | 60 milligrams |
Health Benefits of Key Ingredients:
- Cream Cheese: Provides calcium and protein.
- Dark Chocolate: Rich in antioxidants and may improve heart health.
- Berries: High in vitamins and antioxidants, adding nutritional value.
Frequently Asked Questions
- Can I use a different type of biscuit?
Yes, any similar biscuit can work, but digestive biscuits provide the best texture. - How long can I store the cake?
It can be stored in the fridge for up to 2 days or frozen for a month. - Can I make this cake vegan?
Yes, substitute cream cheese with a vegan alternative and use coconut cream. - What if I don’t have a springform pan?
You can use a regular pan, but be cautious when removing the cake. - How can I adjust the sweetness?
Feel free to add more or less sugar to the cream filling based on your preference. - Is it necessary to chill the cake overnight?
While not mandatory, chilling overnight yields the best texture and flavor. - Can I add fruit to the filling?
Yes, pureed fruits can be mixed into the cream filling for added flavor. - What if my cream filling is too runny?
Ensure you’re using full-fat cream cheese and whip the cream until stiff peaks form.
Final Inspiration & Kitchen Confidence
As you embark on making this No-Bake Biscuit Cake, remember that every great dessert starts with a little creativity and a lot of love. Celebrate your achievements in the kitchen, whether it’s your first attempt or your hundredth. This cake is not just a recipe; it’s a canvas for your culinary expression. So gather your ingredients, invite friends or family to join in the fun, and create a dessert that will leave everyone craving more. Enjoy the process, and let your kitchen confidence shine!
Print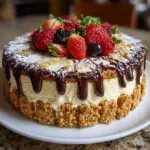
No-Bake Biscuit Cake: Creamy, Decadent Indulgence!
- Total Time: 4 hours 20 minutes
- Yield: 8 servings 1x
- Diet: Vegetarian
Description
This No-Bake Biscuit Cake is a delightful treat that combines the crunch of biscuits with a rich, creamy filling. Each bite offers a perfect balance of sweetness and texture, making it an indulgent dessert that melts in your mouth.
Ingredients
- For the Cake:
- 200g digestive biscuits, crushed
- 100g unsalted butter, melted
- 50g granulated sugar
- For the Cream Filling:
- 400g cream cheese, softened
- 200ml heavy cream
- 100g powdered sugar
- 1 tsp vanilla extract
- For the Topping:
- 50g dark chocolate, grated
- Fresh berries (optional)
Instructions
- In a large bowl, combine the crushed digestive biscuits with melted butter and granulated sugar until well mixed.
- Press the biscuit mixture firmly into the bottom of a 9-inch springform pan to form the base. Refrigerate for 30 minutes to set.
- In another bowl, beat the cream cheese until smooth. Gradually add the heavy cream, powdered sugar, and vanilla extract, mixing until fluffy.
- Spread the cream filling evenly over the chilled biscuit base.
- Sprinkle grated dark chocolate on top and add fresh berries if desired.
- Cover and refrigerate for at least 4 hours, or overnight for best results.
- Once set, carefully remove the sides of the springform pan and slice to serve.
Notes
- This cake can be made up to 2 days in advance and stored in the refrigerator.
- For a gluten-free version, use gluten-free biscuits.
- Feel free to substitute cream cheese with mascarpone for a different flavor profile.
- Prep Time: 20 minutes
- Cook Time: 0 minutes
- Category: desserts
- Method: no-bake
- Cuisine: American
Nutrition
- Serving Size: 1 slice (approximately 100g)
- Calories: 350
- Sugar: 25 grams
- Sodium: 150 milligrams
- Fat: 25 grams
- Saturated Fat: 15 grams
- Unsaturated Fat: 5 grams
- Trans Fat: 0 grams
- Carbohydrates: 30 grams
- Fiber: 1 gram
- Protein: 4 grams
- Cholesterol: 60 milligrams
Keywords: no-bake biscuit cake, dessert, easy cake recipe, creamy cake, chocolate dessert, no-bake dessert, biscuit cake, quick dessert, chilled cake, summer dessert, vegetarian dessert, indulgent treat, party cake
