
Introduction to No-Bake Kool-Aid Pie
As a passionate home cook, I often find myself reminiscing about the sweet, carefree days of summer. One of my fondest memories is making No-Bake Kool-Aid Pie with my family. This delightful dessert is not just a treat; it’s a burst of nostalgia wrapped in a creamy, colorful filling. The first time I made it, I was amazed at how simple it was to whip up something so delicious without turning on the oven. It felt like magic!
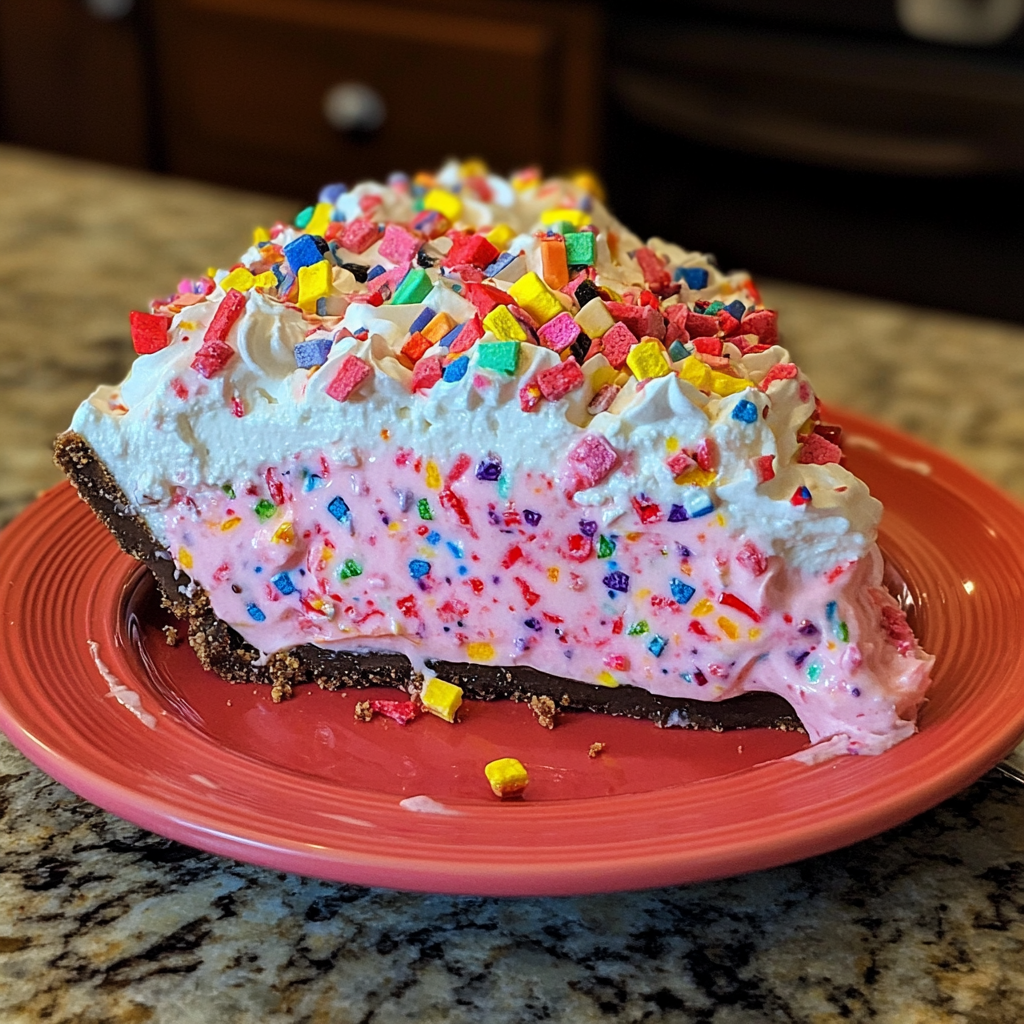
No-Bake Kool-Aid Pie is perfect for those hot summer days when you want something refreshing and fun. The vibrant colors of the Kool-Aid make it visually appealing, and the flavors are as bright as the sunshine. I remember serving it at a family picnic, and the smiles on everyone’s faces were priceless. It’s a dessert that brings people together, sparking laughter and joy with every slice.
What I love most about this pie is its versatility. You can choose any Kool-Aid flavor you like, making it a canvas for your creativity. Whether you prefer classic cherry, tangy lemon-lime, or even tropical punch, the possibilities are endless! Plus, it’s a fantastic way to get kids involved in the kitchen. They can help mix, pour, and, of course, taste along the way!
In this article, I’ll guide you through the ingredients, preparation steps, and tips to create your very own No-Bake Kool-Aid Pie. So, grab your mixing bowl and let’s dive into this delightful culinary adventure together!
Ingredients for No-Bake Kool-Aid Pie
Now that we’ve set the stage for our delicious No-Bake Kool-Aid Pie, let’s gather our ingredients! This part is like assembling a colorful puzzle, where each piece contributes to the final masterpiece. Here’s what you’ll need:
Main Ingredients
- 1 package (3 oz) of your favorite Kool-Aid flavor (I love using cherry or blue raspberry for that vibrant color!)
- 1 cup of boiling water
- 1 cup of cold water
- 1 can (14 oz) of sweetened condensed milk (this is the secret to that creamy texture!)
- 1 pre-made graham cracker pie crust (store-bought or homemade, both work wonderfully)
- 1 cup of whipped topping (like Cool Whip, for that light and fluffy finish)
When choosing your ingredients, I always recommend going for quality. A good brand of sweetened condensed milk can make a world of difference in flavor. And if you’re feeling adventurous, try making your own graham cracker crust! It’s easier than you think and adds a personal touch.
Optional Add-ons
- Fresh fruit (like strawberries or blueberries) for garnish
- Chocolate shavings or sprinkles for a fun twist
- A splash of lemon juice to brighten the flavors
- Additional whipped topping for extra fluffiness
These optional add-ons can elevate your No-Bake Kool-Aid Pie to a whole new level. I often like to add fresh fruit on top, as it not only looks beautiful but also adds a refreshing burst of flavor. Plus, it’s a great way to sneak in some healthy goodness!
With all your ingredients ready, we’re one step closer to creating this delightful dessert. Let’s move on to the next exciting part: preparing our No-Bake Kool-Aid Pie!
How to Prepare No-Bake Kool-Aid Pie
Now that we have our ingredients ready, it’s time to roll up our sleeves and dive into the fun part—preparing our No-Bake Kool-Aid Pie! This process is as easy as pie (pun intended!) and filled with delightful moments. Let’s get started!
Step 1: Prepare the Crust
The first step is to prepare the crust. If you’re using a store-bought graham cracker crust, you can skip this step. But if you’re feeling adventurous and want to make your own, here’s how:
- Crush about 1 ½ cups of graham crackers into fine crumbs.
- Mix the crumbs with ½ cup of melted butter and ¼ cup of sugar until well combined.
- Press the mixture firmly into a pie dish to form an even layer.
Once your crust is ready, pop it in the fridge for about 10 minutes to set. This little chill helps it hold its shape when we add the filling.
Tips for Choosing the Right Crust
If you’re short on time, a pre-made crust is a lifesaver! But if you want to add a personal touch, homemade is the way to go. You can even experiment with different types of cookies for a unique flavor. Think chocolate cookies or vanilla wafers—yum!
Step 2: Mix the Filling
Next up is mixing the filling, which is where the magic happens! In a large mixing bowl, follow these steps:
- Start by dissolving the Kool-Aid powder in 1 cup of boiling water. Stir until it’s completely dissolved.
- Add 1 cup of cold water to the mixture and stir again.
- Now, pour in the sweetened condensed milk and mix until everything is well combined.
- Finally, gently fold in the whipped topping until it’s light and fluffy.
Tips for Achieving the Perfect Consistency
Be careful not to overmix the whipped topping! You want to keep that airy texture. If you find the filling too thick, a splash of cold water can help loosen it up. Just remember, we want it creamy, not runny!
Step 3: Assemble the Pie
Now comes the fun part—assembling our pie! Carefully pour the filling into the prepared crust. Use a spatula to spread it evenly, making sure it reaches all the edges. This is where you can get creative!
- If you’re adding any optional toppings, like fresh fruit or chocolate shavings, sprinkle them on top now.
Tips for Layering Ingredients
For a beautiful presentation, try to layer the toppings in a way that showcases their colors. A rainbow of fruits can make your pie look like a work of art! Plus, it adds a delightful crunch and freshness.
Step 4: Chill the Pie
Once your pie is assembled, it’s time to chill! Cover it with plastic wrap and place it in the refrigerator. Let it chill for at least 4 hours, or overnight if you can wait that long.
Tips for Optimal Chilling Time
The longer you let it chill, the better the flavors meld together. I often make mine the night before a gathering, so it’s ready to impress the next day. Trust me, the anticipation makes the first bite even sweeter!
And there you have it! With these simple steps, you’re well on your way to creating a delightful No-Bake Kool-Aid Pie that will surely be a hit. Let’s move on to the next section, where we’ll talk about the equipment you’ll need for this fun culinary adventure!
Equipment Needed for No-Bake Kool-Aid Pie
Before we dive into the delicious world of No-Bake Kool-Aid Pie, let’s make sure we have all the right tools at our fingertips. The beauty of this recipe is that it doesn’t require fancy equipment. Here’s what you’ll need:
- Mixing Bowls: A large mixing bowl is essential for combining all those vibrant ingredients. I usually grab my trusty glass bowl, as it’s easy to see the colors mixing together!
- Measuring Cups and Spoons: Accurate measurements are key to achieving that perfect pie. A set of measuring cups and spoons will help you get it just right.
- Whisk or Electric Mixer: You can use a whisk to mix the filling by hand, but an electric mixer makes it a breeze! I love the fluffy texture I get when I use my mixer.
- Spatula: A rubber spatula is perfect for folding in the whipped topping and spreading the filling evenly in the crust.
- Pie Dish: A standard pie dish works best for this recipe. If you don’t have one, a round cake pan can be a great alternative!
- Plastic Wrap: This is essential for covering your pie while it chills in the fridge. It keeps everything fresh and prevents any unwanted odors from sneaking in.
With these simple tools, you’re all set to create your No-Bake Kool-Aid Pie! Remember, cooking is all about improvisation, so feel free to use what you have on hand. Now, let’s move on to the next exciting part of our culinary journey!
Variations of No-Bake Kool-Aid Pie
One of the things I adore about No-Bake Kool-Aid Pie is its flexibility. It’s like a blank canvas waiting for your creative touch! Here are a few fun variations that I’ve tried and loved:
- Fruit Fusion: Instead of just one flavor of Kool-Aid, why not mix two? I’ve combined cherry and lemon-lime for a zesty twist that’s bursting with flavor!
- Layered Delight: Create a layered pie by using different Kool-Aid flavors for each layer. Just let each layer chill slightly before adding the next for a stunning visual effect.
- Chocolate Lovers: For a chocolatey twist, add a layer of chocolate pudding beneath the Kool-Aid filling. The combination of flavors is simply divine!
- Frozen Treat: Turn your pie into a frozen dessert by placing it in the freezer instead of the fridge. Just remember to let it sit out for a few minutes before slicing!
These variations not only keep things exciting but also allow you to cater to different tastes. I love experimenting with flavors and toppings, and I encourage you to do the same! The sky’s the limit when it comes to creating your perfect No-Bake Kool-Aid Pie.
Cooking Notes for No-Bake Kool-Aid Pie
As I’ve journeyed through the delightful world of No-Bake Kool-Aid Pie, I’ve gathered a few cooking notes that can help you achieve the best results. These little nuggets of wisdom can make a big difference in your pie-making adventure!
- Temperature Matters: Make sure your boiling water is truly boiling when dissolving the Kool-Aid. This ensures that the powder mixes in smoothly, creating a vibrant filling.
- Chill Time: While I recommend at least 4 hours of chilling, overnight is even better! The longer it sits, the more the flavors meld together, creating a harmonious taste.
- Storage Tips: If you have leftovers (which is rare in my house!), cover the pie tightly with plastic wrap and store it in the fridge. It should stay fresh for up to 3 days.
- Experiment with Flavors: Don’t hesitate to try different Kool-Aid flavors or even mix them! Each flavor brings its own personality to the pie, making it a fun surprise every time.
- Presentation Counts: A sprinkle of fresh fruit or a drizzle of chocolate syrup on top can elevate your pie from simple to stunning. Remember, we eat with our eyes first!
These cooking notes are like little guiding stars on your culinary journey. They’ll help you navigate the process and create a No-Bake Kool-Aid Pie that’s not only delicious but also visually appealing. Now, let’s keep the momentum going and explore the serving suggestions for this delightful dessert!
Serving Suggestions for No-Bake Kool-Aid Pie
Now that our No-Bake Kool-Aid Pie is ready to dazzle, it’s time to think about how to serve it! Presentation can elevate this delightful dessert from simple to spectacular. Here are some of my favorite serving suggestions that always impress family and friends:
- Garnish with Fresh Fruit: A sprinkle of fresh berries or slices of kiwi on top not only adds a pop of color but also a refreshing taste. I love using strawberries for that sweet contrast!
- Drizzle of Chocolate: A light drizzle of chocolate syrup over the top can add a touch of decadence. It’s like a cherry on top, but even better!
- Serve with Whipped Cream: A dollop of extra whipped topping on each slice makes for a fluffy, indulgent experience. It’s like a cloud of sweetness!
- Pair with Ice Cream: For an extra treat, serve a slice alongside a scoop of vanilla or rainbow sherbet. The combination of flavors is simply delightful!
- Use Fun Plates: Don’t underestimate the power of presentation! Serving your pie on colorful or themed plates can make the dessert feel even more special.
These serving suggestions not only enhance the visual appeal but also add layers of flavor that make each bite a little adventure. I always find that the way we present food can spark joy and excitement, making the experience even more memorable. So, gather your loved ones, slice up that beautiful pie, and enjoy every delicious moment together!
Tips for Making No-Bake Kool-Aid Pie
As I’ve whipped up my fair share of No-Bake Kool-Aid Pies, I’ve gathered some handy tips that can make your pie-making experience even smoother and more enjoyable. These little nuggets of wisdom can help you avoid common pitfalls and ensure your pie turns out perfectly every time!
- Read the Instructions: Before diving in, take a moment to read through the entire recipe. This helps you understand the steps and gather everything you need, making the process seamless.
- Use Cold Ingredients: For the best results, make sure your cold water and whipped topping are chilled. This helps maintain that light and fluffy texture we all love!
- Mix Gently: When folding in the whipped topping, be gentle! This keeps the filling airy and prevents it from deflating. Think of it as cradling a delicate cloud!
- Customize Your Flavor: Don’t be afraid to experiment with different Kool-Aid flavors or even mix them together. Each combination can create a unique taste adventure!
- Chill Longer for Best Flavor: If you can, let your pie chill overnight. The flavors meld beautifully, and the pie sets up perfectly, making each slice a delightful treat.
With these tips in your back pocket, you’re ready to create a No-Bake Kool-Aid Pie that’s not only delicious but also a joy to make. Remember, cooking is all about having fun and expressing your creativity, so enjoy every moment of this sweet adventure!
Breakdown of Time for No-Bake Kool-Aid Pie
As a home cook, I know that time management is key in the kitchen. When it comes to making No-Bake Kool-Aid Pie, it’s all about balancing preparation and chilling time. Here’s a quick breakdown to help you plan your culinary adventure:
- Prep Time: Approximately 20 minutes. This includes gathering your ingredients, preparing the crust, and mixing the filling. It’s a fun and quick process that gets you excited for the final result!
- Chilling Time: At least 4 hours. This is crucial for allowing the flavors to meld and the pie to set properly. If you can, I highly recommend letting it chill overnight for the best taste!
- Total Time: About 4 hours and 20 minutes (or longer if you choose to chill overnight). This total time includes both the prep and chilling phases, making it a perfect dessert to prepare ahead of time.
With this time breakdown, you can easily fit making No-Bake Kool-Aid Pie into your day. Whether it’s for a family gathering or a simple weeknight treat, knowing how long each step takes helps you plan better. So, roll up your sleeves, and let’s get started on this delightful dessert!
Nutritional Information for No-Bake Kool-Aid Pie
As a passionate home cook, I believe that enjoying dessert doesn’t have to come with guilt. While No-Bake Kool-Aid Pie is a sweet treat, it’s good to know what you’re indulging in. Here’s a general breakdown of the nutritional information per slice (assuming the pie is cut into 8 slices):
- Calories: Approximately 200 calories
- Fat: 8g (mostly from the whipped topping and crust)
- Carbohydrates: 30g (thanks to the sweetened condensed milk and Kool-Aid)
- Sugar: 20g (from the Kool-Aid and sweetened condensed milk)
- Protein: 2g (a small amount from the sweetened condensed milk)
Keep in mind that these values can vary based on the specific ingredients you choose, especially if you opt for low-fat or sugar-free alternatives. I often like to balance my dessert with a healthy meal earlier in the day, so I can enjoy a slice of this delightful pie without worry. Remember, moderation is key, and sharing with friends and family makes it even sweeter!
Frequently Asked Questions about No-Bake Kool-Aid Pie
As I’ve shared my love for No-Bake Kool-Aid Pie, I’ve often encountered some common questions from fellow home cooks and dessert enthusiasts. I’m excited to address these queries, as they can help you navigate your own pie-making adventure with ease. Here are some frequently asked questions that I hope will inspire you to create your own delicious masterpiece!
Can I use sugar-free Kool-Aid for this recipe?
Absolutely! Using sugar-free Kool-Aid is a great way to enjoy this pie with fewer calories. The flavor will still shine through, and you won’t miss out on the fun!
How long does No-Bake Kool-Aid Pie last in the fridge?
When stored properly, your pie can last up to 3 days in the fridge. Just make sure to cover it tightly with plastic wrap to keep it fresh and prevent any odors from sneaking in.
Can I freeze No-Bake Kool-Aid Pie?
Yes, you can freeze it! Just remember to let it thaw for a few minutes at room temperature before slicing. The texture may change slightly, but it’s still a delightful treat!
What’s the best way to slice the pie?
To get clean slices, I recommend using a sharp knife that’s been dipped in warm water. This helps the knife glide through the pie smoothly, giving you those perfect, picture-worthy slices!
Can I make this pie ahead of time?
Definitely! In fact, making it a day in advance is a fantastic idea. The flavors meld beautifully overnight, and you’ll have a delicious dessert ready to impress your guests!
What if I don’t have a graham cracker crust?
No worries! You can use any pre-made pie crust you have on hand, or even make a crust from crushed cookies like Oreos or vanilla wafers. The possibilities are endless!
These questions reflect the curiosity and creativity that come with making No-Bake Kool-Aid Pie. I hope my answers inspire you to dive into this delightful dessert and make it your own. Remember, cooking is all about having fun and experimenting, so don’t hesitate to ask your own questions along the way!
Conclusion on No-Bake Kool-Aid Pie
As I wrap up this delightful journey into the world of No-Bake Kool-Aid Pie, I can’t help but smile at the memories and joy this dessert brings. It’s more than just a recipe; it’s a celebration of creativity, family, and the simple pleasures of life. The vibrant colors and refreshing flavors make it a perfect treat for any occasion, whether it’s a sunny picnic or a cozy family gathering.
What I love most about this pie is its versatility. You can customize it to suit your taste, making it a fun project for both kids and adults alike. Plus, the no-bake aspect means you can whip it up without breaking a sweat, leaving you more time to enjoy the company of loved ones.
So, whether you’re a seasoned home cook or just starting your culinary adventure, I encourage you to give No-Bake Kool-Aid Pie a try. It’s a sweet reminder that cooking can be fun, easy, and filled with love. Grab your favorite Kool-Aid flavor, gather your ingredients, and let the magic unfold. Happy baking!
