
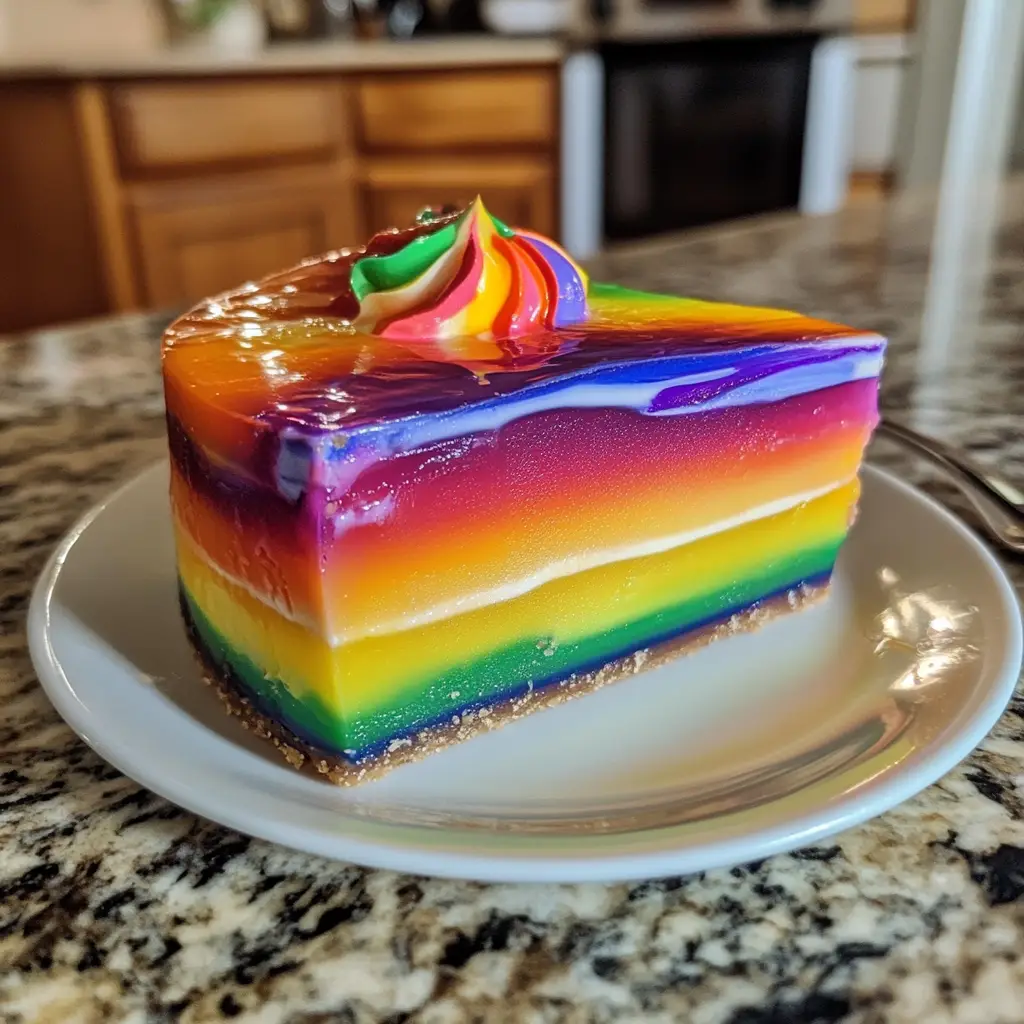
Introduction to No-Bake Rainbow Jello Cheesecake Recipe
As a passionate home cook, I find joy in creating desserts that not only taste delightful but also look like a work of art. One of my all-time favorites is the No-Bake Rainbow Jello Cheesecake. This vibrant dessert is a feast for the eyes and the taste buds, making it perfect for any celebration or just a fun family treat. I remember the first time I made it; the kitchen was filled with laughter and excitement as my kids watched the colorful layers come to life. It felt like a magical science experiment, and the best part? No oven required!
This recipe is a wonderful blend of creamy cheesecake and fruity jello, layered together to create a rainbow effect that’s sure to impress. It’s light, refreshing, and perfect for warm days when you want something sweet without the heaviness of traditional baked desserts. Plus, it’s incredibly easy to make, which is a huge bonus for busy cooks like me!
Whether you’re hosting a birthday party, a summer barbecue, or simply want to brighten up a regular weeknight, this No-Bake Rainbow Jello Cheesecake is the answer. I love how it brings everyone together, sparking joy and smiles with each colorful slice. So, grab your mixing bowls and let’s dive into this delightful recipe that’s as fun to make as it is to eat!
Ingredients for No-Bake Rainbow Jello Cheesecake Recipe
Before we embark on this colorful culinary adventure, let’s gather our ingredients. I always believe that quality matters, especially when it comes to desserts. Using fresh and vibrant ingredients can make a world of difference in flavor and presentation. Here’s what you’ll need to create this stunning No-Bake Rainbow Jello Cheesecake.
Main Ingredients
- 1 ½ cups graham cracker crumbs
- ½ cup unsalted butter, melted
- 2 cups cream cheese, softened
- 1 cup powdered sugar
- 1 teaspoon vanilla extract
- 2 cups heavy whipping cream
- 3 cups boiling water
- 3 (3-ounce) packages of flavored gelatin (Jello) in assorted colors
- 1 cup cold water
For the crust, I prefer using unsalted butter to control the saltiness, but if you only have salted butter, it works too! Just adjust the amount of salt in the recipe accordingly.
Optional Add-ons
- Fresh fruit for garnish (like strawberries, blueberries, or kiwi)
- Whipped cream for topping
- Chocolate shavings for a decadent touch
- Food coloring to enhance the Jello colors (if desired)
Feel free to get creative with the optional add-ons! I often add fresh fruit on top for a pop of color and a burst of flavor. It’s like adding a cherry on top of an already fabulous sundae!
Now that we have our ingredients ready, let’s move on to the fun part—preparing this delightful No-Bake Rainbow Jello Cheesecake!
How to Prepare No-Bake Rainbow Jello Cheesecake Recipe
Now that we have our ingredients all lined up, it’s time to roll up our sleeves and get to the fun part—preparing this colorful masterpiece! I love how each step brings us closer to that beautiful, layered dessert. Let’s dive in!
Step 1: Prepare the Crust
First things first, we need to create a solid foundation for our cheesecake. The crust is like the canvas for our colorful layers, so let’s make it count!
- In a mixing bowl, combine the graham cracker crumbs and melted butter. Stir until the crumbs are evenly coated.
- Press the mixture firmly into the bottom of a 9-inch springform pan. Make sure it’s packed tightly to hold up the layers above.
- Place the crust in the refrigerator to set while we prepare the filling.
Tips for a Perfect Crust
To achieve a perfect crust, I recommend using a flat-bottomed measuring cup to press the crumbs down evenly. This helps create a sturdy base that won’t crumble when you slice into the cheesecake. If you want a little extra flavor, try adding a pinch of cinnamon to the graham cracker mixture!
Step 2: Make the Cheesecake Filling
With the crust chilling, it’s time to whip up the creamy cheesecake filling. This is where the magic happens!
- In a large mixing bowl, beat the softened cream cheese until smooth and creamy.
- Add the powdered sugar and vanilla extract, mixing until well combined.
- In a separate bowl, whip the heavy cream until stiff peaks form. Gently fold the whipped cream into the cream cheese mixture until fully incorporated.
Tips for Creamy Filling
For a super creamy filling, make sure your cream cheese is at room temperature. This helps it blend smoothly without lumps. Also, folding the whipped cream gently is key; you want to keep that light and airy texture!
Step 3: Prepare the Jello Layers
Now comes the fun part—creating those vibrant Jello layers! Each layer adds a splash of color and flavor.
- In a bowl, dissolve one package of flavored gelatin in 1 cup of boiling water. Stir until completely dissolved.
- Add 1/3 cup of cold water to the gelatin mixture and let it cool slightly.
- Once cooled, pour a thin layer of the gelatin over the cheesecake filling in the springform pan. Place it in the refrigerator to set for about 30 minutes.
- Repeat this process with the remaining Jello flavors, layering them one at a time, allowing each layer to set before adding the next.
Tips for Layering Jello
To create clean layers, make sure each Jello layer is fully set before adding the next. I like to use a spoon to gently pour the Jello over the back of the spoon, which helps it spread evenly without disturbing the layers below.
Step 4: Assemble the No-Bake Rainbow Jello Cheesecake
Once all the layers are set, it’s time to bring everything together! This is where the beauty of our No-Bake Rainbow Jello Cheesecake truly shines.
- After the final Jello layer has set, carefully remove the cheesecake from the springform pan.
- Garnish with fresh fruit, whipped cream, or chocolate shavings if desired.
- Slice into wedges and serve chilled. Enjoy the colorful layers with every bite!
Tips for Assembly
When removing the cheesecake from the pan, run a knife around the edge to loosen it. This helps prevent any sticking. And don’t forget to take a moment to admire your creation before diving in—it’s a true work of art!
Equipment Needed for No-Bake Rainbow Jello Cheesecake Recipe
Before we dive into the kitchen, let’s gather the essential tools that will help us create this stunning No-Bake Rainbow Jello Cheesecake. Having the right equipment makes the process smoother and more enjoyable. Here’s what you’ll need:
- 9-inch springform pan: This is perfect for easy removal of the cheesecake once it’s set. If you don’t have one, a regular pie dish will work, but be careful when serving.
- Mixing bowls: I recommend having at least two—one for the cheesecake filling and another for the Jello layers. It keeps things organized and makes mixing easier.
- Electric mixer: A hand mixer or stand mixer is ideal for whipping the cream and blending the cheesecake filling. If you don’t have one, a whisk will do, but it’ll take a bit more elbow grease!
- Measuring cups and spoons: Accurate measurements are key to a successful cheesecake, so make sure you have these handy.
- Spatula: A rubber spatula is great for folding in the whipped cream and scraping down the sides of the bowls.
- Whisk: This is useful for mixing the gelatin and water together. A whisk helps ensure everything is well combined.
- Refrigerator: While not a tool per se, you’ll need a fridge to chill the cheesecake and set those beautiful layers!
With these tools at your side, you’ll be well-equipped to tackle this colorful dessert. Remember, cooking is all about having fun, so don’t stress if you don’t have every single item. Get creative with what you have, and let’s make some magic happen in the kitchen!
Variations of No-Bake Rainbow Jello Cheesecake Recipe
As I’ve experimented with my No-Bake Rainbow Jello Cheesecake, I’ve discovered that there are endless ways to put a personal twist on this delightful dessert. Each variation brings its own unique flavor and flair, making it even more fun to create. Here are a few ideas that I absolutely love:
- Fruit-Infused Layers: Instead of using flavored gelatin, try incorporating real fruit puree into your layers. Blending strawberries, mangoes, or blueberries with a bit of sugar can create a fresh and fruity twist that’s bursting with flavor!
- Chocolate Cheesecake Base: For chocolate lovers, mix in some cocoa powder into the cheesecake filling. This adds a rich, chocolatey flavor that pairs beautifully with the fruity Jello layers.
- Nutty Crust: Swap out the graham cracker crumbs for crushed nuts or cookies, like Oreos or almond cookies. This adds a delightful crunch and a different flavor profile to the crust.
- Layered with Yogurt: For a healthier option, you can replace some of the cream cheese with Greek yogurt. This gives the cheesecake a tangy flavor while still keeping it creamy and delicious.
- Seasonal Themes: Change the colors and flavors of the Jello to match the seasons or holidays. For instance, use red and green for Christmas or pastel colors for Easter. It’s a fun way to celebrate with your dessert!
These variations not only keep things exciting but also allow you to cater to different tastes and preferences. I love how a simple recipe can transform into something new and delightful with just a few tweaks. So, don’t hesitate to get creative and make this No-Bake Rainbow Jello Cheesecake your own!
Cooking Notes for No-Bake Rainbow Jello Cheesecake Recipe
As I’ve whipped up this No-Bake Rainbow Jello Cheesecake, I’ve learned a few handy tips that can make your baking experience even smoother. These cooking notes are like little nuggets of wisdom that I wish I had known from the start!
- Chill Time is Key: Patience is a virtue when it comes to this dessert. Each layer of Jello needs to set properly before adding the next. I usually set a timer to ensure I don’t rush this step. Trust me, it’s worth the wait!
- Room Temperature Ingredients: For the best results, make sure your cream cheese and heavy cream are at room temperature. This helps them blend together seamlessly, creating that luscious filling we all love.
- Use Boiling Water: When dissolving the gelatin, always use boiling water. It ensures that the gelatin fully dissolves, preventing any graininess in your final dessert.
- Keep It Covered: Once your cheesecake is assembled, cover it with plastic wrap or a lid while it chills in the fridge. This prevents any unwanted odors from the fridge from sneaking into your beautiful creation.
- Serving Tip: For clean slices, dip your knife in hot water before cutting. Wipe it dry between slices for that picture-perfect look!
These cooking notes have made my journey with the No-Bake Rainbow Jello Cheesecake even more enjoyable. I hope they help you too! Remember, cooking is all about learning and having fun, so don’t hesitate to experiment and find what works best for you.
Serving Suggestions for No-Bake Rainbow Jello Cheesecake Recipe
When it comes to serving my No-Bake Rainbow Jello Cheesecake, I love to make it a special occasion, no matter the day! Presentation is key, and there are so many fun ways to serve this colorful dessert that can elevate its appeal. Here are some of my favorite serving suggestions:
- Individual Portions: For a fun twist, consider serving the cheesecake in individual cups or jars. This not only makes for a beautiful presentation but also allows guests to enjoy their own personal dessert. Plus, it’s perfect for parties!
- Garnish with Fresh Fruit: I often top each slice with a medley of fresh fruits like strawberries, blueberries, or kiwi. The vibrant colors pop against the cheesecake, making it even more eye-catching!
- Whipped Cream Swirls: A dollop of whipped cream on top adds a creamy touch. You can even pipe it into fun shapes for a more decorative look. It’s like adding a fluffy cloud to your rainbow!
- Chocolate Drizzle: For those who love a bit of decadence, a drizzle of chocolate sauce over the top can take this dessert to the next level. It adds a rich flavor that complements the fruity layers beautifully.
- Serve with a Side of Ice Cream: Pairing a slice of cheesecake with a scoop of vanilla or fruit-flavored ice cream creates a delightful contrast in textures and flavors. It’s a match made in dessert heaven!
These serving suggestions not only enhance the visual appeal of the No-Bake Rainbow Jello Cheesecake but also add layers of flavor and fun. I love how a little creativity can turn a simple dessert into a showstopper that everyone will remember. So, get ready to impress your family and friends with this colorful delight!
Tips for Making No-Bake Rainbow Jello Cheesecake Recipe
As I’ve crafted my No-Bake Rainbow Jello Cheesecake, I’ve gathered a treasure trove of tips that can help you create your own masterpiece with ease. These little nuggets of wisdom can make all the difference in achieving that perfect, colorful dessert. Here are my top tips to ensure your cheesecake turns out beautifully:
- Prep Ahead: If you’re short on time, consider preparing the crust and cheesecake filling a day in advance. This way, you can focus on layering the Jello the next day without feeling rushed.
- Use Gelatin Wisely: When dissolving the gelatin, make sure to stir it well until fully dissolved. This prevents any lumps from forming in your layers, ensuring a smooth finish.
- Layer with Love: Pour each Jello layer slowly and gently over the cheesecake filling. This helps maintain the integrity of the layers and keeps them looking vibrant and distinct.
- Chill Between Steps: Don’t skip the chilling time! Allow each layer to set completely before adding the next. This patience pays off with stunning, clean layers.
- Experiment with Flavors: Don’t be afraid to mix and match Jello flavors! Combining different fruity flavors can create a delightful surprise in every bite.
These tips have made my journey with the No-Bake Rainbow Jello Cheesecake even more enjoyable and successful. Remember, cooking is all about having fun and experimenting, so embrace the process and let your creativity shine!
Breakdown of Time for No-Bake Rainbow Jello Cheesecake Recipe
As a home cook, I know that time management is key when preparing a delightful dessert like the No-Bake Rainbow Jello Cheesecake. It’s important to plan ahead so you can enjoy the process without feeling rushed. Here’s a simple breakdown of the time you’ll need to create this colorful masterpiece:
- Prep Time: Approximately 30 minutes. This includes gathering your ingredients, preparing the crust, and mixing the cheesecake filling.
- Chilling Time: About 4 to 6 hours. Each Jello layer needs time to set, so be sure to allow for this crucial step. I often make it the night before to let it chill overnight!
- Total Time: Roughly 4 to 6 hours and 30 minutes. This total includes both the prep time and the chilling time, ensuring your cheesecake is perfectly set and ready to impress.
By breaking down the time, you can easily plan your day around making this stunning dessert. I love how a little organization can lead to a beautiful creation that brings joy to my family and friends. So, grab your ingredients and let’s get started on this colorful journey!
Nutritional Information for No-Bake Rainbow Jello Cheesecake Recipe
As a passionate home cook, I always find it helpful to know the nutritional information of the dishes I prepare. It allows me to enjoy my creations while being mindful of what I’m serving to my family. Here’s a general breakdown of the nutritional content for a slice of No-Bake Rainbow Jello Cheesecake, based on a standard 12-serving recipe:
- Calories: Approximately 250 calories per slice
- Fat: 15 grams (of which saturated fat is about 9 grams)
- Carbohydrates: 30 grams (including about 20 grams of sugar)
- Protein: 3 grams
- Sodium: 150 milligrams
Keep in mind that these values can vary based on the specific brands of ingredients you use and any optional add-ons you choose to include. For instance, using low-fat cream cheese or sugar-free gelatin can help reduce calories and sugar content. I love experimenting with healthier alternatives while still keeping the dessert delicious!
Enjoying a slice of this colorful cheesecake is a delightful treat, and knowing the nutritional information helps me balance indulgence with a healthy lifestyle. So, whether you’re celebrating a special occasion or just treating yourself, this No-Bake Rainbow Jello Cheesecake is a fun and vibrant choice!
Frequently Asked Questions about No-Bake Rainbow Jello Cheesecake Recipe
As I’ve shared my No-Bake Rainbow Jello Cheesecake with friends and family, I’ve received a lot of questions about this colorful dessert. It’s always fun to see the excitement on their faces when they learn how easy it is to make! Here are some of the most frequently asked questions I’ve encountered, along with my answers to help you on your culinary journey.
Can I use different flavors of Jello?
Absolutely! One of the best parts of this recipe is the versatility of flavors. You can mix and match your favorite Jello flavors to create a unique taste experience. I often use fruity flavors like strawberry, orange, and blue raspberry, but feel free to get creative!
How long does the cheesecake last in the fridge?
This No-Bake Rainbow Jello Cheesecake can last up to 5 days in the refrigerator if stored properly. Just make sure to cover it with plastic wrap or a lid to keep it fresh. However, I doubt it will last that long—everyone loves it too much!
Can I make this cheesecake ahead of time?
Yes! In fact, I recommend making it a day in advance. This allows the layers to set perfectly and gives you one less thing to worry about on the day of your event. Just remember to keep it chilled until you’re ready to serve!
What if I don’t have a springform pan?
If you don’t have a springform pan, don’t fret! You can use a regular pie dish or a square baking dish. Just be careful when serving, as it may be a bit trickier to remove the cheesecake from a non-springform pan. A spatula can help you scoop out those delicious slices!
Can I freeze the No-Bake Rainbow Jello Cheesecake?
Yes, you can freeze it! Just make sure to wrap it tightly in plastic wrap and then in aluminum foil to prevent freezer burn. When you’re ready to enjoy it, let it thaw in the refrigerator overnight. The texture may change slightly, but it will still be delicious!
These questions reflect the curiosity and excitement that come with making this delightful dessert. I hope my answers help you feel more confident as you embark on your own No-Bake Rainbow Jello Cheesecake adventure. Remember, cooking is all about having fun and sharing joy with others, so don’t hesitate to reach out if you have more questions!
Conclusion on No-Bake Rainbow Jello Cheesecake Recipe
As I wrap up my journey with the No-Bake Rainbow Jello Cheesecake, I can’t help but smile at the memories it has created in my kitchen. This dessert is not just a treat; it’s a celebration of color, flavor, and creativity. The vibrant layers of fruity Jello combined with the creamy cheesecake filling make it a delightful experience for both the eyes and the taste buds.
What I love most about this recipe is its versatility. Whether you’re hosting a birthday party, a summer barbecue, or simply want to brighten up a weeknight dinner, this cheesecake fits the bill perfectly. It’s easy to make, requires no baking, and can be customized to suit any occasion or personal taste. Plus, it’s a fantastic way to get the kids involved in the kitchen, sparking their creativity as they help layer the colors.
So, if you’re looking for a dessert that brings joy and smiles to your table, look no further than this No-Bake Rainbow Jello Cheesecake. It’s a sweet reminder that cooking can be fun, colorful, and full of love. I can’t wait for you to try it and create your own delicious memories!
