
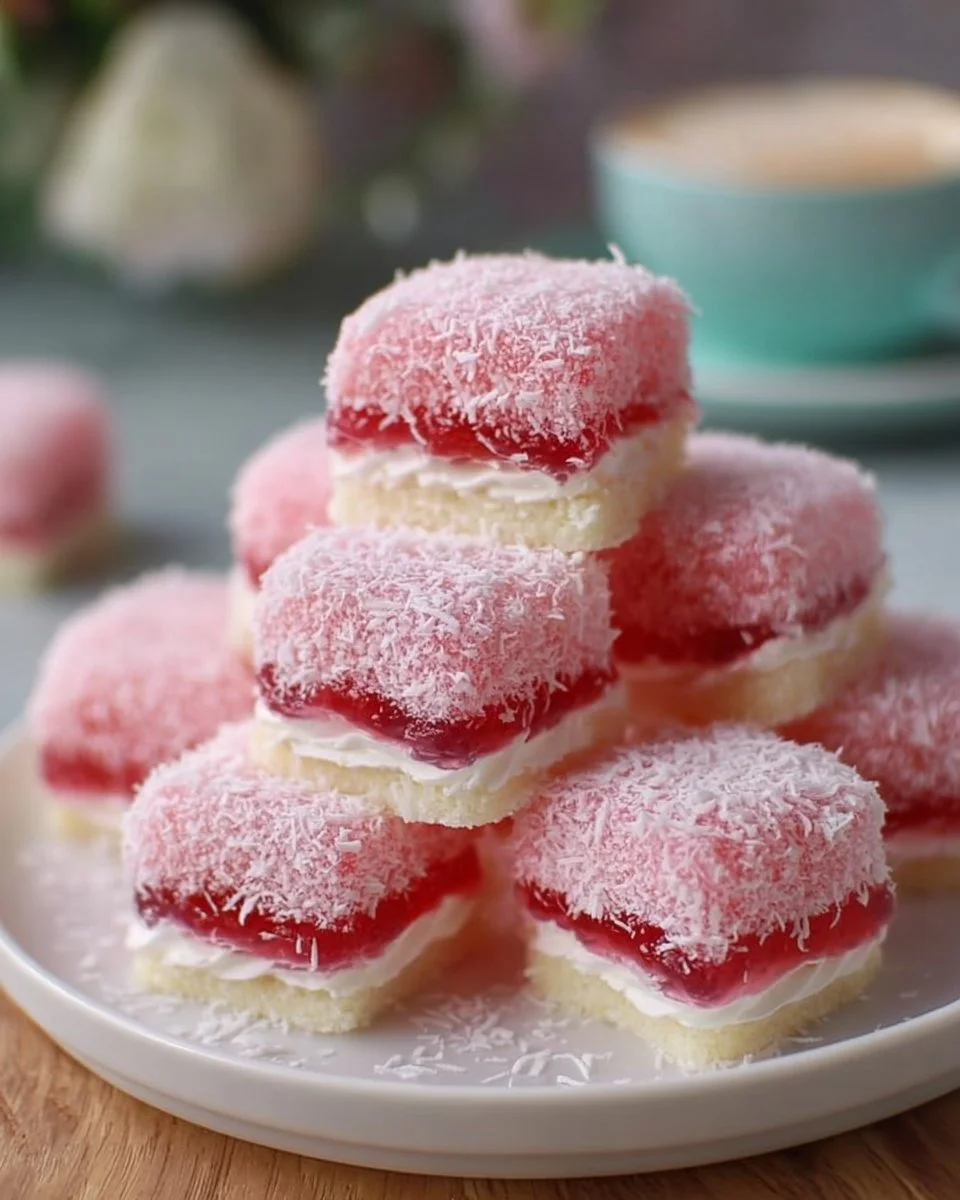
Indulging in the tender embrace of a delightful Old-Fashioned Pink Jelly Cake transports you back to a simpler time, where dessert beckoned from the kitchen as if whispering sweet secrets. Imagine lifting a fluffy, lightly golden cake from its patty pan, still warm and fragrant, and as you take a moment to savor its gentle aroma, it wafts through the air like a nostalgic embrace. The exterior invites you with its soft texture, while the rich, fruity jelly center waits within like a hidden treasure. Encased in a soft, cloud-like sponge, coated in delicate coconut, and finished with a luscious dollop of whipped cream, each bite unfolds a symphony of flavors and nostalgia, capturing the essence of childhood treats.
The contrast of textures plays a delightful game on your palate. As you sink your teeth into the sponge cake, the lightness crumbles effortlessly, revealing a jewel-bright burst of strawberry goodness that dances through the creamy whipped cream. It feels like biting into a cloud of joy, where every element sings in harmony — the sweetness of the jelly, the airy softness of the cake, and the luxurious creaminess of your garnish tantalize your taste buds. This vibrant dessert doesn’t just satisfy a sweet craving; it wraps you in a comforting hug, sparking cherished memories with every taste.
When you pop these charming cakes onto a platter, they catch the light just right, tempting everyone around the table. Heartfelt conversations and laughter fill the air, enhanced by the joyful colors of this dessert. Perfect for birthdays, afternoon tea, or simply because you deserve a little sweetness in your life, Old-Fashioned Pink Jelly Cakes create unforgettable moments that linger in the heart long after the last crumb disappears.
Why You’ll Love This Old-Fashioned Pink Jelly Cake
Old-Fashioned Pink Jelly Cakes are not just desserts; they are gateways to cherished memories and joyful occasions. With a delightful sweetness that doesn’t overwhelm, they stand out, inviting everyone for a second helping. Each layer of flavor adds another dimension, making it a perfect delight for both young and grown-up palates. The combination of the soft sponge cake, the fruity jelly, and the decadent whipped cream makes these cakes an extraordinary treat that simply shouts happiness.
One of the best things about these cakes is their versatility. They shine during birthdays, afternoon teas, holiday gatherings, or just as a surprise for yourself on a quiet Sunday afternoon. Their vibrant look and delightful textures appeal to the eye first and will leave your guests awe-struck. You’ll love how they spark joy wherever you bring them, transforming any moment into a celebration with just a tray of these vibrant, fluffy beauties.
Preparation Phase & Tools to Use
To bring Old-Fashioned Pink Jelly Cakes to life, gather your essential tools. Each one plays a significant role in crafting these delightful confections:
- Patty-Pan Tins: These molds shape the cakes perfectly, allowing for an even bake and delightful individual servings. Ideal for portion control!
- Electric Mixer: A powerful mixer makes whipping the batter a breeze, achieving that fluffy texture that holds your jelly so beautifully. If you’d like, whisking by hand is an option, but prepare for a workout!
- Mixing Bowls: A set of different-sized bowls aids in preparing both the batter and the jelly mixture separately without confusion.
- Slotted Spoon: Essential for dipping your little cakes into the jelly without them getting overly saturated, ensuring just the right amount of flavor envelops each bite.
Practical Preparation Tips
Begin with your ingredients at room temperature for easier mixing. Always ensure your oven preheats fully before placing your cakes in. This guarantees that they rise beautifully, achieving that perfect lightness. Remember to also grease your patty-pan tins adequately; no one wants to leave a delicious cake behind in the pan!
Ingredients for Old-Fashioned Pink Jelly Cakes
Here’s what you’ll need to create these scrumptious cakes:
- 80g butter, softened – Brings richness and flavor.
- 1/2 cup (110g) caster sugar – Perfectly fine sugar for a sweet, even texture.
- 1 tsp vanilla extract – Infuses the batter with warmth and depth.
- 1 egg – Acts as a binder and adds moisture.
- 2/3 cup (160g) milk – Creates a tender crumb.
- 1 cup (130g) self-raising flour, sifted – Ensures a light and fluffy texture.
- 85g packet strawberry jelly crystals – The star of the show, bringing that vibrant pink and fruity flavor.
- 1 cup (240g) boiling water – Dissolves the jelly crystals.
- 1 cup (240g) cold water – Balances the mixture for the perfect jelly texture.
- 3 1/2 cups (280g) desiccated coconut – Coats the cakes, adding a delightful chew and tropical feel.
- 1 cup (240g) whipped cream – For that luscious finish that ties everything together.
For substitutions, if you can’t find caster sugar, granulated sugar works well. You could use coconut cream in place of regular whipped cream for a dairy-free option. Any berry jelly can replace strawberry if you want to explore new flavors!
How to Make Old-Fashioned Pink Jelly Cakes
- Preheat your Oven: Set your oven to 175°C (fan-forced).
- Grease Your Tins: Lightly grease two 12-hole patty-pan tins to ensure easy cake removal.
- Cream Together: In a large bowl, combine the softened butter, caster sugar, and vanilla extract. Beat with an electric mixer until pale and fluffy.
- Add the Egg: Crack in the egg and beat until fully incorporated, ensuring the mixture is smooth and cohesive.
- Incorporate Milk and Flour: Gently fold, alternating between the milk and sifted self-raising flour in two batches to maintain that fluffy texture.
- Fill the Tins: Spoon the batter into the prepared patty-pan holes, filling each just below the top for even baking.
- Bake: Place in the oven and bake for 15–18 minutes or until lightly golden. A skewer inserted should come out clean.
- Cool: Allow the cakes to cool in the tin for 5 minutes, then transfer to a wire rack to cool completely.
- Prepare the Jelly: In a separate bowl, dissolve the jelly crystals in boiling water and stir in the cold water. Let it refrigerate until partially set (about 1–2 hours).
- Dip into Jelly: Using a slotted spoon, carefully dip each cooled cake into the jelly mixture, allowing excess to drip off.
- Roll in Coconut: Immediately roll each jelly-coated cake in desiccated coconut.
- Assemble the Cakes: Spoon a generous amount of whipped cream onto one half of a cake and sandwich it with another half.
- Chill: Place assembled cakes in the fridge for 30 minutes to set the jelly before serving.
Chef’s Notes & Helpful Tips
- Make-Ahead: Prepare the cakes a day in advance, allowing you to chill them overnight for an excellent flavor meld.
- Cooking Alternatives: You can adapt this recipe for an air fryer! Bake at the same temperature for about 10–12 minutes, monitoring closely to avoid overbaking.
- Customization Ideas: Experiment with filling flavors! Lemon cream or chocolate ganache can be mouthwatering alternatives to whipped cream.
Common Mistakes to Avoid
- Overmixing the Batter: This can lead to tough cakes; mix until just combined to retain that light texture.
- Saturated Cakes: When dipping, ensure you allow excess jelly to drip off. Too much jelly can make the cakes soggy and lose their delightful structure.
- Skipping the Cooling Step: If you skip cooling the cakes, the jelly may dissolve upon contact, leading to messy results!
What to Serve With Old-Fashioned Pink Jelly Cakes
Serve these beautiful cakes alongside delightful accompaniments that elevate the experience:
- Fresh Berries: Strawberries or blueberries add a fresh touch, enhancing the sweet flavors.
- Tea: A warm cup of Earl Grey or classic English Breakfast complements the sweetness beautifully.
- Coffee: A rich cappuccino or a smooth latte balances the sugary bliss with a touch of bitterness.
- Vanilla Ice Cream: A scoop of creamy vanilla provides a cool contrast to the warmth of the cake.
- Lemon Curd: The tangy flavor cuts through the sweetness, creating a delightful combination.
- Chilled Sparkling Water or Lemonade: Refreshing beverages keep the palate refreshed and ready for more.
- Chocolate Sauce: Drizzle over the top before serving for a decadent finish!
Storage & Reheating Instructions
Store any leftover Old-Fashioned Pink Jelly Cakes in an airtight container in the refrigerator for up to three days, ensuring they stay fresh and vibrant. You can freeze uncoated cakes for up to a month—just thaw in the refrigerator before dipping and coating with jelly and coconut. To reheat, place in the microwave for about 10-15 seconds; skip reheating entirely to maintain the integrity of the jelly.
Estimated Nutrition Information
Approximately per cake:
- Calories: 180
- Total Fat: 7g
- Saturated Fat: 4g
- Carbohydrates: 28g
- Sugars: 12g
- Protein: 2g
(Note: Nutritional values may vary based on ingredient brands and cooking methods.)
FAQs
1. Can I make these jelly cakes gluten-free?
Absolutely! Substitute your self-raising flour with a gluten-free blend or almond flour. Just ensure your jelly is gluten-free as well.
2. How long will the jelly cakes last?
Properly stored in the fridge, they will last up to three days. However, they are best enjoyed fresh!
3. Can I use a different flavor of jelly?
Yes! While strawberry jelly brings a classic feel, feel free to experiment with raspberry, cherry, or even tropical mango flavors for a unique twist.
4. What can I do if the jelly doesn’t set properly?
If your jelly doesn’t set, it might be from using water that’s too cold. Ensure boiling water fully dissolves the jelly crystals before adding the cold water.
5. Can I replace the egg in this recipe?
You can substitute the egg with a flaxseed meal or chia seed mixture—simply mix one tablespoon of either with three tablespoons of water, let it sit for a few minutes, and use it as a binding agent.
Conclusion
Old-Fashioned Pink Jelly Cakes offer a beautiful blend of nostalgia and modern-day delight—a testament to the joy and comfort that comes from sharing food we love. They light up our taste buds, invoking smiles and laughter with every slice. Don’t just take my word for it; gather your ingredients, embrace the preparation, and savor the magic as you create a batch of these lovely treats. Every cake you bite into will remind you that sweetness truly is one of life’s greatest pleasures. Create your memories today with this charming recipe!
Print
Old-Fashioned Pink Jelly Cake
- Total Time: 1 hour 30 minutes
- Yield: 12 servings 1x
- Diet: Vegetarian
Description
A delightful and nostalgic dessert featuring tender sponge cake with a fruity jelly center, coated in coconut and topped with whipped cream.
Ingredients
- 80g butter, softened
- 1/2 cup (110g) caster sugar
- 1 tsp vanilla extract
- 1 egg
- 2/3 cup (160g) milk
- 1 cup (130g) self-raising flour, sifted
- 85g packet strawberry jelly crystals
- 1 cup (240g) boiling water
- 1 cup (240g) cold water
- 3 1/2 cups (280g) desiccated coconut
- 1 cup (240g) whipped cream
Instructions
- Preheat your oven to 175°C (fan-forced).
- Lightly grease two 12-hole patty-pan tins.
- In a large bowl, cream together butter, caster sugar, and vanilla extract until pale and fluffy.
- Add the egg and beat until fully incorporated.
- Gently fold in the milk and sifted self-raising flour alternately in two batches.
- Spoon the batter into the prepared patty-pan holes, filling each just below the top.
- Bake for 15–18 minutes or until golden; a skewer should come out clean.
- Allow cakes to cool in the tin for 5 minutes, then transfer to a wire rack to cool completely.
- Dissolve jelly crystals in boiling water and stir in cold water; refrigerate until partially set (1–2 hours).
- Dip cooled cakes into jelly mixture with a slotted spoon, letting excess drip off.
- Roll each jelly-coated cake in desiccated coconut.
- Assemble by spooning whipped cream onto one half and sandwiching with another half.
- Refrigerate assembled cakes for 30 minutes before serving.
Notes
Make-ahead by preparing the cakes a day in advance. Experiment with different jelly flavors for variety.
- Prep Time: 30 minutes
- Cook Time: 18 minutes
- Category: Dessert
- Method: Baking
- Cuisine: American
Nutrition
- Serving Size: 1 cake
- Calories: 180
- Sugar: 12g
- Sodium: 150mg
- Fat: 7g
- Saturated Fat: 4g
- Unsaturated Fat: 2g
- Trans Fat: 0g
- Carbohydrates: 28g
- Fiber: 1g
- Protein: 2g
- Cholesterol: 30mg
Keywords: cake, jelly, dessert, nostalgic, party treat
