
Introduction to Pumpkin Cobbler Recipe
As the leaves turn golden and the air gets crisp, I find myself drawn to the warm, inviting aroma of pumpkin desserts. There’s something magical about the way pumpkin cobbler fills my kitchen with a sense of comfort and nostalgia. I remember the first time I tried this delightful dish at a friend’s fall gathering. The moment I took a bite, I was transported to a cozy autumn afternoon, wrapped in a soft blanket, sipping on spiced cider. It was love at first taste!
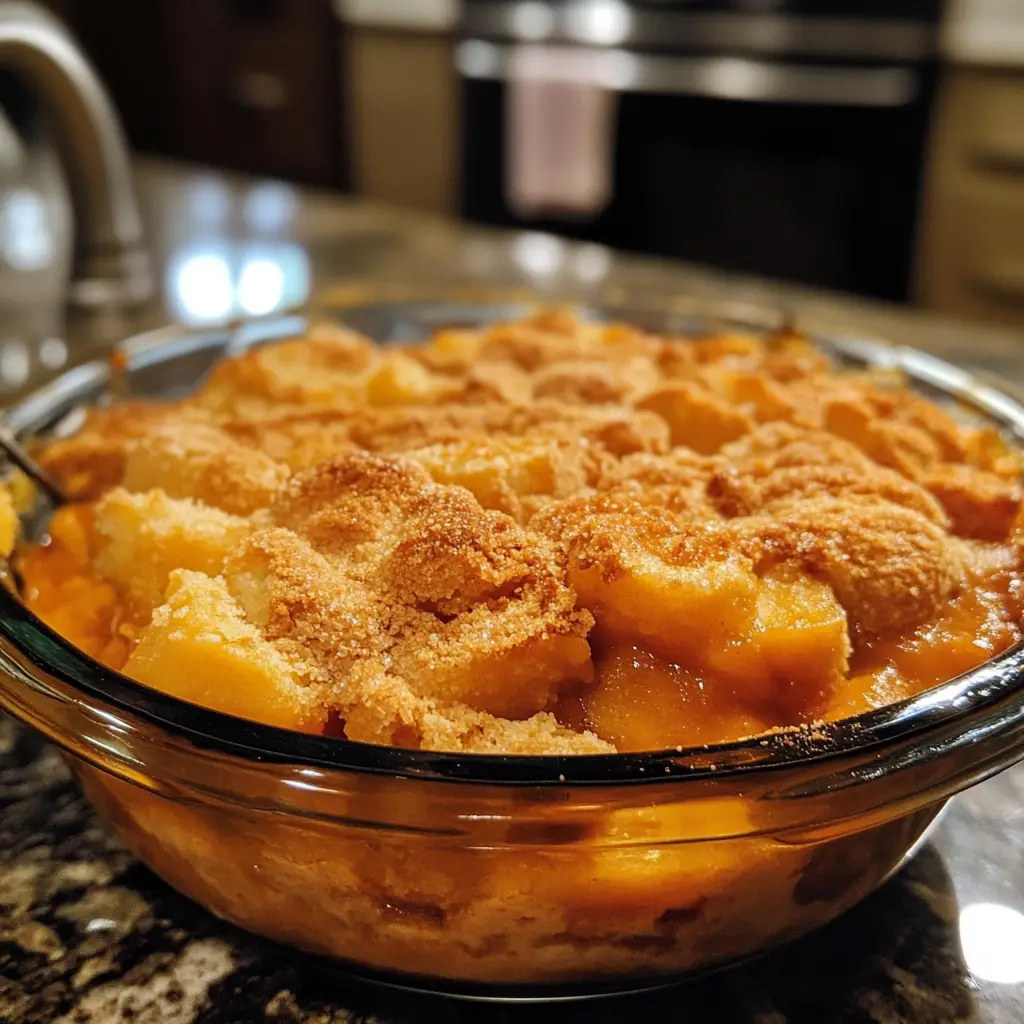
What I adore about pumpkin cobbler is its perfect blend of flavors and textures. The creamy pumpkin filling, kissed with warm spices, is topped with a buttery, crumbly cobbler that creates a delightful contrast. It’s like a hug in dessert form! Plus, it’s incredibly easy to make, which means I can whip it up for family gatherings or just a quiet evening at home.
In this recipe, I’ll share my secrets to creating the perfect pumpkin cobbler. Whether you’re a seasoned baker or a novice in the kitchen, I promise you’ll find joy in every step. So, grab your apron, and let’s embark on this delicious journey together. Trust me, your taste buds will thank you!
Ingredients for Pumpkin Cobbler Recipe
Before we dive into the delightful process of making pumpkin cobbler, let’s gather our ingredients. I always believe that the quality of ingredients can make or break a dish. So, let’s ensure we have the best of the best for this cozy dessert!
Main Ingredients
- 1 can (15 oz) of pure pumpkin puree (not pumpkin pie filling)
- 1 cup of granulated sugar
- 1 cup of milk (whole milk works best for creaminess)
- 2 large eggs
- 1 teaspoon of vanilla extract
- 1 teaspoon of ground cinnamon
- ½ teaspoon of ground nutmeg
- ½ teaspoon of ground ginger
- ½ teaspoon of salt
- 1 cup of all-purpose flour
- ½ cup of unsalted butter, melted
When I make this cobbler, I always opt for pure pumpkin puree. It gives the dish a rich flavor and a beautiful color. If you’re feeling adventurous, you can even roast your own pumpkin and puree it! Just remember, fresh pumpkin can be a bit watery, so drain it well before using.
Optional Add-ons
- 1 cup of chopped pecans or walnuts for added crunch
- 1 cup of chocolate chips for a sweet twist
- 1 teaspoon of pumpkin spice for an extra kick
- Whipped cream or vanilla ice cream for serving
These optional add-ons can elevate your pumpkin cobbler to new heights! I love tossing in some chocolate chips for a surprise burst of sweetness. And who can resist a scoop of vanilla ice cream melting over a warm slice? It’s pure bliss!
Now that we have our ingredients ready, let’s move on to the fun part—preparing our pumpkin cobbler!
How to Prepare Pumpkin Cobbler Recipe
Now that we have our ingredients all lined up, it’s time to roll up our sleeves and get cooking! Making pumpkin cobbler is a delightful experience, and I can’t wait to share the steps with you. Let’s dive right in!
Step 1: Preheat the Oven
The first step is to preheat your oven to 350°F (175°C). This ensures that your cobbler bakes evenly and comes out perfectly golden.
Tips for Preheating
- Make sure to set your oven rack to the middle position. This allows for even heat distribution.
- While the oven is heating, you can start preparing your filling and topping. It’s a great way to save time!
Step 2: Prepare the Pumpkin Filling
In a large mixing bowl, combine the pumpkin puree, sugar, milk, eggs, vanilla extract, cinnamon, nutmeg, ginger, and salt. Whisk everything together until it’s smooth and creamy. This filling is the heart of your cobbler!
Tips for Pumpkin Filling
- Use a whisk or an electric mixer for a lump-free filling. I love using my hand mixer for this—it makes the process so easy!
- Don’t be shy with the spices! They bring warmth and depth to the pumpkin flavor.
Step 3: Make the Cobbler Topping
In another bowl, mix the flour, sugar, and melted butter until crumbly. This will create that delicious, buttery topping that contrasts beautifully with the pumpkin filling.
Tips for Cobbler Topping
- For a sweeter topping, you can add a bit more sugar. Just taste as you go!
- If you want a crunchier texture, consider adding chopped nuts to the topping mixture.
Step 4: Assemble the Pumpkin Cobbler
Now comes the fun part! Pour the pumpkin filling into a greased baking dish. Then, sprinkle the cobbler topping evenly over the filling. Don’t worry about covering it completely; some pumpkin will peek through, and that’s perfectly fine!
Tips for Assembly
- Use a spatula to spread the topping gently. You want it to be fluffy and not packed down.
- Feel free to sprinkle some extra cinnamon or sugar on top for a lovely finish!
Step 5: Bake the Pumpkin Cobbler
Place your assembled cobbler in the preheated oven and bake for about 45-50 minutes. You’ll know it’s done when the topping is golden brown and a toothpick inserted in the center comes out clean.
Tips for Baking
- Keep an eye on it during the last 10 minutes. Ovens can vary, and you want to avoid over-baking.
- If the topping browns too quickly, you can cover it loosely with aluminum foil.
Once it’s out of the oven, let it cool for a few minutes. The aroma will be irresistible, and you’ll be counting down the seconds until you can dig in!
Equipment Needed for Pumpkin Cobbler Recipe
Before we get our hands dirty with the pumpkin cobbler, let’s make sure we have the right tools at our disposal. Having the right equipment can make the cooking process smoother and more enjoyable. Here’s what you’ll need:
- Mixing Bowls: A couple of medium-sized mixing bowls will do the trick. I love using glass bowls because I can see the ingredients mixing together!
- Whisk or Electric Mixer: A whisk is perfect for blending the pumpkin filling, but if you have an electric mixer, it makes the job even easier. It’s like having a little helper in the kitchen!
- Measuring Cups and Spoons: Accurate measurements are key to a successful cobbler. I always keep a set of measuring cups and spoons handy.
- Baking Dish: A 9×13 inch baking dish works best for this recipe. If you don’t have one, a similar-sized casserole dish will work just fine!
- Spatula: A rubber spatula is great for spreading the cobbler topping evenly over the pumpkin filling. It’s like a magic wand for desserts!
- Oven Mitts: Safety first! Protect your hands when taking the hot cobbler out of the oven.
If you’re missing any of these tools, don’t fret! You can often improvise with what you have at home. For example, a fork can substitute for a whisk, and any oven-safe dish can work in place of a baking dish. The most important thing is to have fun and enjoy the process!
Variations of Pumpkin Cobbler Recipe
While I absolutely adore the classic pumpkin cobbler, there are so many fun variations to explore! Each twist brings a new flavor profile that can make your dessert even more exciting. Here are a few of my favorite adaptations that I’ve tried over the years:
- Apple-Pumpkin Cobbler: Combine the warm flavors of pumpkin with tart apples. Just slice up a couple of apples and mix them into the pumpkin filling for a delightful fruity surprise!
- Chocolate Pumpkin Cobbler: For all the chocolate lovers out there, add a cup of chocolate chips to the pumpkin filling. The rich chocolate pairs beautifully with the spices, creating a decadent treat.
- Maple Pumpkin Cobbler: Swap out the granulated sugar for pure maple syrup. This adds a lovely depth of flavor and a hint of caramel sweetness that’s simply irresistible.
- Gluten-Free Pumpkin Cobbler: Use a gluten-free flour blend instead of all-purpose flour. It’s an easy way to make this dessert accessible for those with dietary restrictions.
These variations not only keep things interesting but also allow you to cater to different tastes and preferences. I love experimenting with these twists, and I encourage you to get creative in your kitchen! Who knows, you might just discover your new favorite version of pumpkin cobbler!
Cooking Notes for Pumpkin Cobbler Recipe
As I’ve journeyed through the delightful world of pumpkin cobbler, I’ve picked up a few cooking notes that can help elevate your baking experience. These little tips can make a big difference in the final outcome of your dish!
- Room Temperature Ingredients: For the best results, make sure your eggs and milk are at room temperature. This helps them blend more smoothly into the pumpkin filling, creating a creamy texture.
- Don’t Overmix: When combining your ingredients, be gentle! Overmixing can lead to a dense cobbler. Just mix until everything is combined, and you’ll be golden.
- Let It Rest: After baking, allow your cobbler to cool for about 10-15 minutes before serving. This helps the filling set up a bit more, making it easier to slice and serve.
- Storage Tips: If you have leftovers (which is rare in my house!), store them in an airtight container in the fridge. It can last for up to 3 days, but I doubt it will last that long!
- Reheating: To enjoy your cobbler again, simply pop it in the microwave for a few seconds or warm it in the oven at 350°F (175°C) until heated through. A scoop of ice cream on top makes it even better!
These cooking notes are like little nuggets of wisdom I’ve gathered over time. They help ensure that every pumpkin cobbler I make is a delicious success. I hope they inspire you to create your own cozy masterpiece!
Serving Suggestions for Pumpkin Cobbler Recipe
Now that your pumpkin cobbler is baked to perfection, it’s time to think about how to serve it! Presentation can elevate your dessert from delicious to downright irresistible. Here are some of my favorite serving suggestions that will make your pumpkin cobbler shine:
- Classic Whipped Cream: A dollop of freshly whipped cream on top adds a light and airy touch. It’s like a cloud of sweetness that complements the warm spices beautifully!
- Vanilla Ice Cream: There’s nothing quite like a scoop of creamy vanilla ice cream melting over a warm slice of cobbler. The contrast of temperatures is pure bliss!
- Cinnamon Sugar Dusting: For a little extra flair, sprinkle some cinnamon sugar on top before serving. It adds a delightful crunch and enhances the cozy flavors.
- Caramel Drizzle: A drizzle of warm caramel sauce can take your cobbler to the next level. The rich sweetness pairs perfectly with the pumpkin filling.
- Chopped Nuts: For added texture, sprinkle some chopped pecans or walnuts on top. They provide a lovely crunch that contrasts with the soft filling.
When I serve pumpkin cobbler, I love to arrange it on a rustic wooden board, garnished with a few sprigs of fresh mint or a sprinkle of cinnamon. It creates a warm, inviting atmosphere that makes everyone feel at home. No matter how you choose to serve it, I guarantee your guests will be coming back for seconds!
Tips for Perfecting Pumpkin Cobbler Recipe
As I’ve baked pumpkin cobbler time and time again, I’ve gathered a treasure trove of tips that can help you achieve that perfect, mouthwatering dessert. These little nuggets of wisdom can make all the difference in your baking journey!
- Use Fresh Spices: Freshly ground spices can elevate the flavor of your cobbler. I love using whole nutmeg and grinding it myself. The aroma is simply divine!
- Don’t Skip the Salt: A pinch of salt enhances the sweetness and balances the flavors. It’s like a secret ingredient that brings everything together!
- Experiment with Sweetness: Taste your pumpkin filling before baking. If you prefer it sweeter, feel free to add a bit more sugar or maple syrup. It’s all about your personal preference!
- Check for Doneness: Every oven is different, so keep an eye on your cobbler as it bakes. A toothpick should come out clean, but a little gooeyness is okay if it’s from the pumpkin filling.
- Let It Cool: Allow your cobbler to cool for at least 10 minutes before serving. This helps the filling set and makes for easier slicing. Plus, it gives you a moment to savor the delightful aroma!
These tips are like little guiding stars on your baking adventure. With each cobbler you make, you’ll find your rhythm and discover what works best for you. Happy baking!
Breakdown of Time for Pumpkin Cobbler Recipe
Now that we’ve covered the ingredients and steps, let’s talk about the time it takes to create this delicious pumpkin cobbler. I always find it helpful to have a clear idea of how long each part of the process will take. This way, I can plan my baking adventure without any surprises!
- Prep Time: Approximately 15-20 minutes. This includes gathering your ingredients, preheating the oven, and mixing the pumpkin filling and cobbler topping. It’s a quick and enjoyable process!
- Cooking Time: About 45-50 minutes. This is when your kitchen will fill with that heavenly aroma as the cobbler bakes to golden perfection.
- Total Time: Roughly 1 hour and 5-10 minutes. This includes both prep and cooking time, plus a few minutes for cooling before serving. It’s a small investment for a dessert that brings so much joy!
Knowing the time breakdown helps me stay organized and excited as I bake. Plus, it’s always nice to have a delicious treat ready in just over an hour! So, let’s get to baking and enjoy every moment of this delightful journey!
Nutritional Information for Pumpkin Cobbler Recipe
As a passionate home cook, I always find it helpful to know the nutritional content of the dishes I prepare. While pumpkin cobbler is a delightful treat, it’s good to be mindful of what we’re enjoying. Here’s a general breakdown of the nutritional information for one serving of pumpkin cobbler (based on a recipe serving 12):
- Calories: Approximately 250-300 calories
- Protein: 4-5 grams
- Fat: 10-12 grams
- Carbohydrates: 40-45 grams
- Fiber: 2-3 grams
- Sugar: 15-20 grams
These values can vary based on the specific ingredients you use, especially if you opt for add-ons like nuts or chocolate chips. I always remind myself that while pumpkin cobbler is a sweet indulgence, it also contains the goodness of pumpkin, which is rich in vitamins A and C, as well as fiber. So, enjoy your slice of cobbler, and remember that balance is key in any diet!
Frequently Asked Questions about Pumpkin Cobbler Recipe
As I’ve shared my pumpkin cobbler recipe with friends and family, I’ve noticed a few common questions pop up. It’s always great to clarify any doubts and help fellow home cooks feel confident in their baking adventures. Here are some of the most frequently asked questions about this delightful dessert:
Can I use fresh pumpkin instead of canned?
Absolutely! Using fresh pumpkin can add a wonderful flavor to your cobbler. Just make sure to roast and puree it first. Remember to drain any excess moisture to avoid a watery filling!
How do I store leftover pumpkin cobbler?
If you have any leftovers (which is rare in my house!), store them in an airtight container in the fridge. It can last for up to three days. Just reheat it in the microwave or oven before serving for the best taste!
Can I make pumpkin cobbler ahead of time?
Yes, you can prepare the filling and topping separately a day in advance. Just store them in the fridge. When you’re ready to bake, assemble and pop it in the oven. It’s a great way to save time on busy days!
What can I substitute for eggs in this recipe?
If you’re looking for an egg substitute, you can use ¼ cup of unsweetened applesauce or a flax egg (1 tablespoon of ground flaxseed mixed with 2.5 tablespoons of water). Both options work well in keeping the cobbler moist!
Can I freeze pumpkin cobbler?
Yes, you can freeze pumpkin cobbler! Just make sure it’s completely cooled before wrapping it tightly in plastic wrap and then aluminum foil. It can last in the freezer for up to three months. Thaw it in the fridge overnight before reheating.
These FAQs are just a few of the questions I’ve encountered while sharing my love for pumpkin cobbler. I hope they help you feel more prepared and excited to create this delicious dessert in your own kitchen!
Conclusion on Pumpkin Cobbler Recipe
As I reflect on my journey with pumpkin cobbler, I can’t help but smile at the joy it brings to my kitchen and my loved ones. This delightful dessert is more than just a recipe; it’s a celebration of flavors, warmth, and togetherness. The creamy pumpkin filling, infused with spices, paired with a buttery cobbler topping, creates a symphony of taste that dances on the palate.
What I love most about this pumpkin cobbler recipe is its versatility. Whether you’re hosting a festive gathering or enjoying a quiet evening at home, it’s the perfect treat to share. Plus, it’s easy to customize with your favorite add-ons or variations, making it a dish that can evolve with your culinary adventures.
So, as the seasons change and the air turns crisp, I encourage you to embrace the magic of pumpkin cobbler. Gather your ingredients, roll up your sleeves, and let the aroma fill your home. I promise, each bite will remind you of cozy autumn days and the simple pleasures of life. Happy baking!
