
Sensory-Rich Introduction with Immediate Craving
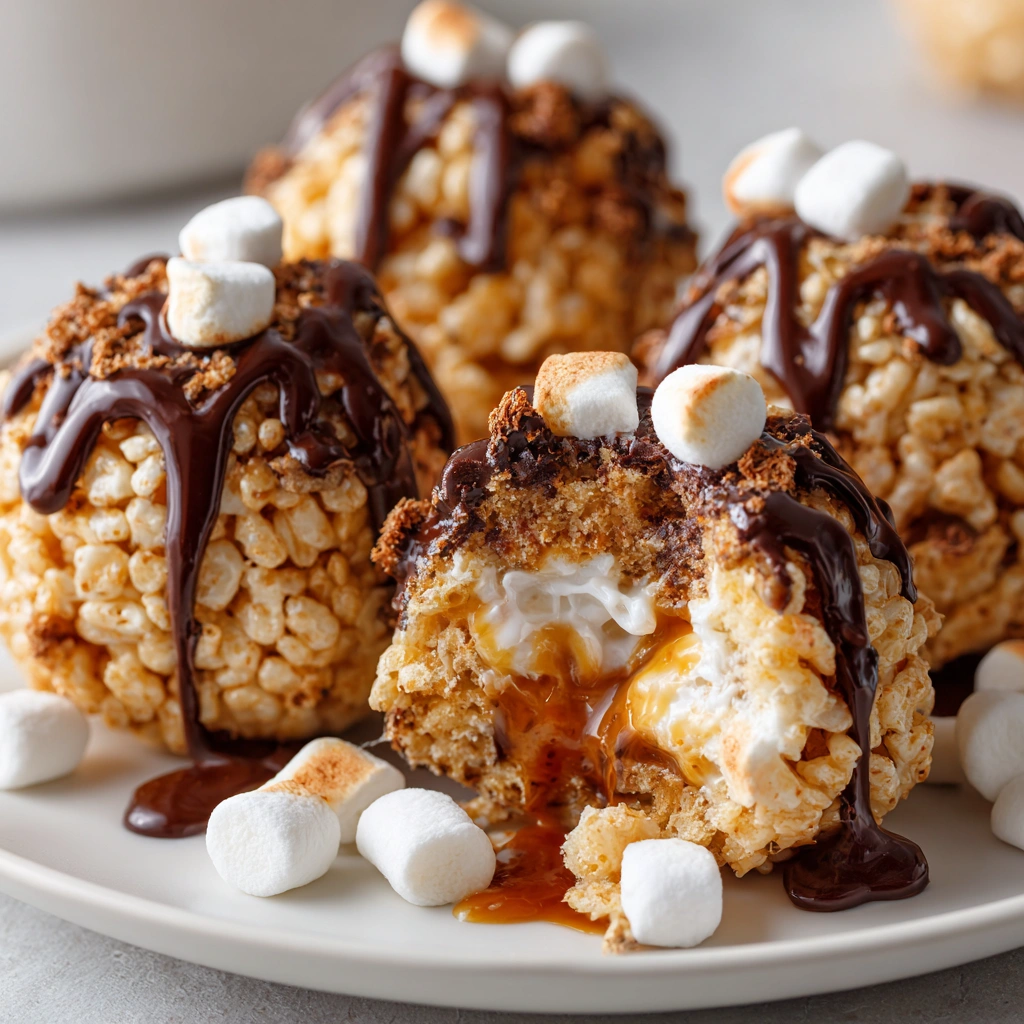
Imagine biting into a Rice Krispie Easter Egg—the moment your teeth sink through the glossy chocolate coating, you’re greeted by a delightful crunch that gives way to the soft, gooey marshmallow center. The sweet aroma of melted marshmallows and butter fills the air, mingling with the rich scent of chocolate, creating an irresistible invitation to indulge. Each egg is a vibrant burst of color, adorned with playful sprinkles that catch the light, making them not just a treat, but a feast for the eyes.
As I reminisce about my childhood, I can’t help but smile at the memories of making these delightful treats with my family every Easter. My mom would gather us around the kitchen, her laughter echoing as we eagerly mixed the marshmallows and Rice Krispies. I remember the sticky fingers and the joyful chaos as we shaped the eggs, each one a little different, a reflection of our personalities. Those moments were filled with love, laughter, and the sweet anticipation of sharing our creations with friends and family.
The joy these colorful eggs bring is palpable, especially when children’s faces light up at the sight of them. They’re not just treats; they’re a symbol of celebration, a way to connect with loved ones during the holiday. Whether it’s an Easter celebration, a spring picnic, or a festive gift for a neighbor, these Rice Krispie Easter Eggs are sure to bring smiles and create lasting memories.
Why You’ll Love This Rice Krispie Easter Eggs
Let me tell you, there’s so much to adore about these Rice Krispie Easter Eggs! First off, the texture contrast is simply divine. Imagine the satisfying crunch of the crispy Rice Krispies mingling with the soft, gooey marshmallow center, all enveloped in a smooth, rich chocolate coating. It’s a delightful mouthfeel that keeps you coming back for more!
Then there’s the flavor balance. The sweetness of the marshmallows and chocolate is perfectly complemented by the slight saltiness of the butter. It’s a harmonious blend that dances on your taste buds, making each bite a little celebration of flavor.
What I love most is the versatility of these treats. You can customize them with different coatings—think white chocolate, dark chocolate, or even a drizzle of caramel. And let’s not forget the decorations! From colorful sprinkles to edible glitter, the possibilities are endless, making them suitable for any occasion, not just Easter.
Plus, this recipe is incredibly easy to whip up. It’s a simple no-bake recipe that requires minimal cooking skills, making it accessible for all ages. Whether you’re a seasoned chef or a kitchen novice, you’ll find joy in creating these delightful eggs.
Finally, the universal appeal of these treats is undeniable. Kids and adults alike can’t resist their charm, making them a hit at any gathering. Whether you’re serving them at a family get-together, a spring picnic, or gifting them to friends, these Rice Krispie Easter Eggs are sure to bring smiles and create sweet memories.
Essential Tools & Preparation Strategy
Before diving into the delightful world of Rice Krispie Easter Eggs, let’s gather our tools and set the stage for success. Having the right equipment not only makes the process smoother but also enhances your overall experience in the kitchen. Trust me, a little preparation goes a long way!
- Large saucepan: This is essential for melting the butter and marshmallows evenly. I recommend a non-stick variety to make cleanup a breeze.
- Mixing spoon: A sturdy spoon is needed to mix the cereal and marshmallow mixture thoroughly. Wooden spoons are my go-to for their durability.
- Parchment paper: Line your baking sheet with this to prevent sticking and make cleanup easier. It’s a small step that saves a lot of hassle!
- Microwave-safe bowl: Perfect for melting chocolate without burning it. I usually opt for glass bowls as they heat evenly.
- Cookie scoop or measuring cup: These tools help in shaping uniform egg sizes, ensuring that your treats look as good as they taste.
- Refrigerator: Essential for chilling the formed eggs to help them hold their shape. Don’t skip this step!
- Optional: A silicone spatula can be a game-changer for easier mixing and scraping down the sides of your bowl.
With your tools ready, you’re all set to create these scrumptious Rice Krispie Easter Eggs. Remember, the joy of cooking comes not just from the end result but from the process itself. So, let’s get started!
Ingredients & Their Roles in This Rice Krispie Easter Eggs
Understanding the ingredients that go into your Rice Krispie Easter Eggs is key to mastering this delightful treat. Each component plays a vital role in creating the perfect balance of flavor and texture. Let’s break it down!
For the Rice Krispie Mixture:
- Rice Krispies cereal: This is the star of the show, providing that signature crunch that makes these eggs so irresistible. The light, airy texture of the cereal creates a delightful contrast to the gooey marshmallow.
- Mini marshmallows: These little puffs of sweetness are essential for creating the gooey texture that binds everything together. As they melt, they become a luscious, sticky mixture that envelops the Rice Krispies, making each bite a heavenly experience.
- Unsalted butter: Adding richness and depth, butter helps to bind the mixture while also enhancing the overall flavor. The slight saltiness of unsalted butter balances the sweetness of the marshmallows perfectly.
- Vanilla extract: A splash of vanilla elevates the flavor profile, adding a warm, aromatic note that complements the sweetness of the marshmallows and chocolate.
For the Chocolate Coating:
- Chocolate chips: Whether you choose milk or dark chocolate, these chips provide a sweet, rich outer layer that adds a luxurious finish to your eggs. The glossy coating not only looks beautiful but also adds a satisfying snap when you bite into it.
- Coconut oil: This is optional, but a tablespoon of coconut oil can make your chocolate coating smoother and easier to work with. It helps the chocolate glide over the eggs, ensuring an even, glossy finish.
For Decoration:
- Colored sprinkles: These fun, vibrant additions bring a festive flair to your Rice Krispie Easter Eggs. They not only enhance the visual appeal but also add a slight crunch that contrasts beautifully with the soft interior.
- Edible glitter: For those looking to add a touch of magic, edible glitter is a whimsical option. It catches the light and makes your treats sparkle, perfect for special occasions!
With these ingredients in hand, you’re well on your way to creating a batch of delightful Rice Krispie Easter Eggs that will impress everyone at your Easter celebration. Each component contributes to the overall experience, making these treats not just delicious but also a joy to create!
Step-by-Step Guide to Perfect Rice Krispie Easter Eggs
Now that we have our ingredients and tools ready, it’s time to dive into the fun part—making these delightful Rice Krispie Easter Eggs! Follow this step-by-step guide, and you’ll be well on your way to creating a batch of treats that will have everyone asking for seconds.
- Melt the Butter: In a large saucepan, melt 3 tablespoons of unsalted butter over low heat. Keep an eye on it to ensure it doesn’t brown; we want it just melted and bubbly.
- Add the Marshmallows: Once the butter is melted, add 4 cups of mini marshmallows. Stir continuously until they are completely melted and smooth, which should take about 5 minutes. The aroma of sweet marshmallows will fill your kitchen, and trust me, it’s heavenly!
- Incorporate Vanilla: Remove the saucepan from heat and stir in 1 teaspoon of vanilla extract. This little addition elevates the flavor, making your treats even more irresistible.
- Mix in the Cereal: Gradually add 6 cups of Rice Krispies cereal to the melted marshmallow mixture. Use your mixing spoon to gently fold the cereal in until it’s well coated. Be careful not to overmix, as we want to keep that delightful crunch!
- Shape the Eggs: Allow the mixture to cool slightly—just enough so it’s manageable. Then, using your hands, shape the mixture into egg shapes, about 2-3 inches long. Place each shaped egg on a parchment-lined baking sheet. Don’t worry if they’re not perfect; each one will have its own character!
- Chill to Set: Pop the baking sheet into the refrigerator and chill the formed eggs for about 30 minutes. This step is crucial for helping them hold their shape, so don’t skip it!
- Melt the Chocolate: While the eggs are chilling, melt 2 cups of chocolate chips (your choice of milk or dark) along with 1 tablespoon of coconut oil in a microwave-safe bowl. Heat in 30-second intervals, stirring in between until the mixture is smooth and glossy. The coconut oil is optional but helps achieve a silky texture.
- Dip and Decorate: Once the chocolate is melted, dip each Rice Krispie egg into the chocolate, allowing any excess to drip off. Place them back on the parchment paper and sprinkle with colored sprinkles or edible glitter before the chocolate sets. This is where the fun really begins—get creative with your decorations!
And there you have it! Follow these steps, and you’ll have a batch of beautiful Rice Krispie Easter Eggs that are not only delicious but also a joy to share. Enjoy the process, and don’t forget to sneak a taste along the way!
Chef’s Notes & Pro Tips for Flawless Results
As you embark on your journey to create these delightful Rice Krispie Easter Eggs, I want to share some of my favorite tips and tricks that will help you achieve flawless results every time. Trust me, a little extra care can make a world of difference!
- Make-ahead instructions: These treats can be prepared up to 3 days in advance, making them a perfect option for busy schedules. Just store them in an airtight container at room temperature, and they’ll be ready to impress when you need them!
- Storage tips: Keep your Rice Krispie Easter Eggs in a cool, dry place. Avoid refrigeration, as it can cause the eggs to harden and lose that delightful chewy texture we all love.
- Equipment recommendations: For easier cleanup, I highly recommend using a non-stick saucepan when melting your butter and marshmallows. It makes the process smoother and saves you from the dreaded sticky aftermath!
- Customization options: Don’t be afraid to get creative! Experiment with different types of chocolate—white, dark, or even flavored varieties like mint or orange. You can also play around with various decorations, from themed sprinkles to drizzles of contrasting chocolate for a stunning visual effect.
With these tips in your back pocket, you’re well-equipped to create a batch of Rice Krispie Easter Eggs that will not only taste amazing but also look like a work of art. Happy cooking!
Avoid These Common Cooking Mistakes
Even the most seasoned cooks can run into a few hiccups when making Rice Krispie Easter Eggs. To help you navigate the process smoothly, I’ve compiled a list of common mistakes to avoid. Trust me, steering clear of these pitfalls will ensure your treats turn out perfectly every time!
- Not allowing marshmallows to melt completely: This can lead to a gritty texture in your mixture. Make sure to stir continuously until the marshmallows are fully melted and smooth—this is key to achieving that gooey goodness!
- Overmixing the Rice Krispies: While it’s tempting to mix vigorously, overmixing can make the mixture tough. Gently fold the cereal in until just combined to maintain that delightful crunch.
- Not chilling the eggs long enough: If you skip or rush this step, your eggs may not hold their shape. Chill them for at least 30 minutes to ensure they set properly.
- Using too much butter: While butter adds richness, using too much can lead to a greasy mixture. Stick to the recommended 3 tablespoons for the best results.
- Improper chocolate coating: If your eggs aren’t fully coated in chocolate, they can end up with a dry texture. Make sure to dip each egg thoroughly and let any excess chocolate drip off before placing them back on the parchment paper.
- Storing in the fridge: While it might seem like a good idea, refrigerating your Rice Krispie Easter Eggs can make them hard. Instead, store them at room temperature in an airtight container to keep them soft and chewy.
- Using stale Rice Krispies: Freshness matters! Stale cereal can affect the crunchiness of your eggs. Always use fresh Rice Krispies for that perfect snap.
By keeping these common mistakes in mind, you’ll be well on your way to creating a batch of Rice Krispie Easter Eggs that are not only delicious but also visually stunning. Happy cooking!
Creative Variations & Customizations
One of the best things about Rice Krispie Easter Eggs is their versatility! You can easily customize them to suit your taste preferences or the occasion. Here are some fun and creative variations to consider:
- Gluten-free version: If you or your loved ones are gluten-sensitive, simply swap regular Rice Krispies for gluten-free Rice Krispies. This way, everyone can enjoy these delightful treats without worry!
- Different chocolate types: Why not mix it up? Instead of the classic chocolate chips, try using white chocolate or even flavored varieties like mint or caramel. Each option brings a unique twist to the flavor profile!
- Seasonal decorations: Get festive with your decorations! Use themed sprinkles for different holidays—think orange and black for Halloween or red and green for Christmas. This adds a fun touch and makes your treats even more appealing.
- Nutty addition: For those who love a bit of crunch, consider incorporating chopped nuts into the mixture. Almonds, pecans, or walnuts can add a delightful texture and flavor contrast to the soft marshmallow and chocolate.
- Fruit-infused: Want to add a chewy texture? Toss in some dried fruit pieces, like cranberries or apricots, into the Rice Krispie mixture. This not only enhances the flavor but also adds a pop of color!
With these creative variations, you can make your Rice Krispie Easter Eggs truly your own. Don’t be afraid to experiment and have fun with the process—after all, cooking is all about creativity and joy!
Perfect Pairings: What to Serve With Rice Krispie Easter Eggs
When it comes to enjoying your delightful Rice Krispie Easter Eggs, the right accompaniments can elevate the experience to a whole new level. Here are some perfect pairings that not only complement the sweetness of these treats but also enhance your overall enjoyment:
- Glass of milk: A classic pairing that perfectly complements the sweetness of the eggs. The creamy texture of milk balances the crunchiness, making each bite even more satisfying.
- Fruit salad: A refreshing contrast to the sweetness of the Rice Krispie Easter Eggs. The natural acidity of fresh fruits like berries or citrus adds a bright note that cuts through the richness.
- Cup of hot chocolate: For those cozy moments, a warm cup of hot chocolate is the perfect companion. The rich, chocolatey flavor pairs beautifully with the chocolate coating of the eggs.
- Easter dessert table: These eggs make a fantastic addition to any Easter dessert table, complementing other themed treats like carrot cake or bunny-shaped cookies. They add a fun, colorful element that everyone will love!
- Gift basket: Consider including these delightful treats in a gift basket for Easter surprises. They add a playful touch and are sure to bring smiles to friends and family.
- Spring picnic: Pack these Rice Krispie Easter Eggs for a spring picnic. Their portability and delightful crunch make them a hit among both kids and adults, adding a festive touch to your outdoor gathering.
- Coffee: For an afternoon snack, pair these treats with a cup of coffee. The bitterness of the coffee contrasts nicely with the sweetness of the eggs, creating a delightful balance.
- Ice cream sundaes: Get creative and use these eggs as a crunchy topping for ice cream sundaes. The combination of creamy ice cream and crunchy chocolate-covered eggs is simply irresistible!
With these perfect pairings, your Rice Krispie Easter Eggs will shine even brighter. Whether you’re hosting a gathering or enjoying a quiet moment at home, these suggestions will enhance your experience and make your treats even more enjoyable!
Storage & Meal Prep Instructions
Once you’ve created your delightful Rice Krispie Easter Eggs, it’s important to know how to store them properly to maintain their freshness and texture. Here are some essential storage and meal prep instructions to keep your treats in top shape:
- Fridge storage: Storing your Rice Krispie Easter Eggs in the refrigerator is not recommended. The cold can cause them to harden, losing that delightful chewy texture we all love. Instead, keep them at room temperature in an airtight container to maintain their softness and crunch.
- Freezer storage: If you want to make these treats ahead of time, you can freeze them for up to 1 month. Just place them in an airtight container or freezer bag, separating layers with parchment paper to prevent sticking. When you’re ready to enjoy them, simply thaw at room temperature for a few hours before serving.
- Reheating methods: Reheating is not applicable for these treats, as they are best enjoyed fresh. The combination of textures and flavors is at its peak right after they’re made, so I recommend savoring them as soon as possible!
By following these storage and meal prep instructions, you can ensure that your Rice Krispie Easter Eggs remain delicious and ready to delight your family and friends whenever the craving strikes. Happy snacking!
Nutrition Facts & Health Insights
Understanding the nutritional profile of your Rice Krispie Easter Eggs can help you enjoy them mindfully. Here’s a breakdown of the nutrition facts per serving, so you can indulge with a little knowledge:
| Nutrient | Amount per Serving |
|---|---|
| Calories | 150 |
| Sugar | 10 grams |
| Sodium | 50 milligrams |
| Fat | 7 grams |
| Saturated Fat | 4 grams |
| Unsaturated Fat | 2 grams |
| Trans Fat | 0 grams |
| Carbohydrates | 20 grams |
| Fiber | 0 grams |
| Protein | 1 gram |
| Cholesterol | 10 milligrams |
These Rice Krispie Easter Eggs are not just a treat; they also offer some interesting health insights. The primary ingredient, rice, is a great source of quick energy, making these eggs a fun snack for kids and adults alike. The carbohydrates from the Rice Krispies provide a rapid energy boost, perfect for those busy days filled with Easter egg hunts or springtime activities.
However, it’s important to enjoy these treats in moderation. While they are delicious and energizing, the sugar content can add up quickly, especially if you indulge in multiple servings. Balancing these sweet delights with healthier options, like fresh fruit or nuts, can help create a well-rounded snack experience.
So go ahead, enjoy your Rice Krispie Easter Eggs as a festive treat, but remember to savor them alongside a variety of other nutritious foods. Happy indulging!
Frequently Asked Questions
As you embark on your journey to create these delightful Rice Krispie Easter Eggs, you might have a few questions along the way. Here are some of the most common queries I’ve encountered, along with helpful answers to guide you through the process:
- Can I use regular marshmallows instead of mini?
Absolutely! You can use regular marshmallows; just keep in mind that they may take a little longer to melt. If you do use them, I recommend cutting them into smaller pieces to help them melt more evenly. - How long do these treats last?
When stored in an airtight container at room temperature, your Rice Krispie Easter Eggs will stay fresh for about 3 days. After that, they may start to lose their delightful texture, so enjoy them while they’re at their best! - Can I make these without chocolate?
Yes, you can! If you prefer to skip the chocolate coating, simply shape the Rice Krispie mixture into eggs and enjoy them as is. You can also dust them with powdered sugar or drizzle with a flavored syrup for a different twist. - What can I substitute for butter?
If you’re looking for a dairy-free option, you can substitute the butter with coconut oil or a plant-based butter alternative. Both will work well to bind the mixture and add richness. - How do I prevent the chocolate from seizing?
To prevent your chocolate from seizing, make sure to use a microwave-safe bowl and heat the chocolate in short intervals (30 seconds), stirring in between. Adding a small amount of coconut oil can also help keep the chocolate smooth and fluid. - Can I add flavorings to the Rice Krispie mixture?
Definitely! Feel free to experiment with different flavorings. A teaspoon of almond extract or a sprinkle of cinnamon can add a delightful twist to your Rice Krispie Easter Eggs. Just be cautious not to overpower the sweetness! - What if my mixture is too sticky?
If your mixture is too sticky to handle, it might be due to the marshmallows not melting completely or using too much butter. If this happens, you can try adding a bit more Rice Krispies to balance the stickiness. Alternatively, lightly greasing your hands with butter or oil can help when shaping the eggs. - How do I make these vegan-friendly?
To make your Rice Krispie Easter Eggs vegan, simply use vegan butter or coconut oil in place of regular butter, and opt for dairy-free chocolate chips for the coating. Most Rice Krispies are already vegan, but always check the label to be sure!
With these FAQs in mind, you’re well-equipped to tackle any challenges that may arise while making your Rice Krispie Easter Eggs. Enjoy the process, and don’t hesitate to get creative!
Final Inspiration & Kitchen Confidence
As you wrap up your journey of creating these delightful Rice Krispie Easter Eggs, I want to take a moment to remind you just how fun and rewarding this experience can be. Cooking is not just about the end result; it’s about the joy of creating something special with your own hands. Each egg you shape is a little piece of happiness, filled with love and creativity!
Celebrate your achievements, no matter how big or small! Whether you’ve crafted perfectly shaped eggs or embraced the delightful imperfections that come with homemade treats, every creation is worthy of a cheer. Share your beautiful Rice Krispie Easter Eggs with family and friends, and watch their faces light up with joy. There’s nothing quite like the satisfaction of seeing others enjoy something you’ve made!
Now, I invite you to dive into this recipe and let your creativity shine. Try out the variations, experiment with decorations, and make these treats your own. And don’t forget to share your results on social media! Tag your creations with #RiceKrispieEasterEggs and join a community of fellow food lovers who are just as passionate about these crunchy delights. Happy cooking, and may your kitchen be filled with laughter and love!
Print
Rice Krispie Easter Eggs: Irresistibly Crunchy Delights!
- Total Time: 1 hour
- Yield: 12 servings 1x
- Diet: Vegetarian
Description
These Rice Krispie Easter Eggs are a delightful combination of crispy texture and sweet, buttery flavor. Each bite offers a satisfying crunch, complemented by the rich taste of melted marshmallows and a hint of vanilla, making them a perfect treat for the holiday season.
Ingredients
- For the Rice Krispie Mixture:
- 6 cups Rice Krispies cereal
- 4 cups mini marshmallows
- 3 tablespoons unsalted butter
- 1 teaspoon vanilla extract
- For the Chocolate Coating:
- 2 cups chocolate chips (milk or dark)
- 1 tablespoon coconut oil (optional, for smoothness)
- For Decoration:
- Colored sprinkles
- Edible glitter (optional)
Instructions
- In a large saucepan, melt the butter over low heat. Add the mini marshmallows and stir until completely melted and smooth.
- Remove from heat and stir in the vanilla extract.
- Gradually add the Rice Krispies cereal, mixing until well coated.
- Allow the mixture to cool slightly, then shape it into egg shapes, about 2-3 inches long. Place on a parchment-lined baking sheet.
- Chill the formed eggs in the refrigerator for about 30 minutes to set.
- While the eggs are chilling, melt the chocolate chips and coconut oil in a microwave-safe bowl in 30-second intervals, stirring until smooth.
- Dip each Rice Krispie egg into the melted chocolate, allowing excess to drip off, then place back on the parchment paper.
- Sprinkle with colored sprinkles or edible glitter before the chocolate sets. Let the chocolate harden at room temperature or in the fridge for about 15 minutes.
Notes
- Make-ahead: These eggs can be made up to 3 days in advance and stored in an airtight container.
- Storage: Keep in a cool, dry place. Avoid refrigeration as it can make them too hard.
- Substitutions: Use gluten-free Rice Krispies for a gluten-free version or swap chocolate chips for white chocolate for a different flavor.
- Prep Time: 20 minutes
- Cook Time: 10 minutes
- Category: desserts
- Method: no-bake
- Cuisine: American
Nutrition
- Serving Size: 1 Rice Krispie Easter Egg
- Calories: 150
- Sugar: 10 grams
- Sodium: 50 milligrams
- Fat: 7 grams
- Saturated Fat: 4 grams
- Unsaturated Fat: 2 grams
- Trans Fat: 0 grams
- Carbohydrates: 20 grams
- Fiber: 0 grams
- Protein: 1 gram
- Cholesterol: 10 milligrams
Keywords: Rice Krispie Easter Eggs, Easter treats, no-bake desserts, marshmallow treats, chocolate-covered snacks, holiday recipes, kid-friendly desserts, festive sweets, crunchy snacks, spring desserts, homemade candy, easy recipes, colorful treats
