

Introduction to Spider Web Cupcakes
As the leaves turn and the air gets crisp, I can’t help but get excited about Halloween. One of my favorite ways to celebrate is by whipping up some delightful Spider Web Cupcakes. These treats are not just delicious; they’re a fun way to bring a little spooky magic into your kitchen. Perfect for busy moms like us, this recipe is quick and easy, making it a fantastic solution for those hectic days. Plus, they’re sure to impress your loved ones, whether at a school party or a cozy family gathering!
Why You’ll Love This Spider Web Cupcakes
These Spider Web Cupcakes are a delightful blend of ease and flavor. With just a handful of ingredients, you can create a spooky treat that looks impressive without spending hours in the kitchen. They’re moist, chocolatey, and topped with a fun design that kids adore. Plus, they’re perfect for any Halloween gathering, making them a go-to recipe for busy moms and professionals alike. Who doesn’t love a treat that’s both simple and scrumptious?
Ingredients for Spider Web Cupcakes
Gathering the right ingredients is the first step to creating these delightful Spider Web Cupcakes. Here’s what you’ll need:
- All-purpose flour: This is the base of your cupcakes, giving them structure and a light texture.
- Granulated sugar: Sweetness is key! It helps to balance the rich cocoa flavor.
- Unsweetened cocoa powder: This adds that delicious chocolatey goodness that makes these cupcakes irresistible.
- Baking powder: A leavening agent that helps the cupcakes rise and become fluffy.
- Baking soda: Another leavening agent that works with the acidity in the batter for a perfect rise.
- Salt: Just a pinch enhances the flavors and balances the sweetness.
- Unsalted butter: Adds richness and moisture to the cupcakes. Make sure it’s softened for easy mixing!
- Large eggs: They bind the ingredients together and add moisture, making the cupcakes tender.
- Vanilla extract: A splash of vanilla elevates the flavor profile, making it more aromatic.
- Milk: This adds moisture and helps create a smooth batter.
- Powdered sugar: Essential for making the frosting sweet and creamy.
- Black food coloring: This gives your frosting that spooky, dark hue for the spider web effect.
- Chocolate spiders: These are the fun finishing touch, adding a playful element to your cupcakes.
For exact measurements, check the bottom of the article where you can find everything listed for easy printing. Feel free to get creative with your ingredients! You can substitute the all-purpose flour with gluten-free flour or use a dairy-free milk alternative if needed. The possibilities are endless!
How to Make Spider Web Cupcakes
Step 1: Preheat and Prepare
First things first, let’s get that oven preheating to 350°F (175°C). While it warms up, grab your cupcake pan and line it with cute cupcake liners. I love using festive designs for Halloween! This simple step sets the stage for your Spider Web Cupcakes, ensuring they bake evenly and come out easily. Trust me, a well-prepared pan makes all the difference in the world!
Step 2: Mix Dry Ingredients
In a large mixing bowl, combine your all-purpose flour, granulated sugar, cocoa powder, baking powder, baking soda, and salt. Whisk them together until they’re well blended. This is where the magic begins! The dry ingredients create the foundation for your cupcakes, so make sure there are no lumps. A smooth mix means a smooth batter, and we want that for our spooky treats!
Step 3: Combine Wet Ingredients
Now, it’s time to add the wet ingredients. In the same bowl, toss in the softened butter, eggs, vanilla extract, and milk. Using a hand mixer or a whisk, blend everything until it’s smooth and creamy. This step is crucial because it brings all the flavors together. The rich chocolate aroma will start to fill your kitchen, and you’ll know you’re on the right track!
Step 4: Fill Cupcake Liners
With your batter ready, it’s time to fill those cupcake liners! Use a spoon or an ice cream scoop to fill each liner about two-thirds full. This allows room for the cupcakes to rise without overflowing. I like to use a scoop for even portions, which makes for a uniform look. Plus, it’s less messy! You’ll have a dozen delightful cupcakes in no time.
Step 5: Bake the Cupcakes
Pop the filled cupcake pan into your preheated oven and bake for 18-20 minutes. To check for doneness, insert a toothpick into the center of a cupcake. If it comes out clean, they’re ready! The smell of chocolate wafting through your home will be irresistible. Just be careful not to overbake; we want them moist and delicious!
Step 6: Cool the Cupcakes
Once baked, remove the cupcakes from the oven and let them cool in the pan for about 5 minutes. Then, transfer them to a wire rack to cool completely. This step is essential! If you frost them while they’re warm, the frosting will melt away, and we don’t want that. Patience is key here, my friends!
Step 7: Make the Frosting
While the cupcakes cool, let’s whip up that spooky black frosting! In a bowl, mix the powdered sugar with 2 tablespoons of milk until smooth. Add black food coloring gradually until you achieve your desired shade. The darker, the spookier! This frosting will create the perfect backdrop for your spider web design. It’s simple, yet so effective!
Step 8: Frost the Cupcakes
Now comes the fun part—frosting the cupcakes! Use a knife or a piping bag to spread the black frosting generously on each cooled cupcake. Then, take a contrasting white frosting and pipe a spider web design on top. It’s easier than it sounds! Just start from the center and work your way out. Your cupcakes will look like a Halloween masterpiece!
Step 9: Add Decorations
Finally, it’s time to add the finishing touch—chocolate spiders! Gently place one on each cupcake, right in the center of the spider web. This little detail adds a playful element that kids will love. Plus, it makes your Spider Web Cupcakes look extra festive. Get ready for compliments from everyone who sees (or tastes) your spooky creations!
Tips for Success
- Always use room temperature ingredients for a smoother batter.
- Don’t overmix the batter; mix just until combined for fluffy cupcakes.
- Use a toothpick to check for doneness; it should come out clean.
- Let cupcakes cool completely before frosting to avoid melting.
- Experiment with different colors for the spider web for a unique twist!
Equipment Needed
- Cupcake pan: A standard 12-cup pan works great. You can also use silicone molds for easy removal.
- Mixing bowls: A large bowl for mixing and a smaller one for frosting.
- Whisk or hand mixer: Either will do for blending ingredients smoothly.
- Piping bags: Use these for decorating, or a zip-top bag with a corner snipped off works too!
Variations
- Gluten-Free: Substitute all-purpose flour with a gluten-free blend for a delicious alternative.
- Dairy-Free: Use almond milk or coconut milk and dairy-free butter for a lactose-free version.
- Vegan: Replace eggs with flax eggs (1 tablespoon ground flaxseed mixed with 2.5 tablespoons water) and use plant-based milk and butter.
- Flavor Twist: Add a teaspoon of peppermint extract for a refreshing minty flavor or a dash of cinnamon for a warm spice.
- Mini Cupcakes: Make bite-sized versions by using a mini cupcake pan; just reduce the baking time to about 10-12 minutes.
Serving Suggestions
- Pair your Spider Web Cupcakes with a glass of cold milk for a classic treat.
- Serve alongside spooky-themed snacks like ghost-shaped cheese or pumpkin-shaped fruit.
- For a festive touch, display cupcakes on a Halloween-themed platter or cake stand.
- Consider adding a side of caramel or chocolate sauce for dipping!
FAQs about Spider Web Cupcakes
Can I make Spider Web Cupcakes ahead of time?
Absolutely! You can bake the cupcakes a day in advance. Just store them in an airtight container at room temperature. Frost them the day you plan to serve for the best results. This way, you can enjoy the fun of decorating without the last-minute rush!
What can I use instead of black food coloring?
If you prefer to avoid food coloring, you can use activated charcoal for a natural alternative. Just be cautious with the amount, as it can alter the flavor slightly. Alternatively, dark chocolate frosting can also create a similar effect without the color.
How do I store leftover cupcakes?
To keep your Spider Web Cupcakes fresh, store them in an airtight container at room temperature for up to three days. If you want to keep them longer, consider refrigerating them. Just remember to let them come to room temperature before serving!
Can I freeze these cupcakes?
Yes, you can freeze the cupcakes! Just make sure they are completely cooled. Wrap them tightly in plastic wrap and place them in a freezer-safe container. They can last up to three months. Frost them after thawing for the best presentation!
What if my kids don’t like chocolate?
No worries! You can easily adapt the recipe by using vanilla or lemon-flavored cupcakes instead. Just swap out the cocoa powder for more flour and add a splash of vanilla extract. The spider web design will still be a hit!
Final Thoughts
Creating these Spider Web Cupcakes is more than just baking; it’s about making memories with your loved ones. The joy of watching your kids’ faces light up as they see the spooky designs is priceless. Plus, the delightful aroma of chocolate wafting through your home adds to the festive spirit of Halloween. Whether you’re hosting a party or simply enjoying a cozy night in, these cupcakes are sure to bring smiles all around. So roll up your sleeves, gather your ingredients, and let the fun begin! Happy baking, and may your Halloween be filled with sweet treats and laughter!
Print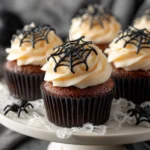
Spider Web Cupcakes: A Spooktacular Treat to Try!
- Total Time: 40 minutes
- Yield: 12 cupcakes 1x
- Diet: Vegetarian
Description
Delicious cupcakes decorated with a spooky spider web design, perfect for Halloween.
Ingredients
- 1 1/2 cups all-purpose flour
- 1 cup granulated sugar
- 1/2 cup unsweetened cocoa powder
- 1 tsp baking powder
- 1/2 tsp baking soda
- 1/4 tsp salt
- 1/2 cup unsalted butter, softened
- 2 large eggs
- 1 tsp vanilla extract
- 1/2 cup milk
- 1 cup powdered sugar
- 2 tbsp milk (for frosting)
- Black food coloring
- Chocolate spiders (for decoration)
Instructions
- Preheat the oven to 350°F (175°C) and line a cupcake pan with liners.
- In a large bowl, mix together the flour, sugar, cocoa powder, baking powder, baking soda, and salt.
- Add the softened butter, eggs, vanilla extract, and milk to the dry ingredients and mix until smooth.
- Fill the cupcake liners about 2/3 full with the batter.
- Bake for 18-20 minutes or until a toothpick inserted in the center comes out clean.
- Let the cupcakes cool completely on a wire rack.
- In a separate bowl, mix the powdered sugar and 2 tablespoons of milk to create a frosting. Add black food coloring to achieve a spider web color.
- Frost the cooled cupcakes with the black frosting.
- Using a contrasting white frosting, pipe a spider web design on top of the black frosting.
- Top with chocolate spiders for decoration.
Notes
- Ensure the cupcakes are completely cool before frosting to prevent melting.
- Adjust the amount of food coloring to achieve the desired darkness.
- Store cupcakes in an airtight container to maintain freshness.
- Prep Time: 20 minutes
- Cook Time: 20 minutes
- Category: Dessert
- Method: Baking
- Cuisine: American
Nutrition
- Serving Size: 1 cupcake
- Calories: 250
- Sugar: 20g
- Sodium: 150mg
- Fat: 10g
- Saturated Fat: 5g
- Unsaturated Fat: 3g
- Trans Fat: 0g
- Carbohydrates: 35g
- Fiber: 1g
- Protein: 3g
- Cholesterol: 30mg
Keywords: Spider Web Cupcakes, Halloween Treats, Spooky Desserts
