

Introduction to Spiderweb Cheesecake
As a busy mom, I know how challenging it can be to whip up something special for family gatherings or Halloween parties. That’s where my Spiderweb Cheesecake comes in! This rich and creamy dessert not only looks stunning but also tastes divine. It’s the perfect way to impress your loved ones without spending hours in the kitchen. Plus, the spiderweb design adds a fun twist that kids and adults alike will adore. So, grab your apron, and let’s dive into this delightful recipe that’s sure to become a family favorite!
Why You’ll Love This Spiderweb Cheesecake
This Spiderweb Cheesecake is a game-changer for busy days. It’s easy to make, requiring just a handful of ingredients and minimal prep time. The creamy texture and rich flavor will have everyone coming back for seconds. Plus, the eye-catching spiderweb design makes it a showstopper at any gathering. Whether it’s Halloween or a family celebration, this cheesecake is sure to bring smiles and sweet memories!
Ingredients for Spiderweb Cheesecake
Gathering the right ingredients is the first step to creating your Spiderweb Cheesecake masterpiece. Here’s what you’ll need:
- Graham cracker crumbs: These form the delicious crust. You can use store-bought or crush your own for a fresher taste.
- Unsalted butter: This adds richness to the crust. Make sure it’s melted for easy mixing.
- Granulated sugar: Sweetens the cheesecake and balances the flavors. You can substitute with a sugar alternative if desired.
- Cream cheese: The star of the show! It gives the cheesecake its creamy texture. Ensure it’s softened for easy blending.
- Vanilla extract: Adds a warm, inviting flavor. Pure vanilla is best, but imitation works in a pinch.
- Eggs: These help bind the cheesecake together. Room temperature eggs mix more smoothly.
- Sour cream: This adds a tangy flavor and creaminess. You can swap it with Greek yogurt for a lighter option.
- Heavy cream: For a luscious texture, this is essential. If you’re looking for a lighter version, half-and-half can be used.
- Chocolate syrup: This is what creates the spiderweb design. Feel free to use homemade or store-bought.
- Powdered sugar: This is optional for sweetening the chocolate syrup drizzle. It gives a nice finish to the design.
For exact measurements, check the bottom of the article where you can find everything listed for easy printing. Now that you have your ingredients ready, let’s move on to the fun part—making this delightful cheesecake!
How to Make Spiderweb Cheesecake
Now that we have our ingredients ready, let’s get to the fun part—making the Spiderweb Cheesecake! Follow these simple steps, and you’ll have a show-stopping dessert that’s sure to impress.
Step 1: Preheat the Oven
First things first, preheat your oven to 325°F (160°C). Preheating is crucial for baking cheesecake. It ensures even cooking and helps achieve that perfect creamy texture. Trust me, you don’t want to skip this step!
Step 2: Prepare the Crust
In a mixing bowl, combine the graham cracker crumbs and melted butter. Stir until the crumbs are fully coated. This mixture should resemble wet sand. Now, press it firmly into the bottom of a springform pan. This step is vital! A well-pressed crust provides a sturdy base for your cheesecake.
Step 3: Make the Cheesecake Filling
In a large mixing bowl, beat the softened cream cheese and granulated sugar together until smooth. This is where the magic begins! Add the eggs one at a time, mixing well after each addition. Then, stir in the sour cream and heavy cream until everything is well combined. The mixture should be creamy and luscious, ready to pour over your crust.
Step 4: Bake the Cheesecake
Pour the cheesecake filling over the crust in the springform pan. Bake for 60-70 minutes. You’ll know it’s done when the center is set but still slightly jiggly. This slight jiggle is key to a creamy cheesecake. Once baked, remove it from the oven and let it cool completely.
Step 5: Create the Spiderweb Design
Once your cheesecake has cooled, it’s time for the fun part! Drizzle chocolate syrup in a spiral pattern on top of the cheesecake. Then, take a toothpick and gently drag it through the syrup to create a spiderweb effect. This simple technique adds a spooky touch that’s perfect for Halloween!
Step 6: Chill and Serve
After decorating, chill your cheesecake in the refrigerator for at least 4 hours. This step is essential for the flavors to meld and the cheesecake to set properly. Once chilled, slice it up and serve. Your Spiderweb Cheesecake is now ready to delight your family and friends!
Tips for Success
- Make sure your cream cheese is at room temperature for a smooth filling.
- Don’t overmix the batter; this helps prevent cracks in your cheesecake.
- Use a water bath for even baking and a creamier texture.
- Let the cheesecake cool gradually to avoid sudden temperature changes.
- For a fun twist, add colorful sprinkles on top after the spiderweb design!
Equipment Needed
- Springform pan: Essential for easy removal. A regular cake pan works too, but slicing will be trickier.
- Mixing bowls: Use a large bowl for the filling and a smaller one for the crust.
- Electric mixer: A hand mixer is perfect, but a whisk can work if you’re feeling strong!
- Toothpick: For creating the spiderweb design. A skewer or knife can also do the trick.
Variations
- Chocolate Spiderweb Cheesecake: Add cocoa powder to the cheesecake mixture for a richer chocolate flavor.
- Gluten-Free Option: Use gluten-free graham crackers or almond flour for the crust to make it suitable for gluten-sensitive guests.
- Fruit Topping: Top with fresh berries or a fruit compote for a refreshing twist.
- Vegan Version: Substitute cream cheese with a vegan alternative and use flax eggs instead of regular eggs.
- Nutty Crust: Mix in crushed nuts like pecans or almonds with the graham cracker crumbs for added texture and flavor.
Serving Suggestions
- Pair your Spiderweb Cheesecake with a dollop of whipped cream for extra creaminess.
- Serve alongside fresh fruit like strawberries or raspberries for a pop of color.
- Complement with a warm cup of spiced chai or pumpkin spice latte.
- For a festive touch, garnish with edible glitter or Halloween-themed sprinkles.
FAQs about Spiderweb Cheesecake
Can I make Spiderweb Cheesecake ahead of time?
Absolutely! This cheesecake is perfect for making a day in advance. Just be sure to chill it for at least 4 hours before serving. It actually tastes even better after sitting overnight, as the flavors meld beautifully.
What can I use instead of cream cheese?
If you’re looking for a lighter option, you can use a vegan cream cheese alternative. Just keep in mind that the texture and flavor may vary slightly. For a dairy-free version, cashew cream is a great substitute!
How do I store leftovers?
Store any leftover Spiderweb Cheesecake in an airtight container in the refrigerator. It should last for about 3-4 days. Just be sure to cover the top to keep that beautiful spiderweb design intact!
Can I freeze Spiderweb Cheesecake?
Yes, you can freeze it! Wrap the cheesecake tightly in plastic wrap and then in aluminum foil. It can be frozen for up to 2 months. Thaw it in the refrigerator overnight before serving.
What’s the best way to cut cheesecake?
To get clean slices, use a sharp knife dipped in hot water. Wipe the knife clean between cuts for perfect, beautiful slices. This way, your Spiderweb Cheesecake will look as good as it tastes!
Final Thoughts
Creating this Spiderweb Cheesecake is more than just baking; it’s about making memories with your loved ones. The joy of seeing their faces light up as they take that first bite is priceless. This dessert brings a touch of whimsy to any occasion, especially Halloween. Plus, it’s a fantastic way to involve your kids in the kitchen, sparking their creativity. So, whether you’re celebrating a spooky holiday or simply indulging in a sweet treat, this cheesecake is sure to become a cherished recipe in your home. Happy baking, and enjoy every delicious moment!
Print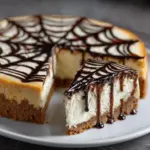
Spiderweb Cheesecake: Discover This Decadent Delight!
- Total Time: 5 hours 30 minutes (including chilling time)
- Yield: 12 servings 1x
- Diet: Vegetarian
Description
A rich and creamy cheesecake decorated with a spiderweb design, perfect for Halloween or any spooky occasion.
Ingredients
- 2 cups graham cracker crumbs
- 1/2 cup unsalted butter, melted
- 1 cup granulated sugar
- 4 (8 oz) packages cream cheese, softened
- 1 teaspoon vanilla extract
- 4 large eggs
- 1 cup sour cream
- 1/2 cup heavy cream
- 1/2 cup chocolate syrup
- 1/4 cup powdered sugar
Instructions
- Preheat the oven to 325°F (160°C).
- In a bowl, mix graham cracker crumbs and melted butter until combined. Press into the bottom of a springform pan.
- In a large mixing bowl, beat cream cheese and granulated sugar until smooth.
- Add vanilla extract and eggs, one at a time, mixing well after each addition.
- Stir in sour cream and heavy cream until fully incorporated.
- Pour the cheesecake mixture over the crust in the springform pan.
- Bake for 60-70 minutes or until the center is set but slightly jiggly.
- Remove from the oven and let cool completely.
- Once cooled, drizzle chocolate syrup in a spiral pattern on top of the cheesecake.
- Use a toothpick to create a spiderweb effect by dragging it through the chocolate syrup.
- Chill in the refrigerator for at least 4 hours before serving.
Notes
- For a more intense chocolate flavor, add cocoa powder to the cheesecake mixture.
- Make sure the cream cheese is at room temperature for a smoother texture.
- Decorate with plastic spiders for a fun Halloween touch.
- Prep Time: 30 minutes
- Cook Time: 1 hour
- Category: Dessert
- Method: Baking
- Cuisine: American
Nutrition
- Serving Size: 1 slice
- Calories: 350
- Sugar: 25g
- Sodium: 300mg
- Fat: 22g
- Saturated Fat: 12g
- Unsaturated Fat: 8g
- Trans Fat: 0g
- Carbohydrates: 30g
- Fiber: 1g
- Protein: 5g
- Cholesterol: 80mg
Keywords: Spiderweb Cheesecake, Halloween dessert, cheesecake recipe
