

The crisp bite of a fresh apple, the sticky-sweet embrace of rich caramel, and the warm, comforting hint of autumn spices—this is the quintessential flavor profile of a classic caramel apple. It’s a symbol of fall, evoking memories of harvest festivals, bonfires, and crisp evenings. But what if you could capture that entire sensory experience in a single, elegant, and delightfully potent bite? Enter the Spiked Caramel Apple Shot: a no-bake, pudding-based dessert shot that is as fun to make as it is to serve.
This innovative treat is the perfect solution for modern entertaining. It elegantly bridges the gap between a cocktail and a dessert, offering the conviviality of a shot with the sophisticated, creamy texture of a mousse or parfait. Gone are the messy sticks and awkward bites; in their place is a perfectly portioned, beautifully garnished cup of joy that promises to be the star of any Halloween party, Thanksgiving gathering, or autumn-themed celebration. In the following sections, we will explore the alchemy behind this recipe, break down its components, provide a detailed guide to its creation, and unlock pro-tips to ensure your shots are not only delicious but visually stunning.
The Alchemy of Flavor: A Deep Dive into the Ingredients
The magic of this recipe lies in its clever use of simple ingredients to create a complex and nostalgic flavor profile. Each component plays a specific and crucial role in building the final product.
The Foundation: Instant Vanilla Pudding Mix and Milk
The instant vanilla pudding mix is the structural heart of this recipe. When combined with cold milk, it undergoes a process of gelation, creating a smooth, stable, and creamy base. This base is essential for giving the shots their signature “set” texture, allowing them to be eaten with a spoon rather than drunk. The vanilla flavor is a neutral yet sweet canvas that perfectly complements the primary flavors of apple and caramel without competing with them. It provides the creamy, custardy note that mimics the richness of a true dessert.
The Spirited Core: Apple Schnapps and Caramel Vodka
This is where the “spiked” element comes to life, and the flavor is built. Apple schnapps brings the unmistakable, bright, and sweet-tart flavor of a red apple. For those seeking a more authentic, tangy apple punch, the recipe suggests using a Granny Smith apple schnapps, which provides a sharper, more robust fruit flavor that cuts through the sweetness beautifully. Caramel vodka introduces the other half of the classic duo, contributing a buttery, toasty sweetness and the necessary alcoholic warmth. If caramel vodka is unavailable, the recipe offers a simple fix: combine regular vodka with a tablespoon of caramel syrup. This flexibility ensures you can achieve the desired flavor profile with bar staples.
The Rich Emulsifier: Caramel Sauce
While the caramel vodka provides the spirit’s caramel essence, the addition of a quarter-cup of actual caramel sauce is a masterstroke. It serves a dual purpose. First, it intensifies the caramel flavor, making it rich and authentic. Second, and just as importantly, it acts as an emulsifier, blending seamlessly with the pudding base and spirits to create a homogenous, smooth, and deeply flavored mixture. Its thick, sugary consistency integrates into the pudding, ensuring every spoonful is infused with its signature taste.
The Pillowy Texture: Cool Whip or Whipped Cream
The final structural component is the Cool Whip or thawed whipped cream. The instruction to “fold” it in is critical. Folding, a gentle cutting and lifting motion, preserves the air bubbles in the whipped cream. This aeration is what transforms the dense pudding mixture into something light, fluffy, and mousse-like. It prevents the shots from being overly heavy and creates a delightful, cloud-like texture that makes them feel like a true dessert.
The Art of Assembly: A Step-by-Step Guide to Perfect Shots
Creating these shots is a simple process, but precision and patience in each step will yield a far superior result. This is a recipe where technique truly matters.
Step 1: Creating the Pudding Base
Begin by placing your instant vanilla pudding mix into a medium-sized bowl. Add one cup of cold milk. The temperature of the milk is important, as it helps activate the thickening agents in the pudding mix more effectively. Using a whisk, vigorously combine the two until the mixture is completely smooth and has begun to thicken. There should be no lumps of dry pudding mix visible. This smooth base is non-negotiable for a flawless final texture.
Step 2: Incorporating the Spirits and Caramel
Once your pudding base is smooth, it’s time to introduce the alcohol. Pour in the half-cup of apple schnapps and the half-cup of caramel vodka (or your vodka-caramel syrup alternative). Stir these in until they are fully and seamlessly combined. You will notice the mixture may thin out slightly, which is perfectly normal. Next, add the quarter-cup of caramel sauce. Stir vigorously to ensure the thick sauce is completely dissolved and emulsified into the liquid, creating a uniform, tan-colored mixture.
Step 3: The Delicate Folding Process
Now, add your thawed Cool Whip or prepared whipped cream to the bowl. This is the most crucial step for texture. Do not stir or beat. Instead, use a spatula to “fold” the cream into the pudding mixture. To fold correctly, cut your spatula down through the center of the mixture, sweep across the bottom, and fold the bottom mixture over the top. Rotate the bowl a quarter-turn and repeat. Continue this process just until the whipped cream is incorporated and no white streaks remain. Overmixing will deflate the cream and result in a denser, less fluffy shot.
Step 4: The Patient Chill
Using a spoon or a piping bag for cleaner edges, portion the fluffy mixture into small plastic or glass shot cups. Once all the cups are filled, place them in the refrigerator to chill for a minimum of one to two hours. This resting period is essential for the pudding to fully set and the flavors to meld together harmoniously. The cold also firms up the texture, making the shots perfectly spoonable. For an even firmer, more ice-cream-like consistency, you can follow the tip to place them in the freezer for 20-30 minutes before serving.
Mastering the Craft: Pro-Tips for Presentation and Flavor
To elevate your Spiked Caramel Apple Shots from great to extraordinary, consider these advanced techniques and creative variations.
The Art of the Layered Drizzle
For a stunning visual effect that also enhances the caramel flavor in every bite, employ this presentation trick. Before you even begin making the pudding mixture, take a bottle of caramel sauce and drizzle a small amount onto the inside of each empty shot cup. You can create a simple spiral at the bottom or artistic streaks up the sides. Once you add the pudding mixture, this hidden layer of caramel will create a beautiful, professional-looking presentation when served, and the first spoonful will reveal the elegant layered effect.
The Garnish Gallery: A Trio of Options
The garnish is the final flourish that completes the “caramel apple” illusion.
-
Crushed Toffee: This provides a delightful buttery crunch and a flavor that echoes the caramel, adding a necessary textural contrast to the creamy shot.
-
Cinnamon Sugar: A light sprinkle introduces the warm, spicy note that is so often associated with autumn and apple desserts, engaging another part of the classic flavor profile.
-
Mini Apple Slice: For the ultimate in elegance and a fresh, crisp bite, a thin, small wedge of fresh apple (a Granny Smith slice works beautifully for contrast) perched on top is a gorgeous and edible garnish that immediately communicates the shot’s primary flavor.
Flavor Intensity and Serving Temperature
As noted in the tips, using a specific type of apple schnapps can dramatically alter the drink’s character. Granny Smith apple schnapps will provide a sharper, more tart apple flavor that is less candied and more sophisticated. Furthermore, paying attention to the chilling time is key. A full two-hour chill in the refrigerator is ideal for a perfect mousse texture, while a brief freeze is an excellent strategy if you are serving them in a warm environment or simply prefer a firmer, colder bite.
The Perfect Potion for Autumn Festivity
The Spiked Caramel Apple Shot is a testament to the creativity of modern mixology and dessert culture. It successfully captures the soul of a timeless autumn treat and repackages it into a convenient, shareable, and utterly delightful form. It is a conversation starter, a crowd-pleaser, and a guaranteed way to bring a touch of whimsical elegance to your seasonal celebrations. By understanding the role of each ingredient and mastering the techniques of folding and presentation, you can create a dessert shot that is not only delicious but also a true work of art. So, gather your ingredients, embrace your inner pastry chef, and prepare to impress your guests with this unforgettable taste of fall.
Print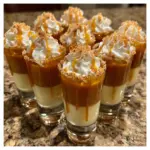
Spiked Caramel Apple Shot
Ingredients
The magic of this recipe lies in its clever use of simple ingredients to create a complex and nostalgic flavor profile. Each component plays a specific and crucial role in building the final product.
The Foundation: Instant Vanilla Pudding Mix and Milk
The instant vanilla pudding mix is the structural heart of this recipe. When combined with cold milk, it undergoes a process of gelation, creating a smooth, stable, and creamy base. This base is essential for giving the shots their signature “set” texture, allowing them to be eaten with a spoon rather than drunk. The vanilla flavor is a neutral yet sweet canvas that perfectly complements the primary flavors of apple and caramel without competing with them. It provides the creamy, custardy note that mimics the richness of a true dessert.
The Spirited Core: Apple Schnapps and Caramel Vodka
This is where the “spiked” element comes to life, and the flavor is built. Apple schnapps brings the unmistakable, bright, and sweet-tart flavor of a red apple. For those seeking a more authentic, tangy apple punch, the recipe suggests using a Granny Smith apple schnapps, which provides a sharper, more robust fruit flavor that cuts through the sweetness beautifully. Caramel vodka introduces the other half of the classic duo, contributing a buttery, toasty sweetness and the necessary alcoholic warmth. If caramel vodka is unavailable, the recipe offers a simple fix: combine regular vodka with a tablespoon of caramel syrup. This flexibility ensures you can achieve the desired flavor profile with bar staples.
The Rich Emulsifier: Caramel Sauce
While the caramel vodka provides the spirit’s caramel essence, the addition of a quarter-cup of actual caramel sauce is a masterstroke. It serves a dual purpose. First, it intensifies the caramel flavor, making it rich and authentic. Second, and just as importantly, it acts as an emulsifier, blending seamlessly with the pudding base and spirits to create a homogenous, smooth, and deeply flavored mixture. Its thick, sugary consistency integrates into the pudding, ensuring every spoonful is infused with its signature taste.
The Pillowy Texture: Cool Whip or Whipped Cream
The final structural component is the Cool Whip or thawed whipped cream. The instruction to “fold” it in is critical. Folding, a gentle cutting and lifting motion, preserves the air bubbles in the whipped cream. This aeration is what transforms the dense pudding mixture into something light, fluffy, and mousse-like. It prevents the shots from being overly heavy and creates a delightful, cloud-like texture that makes them feel like a true dessert.
Instructions
Creating these shots is a simple process, but precision and patience in each step will yield a far superior result. This is a recipe where technique truly matters.
Step 1: Creating the Pudding Base
Begin by placing your instant vanilla pudding mix into a medium-sized bowl. Add one cup of cold milk. The temperature of the milk is important, as it helps activate the thickening agents in the pudding mix more effectively. Using a whisk, vigorously combine the two until the mixture is completely smooth and has begun to thicken. There should be no lumps of dry pudding mix visible. This smooth base is non-negotiable for a flawless final texture.
Step 2: Incorporating the Spirits and Caramel
Once your pudding base is smooth, it’s time to introduce the alcohol. Pour in the half-cup of apple schnapps and the half-cup of caramel vodka (or your vodka-caramel syrup alternative). Stir these in until they are fully and seamlessly combined. You will notice the mixture may thin out slightly, which is perfectly normal. Next, add the quarter-cup of caramel sauce. Stir vigorously to ensure the thick sauce is completely dissolved and emulsified into the liquid, creating a uniform, tan-colored mixture.
Step 3: The Delicate Folding Process
Now, add your thawed Cool Whip or prepared whipped cream to the bowl. This is the most crucial step for texture. Do not stir or beat. Instead, use a spatula to “fold” the cream into the pudding mixture. To fold correctly, cut your spatula down through the center of the mixture, sweep across the bottom, and fold the bottom mixture over the top. Rotate the bowl a quarter-turn and repeat. Continue this process just until the whipped cream is incorporated and no white streaks remain. Overmixing will deflate the cream and result in a denser, less fluffy shot.
Step 4: The Patient Chill
Using a spoon or a piping bag for cleaner edges, portion the fluffy mixture into small plastic or glass shot cups. Once all the cups are filled, place them in the refrigerator to chill for a minimum of one to two hours. This resting period is essential for the pudding to fully set and the flavors to meld together harmoniously. The cold also firms up the texture, making the shots perfectly spoonable. For an even firmer, more ice-cream-like consistency, you can follow the tip to place them in the freezer for 20-30 minutes before serving.
