
The classic candy apple is a symbol of pure, unadulterated joy. It evokes memories of crisp autumn days, county fairs, and the simple pleasure of cracking through a hard, sugary shell to reach the tender fruit within. But for the adult palate, sometimes nostalgia calls for a sophisticated, and decidedly spirited, twist. Enter the Twisted Candy Apple Shot: a dessert and a cocktail seamlessly fused into one irresistible, spoonable treat.
This innovative creation is the perfect centerpiece for any festive gathering. It captures the essential sweet-and-tart flavor of a traditional candy apple while presenting it in a uniquely modern and shareable form. Whether you’re hosting a Halloween bash, a Friendsgiving dinner, or simply celebrating the change of seasons, these shots promise to be the talk of the party. They bridge the gap between the bar and the dessert table, offering a visually stunning, perfectly portioned experience that is as fun to make as it is to consume.
In the following sections, we will deconstruct the magic behind this recipe, exploring the science of its texture and the balance of its flavors. We will provide a comprehensive, step-by-step guide to achieving the perfect fluffy consistency, and we will delve into advanced tips and presentation techniques that will elevate your shots from homemade to professional-grade.
The Science of Sweetness: A Deep Dive into the Ingredients
The genius of the Twisted Candy Apple Shot lies in its clever use of simple, accessible ingredients to create a complex and satisfying dessert. Each component plays a specific and vital role in building the final product’s flavor, texture, and structure.
The Structural Foundation: Instant Vanilla Pudding Mix and Milk
At its core, this recipe is a stabilized mousse, and the instant vanilla pudding mix is the unsung hero that makes it all possible. When combined with cold milk, the powders in the pudding mix—primarily starches and gums—hydrate and swell, creating a thick, smooth, and stable gel. This gel forms the structural backbone of the shot, providing a base that can support the addition of liquids and air without breaking down. The vanilla flavor is a neutral yet sweet canvas, perfectly complementing the primary apple and caramel notes without overpowering them.
The Spirited Soul: Sour Apple Schnapps and Caramel Vodka
This dynamic duo is where the “twisted” in the name comes to life. Sour Apple Schnapps delivers the unmistakable, bright, and tangy punch of a green apple. This sharp, acidic note is crucial for cutting through the sweetness of the other ingredients, replicating the delightful tartness you experience when biting into a real apple. Caramel Vodka provides the other half of the classic flavor pairing, contributing a rich, buttery, and toasty sweetness. The combination of the two spirits creates a layered flavor profile that is far more sophisticated than either could achieve alone. For those without caramel vodka, the simple substitution of regular vodka mixed with a tablespoon of caramel syrup is a testament to the recipe’s versatility.
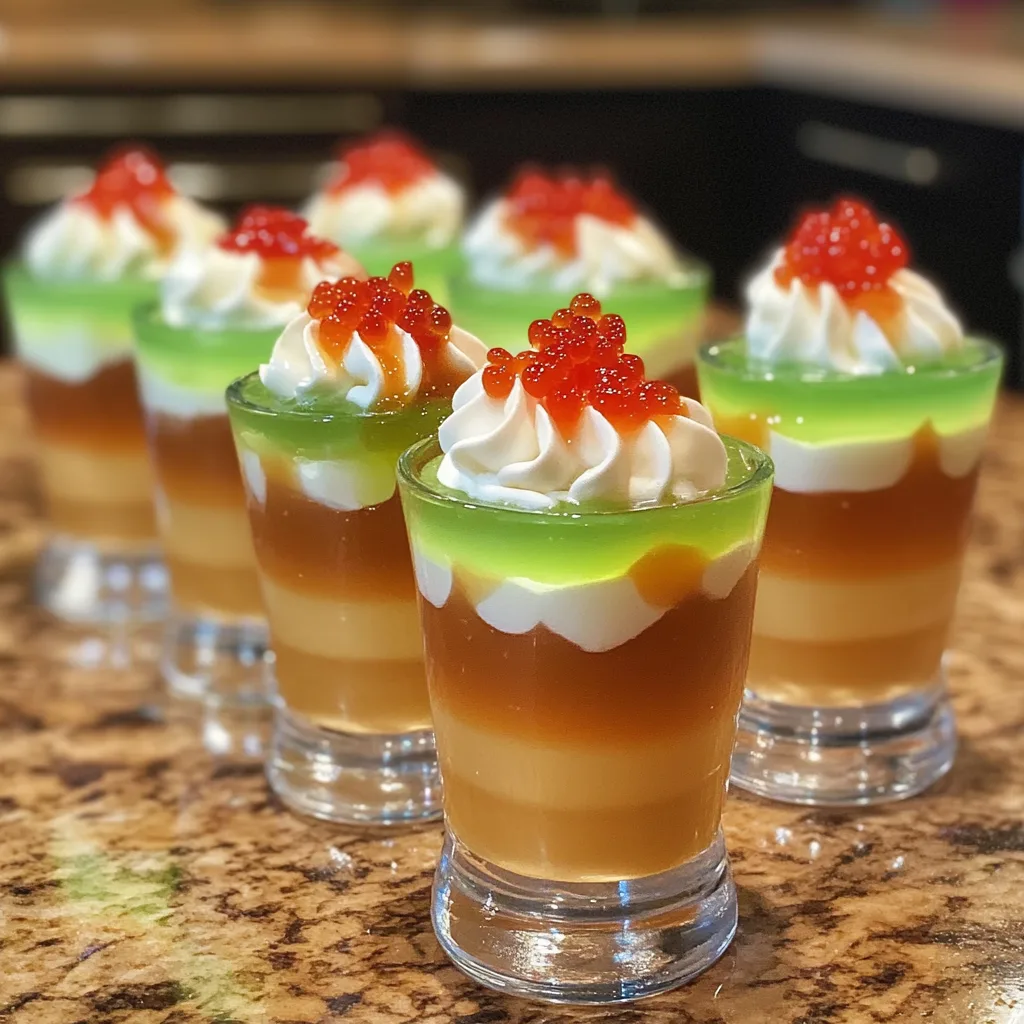
The Visual Spectacle: Food Coloring
While optional, the addition of red or green food coloring is a masterstroke of presentation. We eat with our eyes first, and this single step transforms the mixture from a simple beige pudding into a vibrant visual representation of a candy apple. A few drops of red food coloring create the iconic ruby-red glaze of a classic candy apple, while green enhances the “sour apple” theme, signaling the tart flavor within. This attention to visual detail is what separates a good party treat from a great one.
The Pillowy Texture: Cool Whip or Whipped Cream
The final textural component is the whipped topping. The instruction to “fold” in the Cool Whip is the most critical technique in the entire recipe. Folding—a gentle, deliberate motion that cuts down through the mixture and lifts it over itself—is designed to incorporate the whipped cream while preserving its precious air bubbles. This aeration is what transforms the dense pudding base into a light, fluffy, and mousse-like consistency. Vigorous stirring would deflate the cream, resulting in a dense, heavy shot; proper folding ensures a cloud-like texture that melts in your mouth.
The Art of Assembly: A Step-by-Step Guide to Perfection
Creating these shots is a straightforward process, but precision and patience at each stage are the keys to achieving a flawless final product.
Step 1: Creating the Base
Begin by combining the entire box of instant vanilla pudding mix with one cup of cold milk in a medium-sized bowl. The temperature of the milk is important, as it helps activate the thickening agents effectively. Using a whisk, beat the two together until the mixture is completely smooth and has begun to thicken. Ensure there are no visible lumps of dry powder. This smooth base is the foundation for everything that follows.
Step 2: Incorporating the Spirits and Color
Once your pudding base is smooth, pour in the half-cup of sour apple schnapps and the half-cup of caramel vodka. Stir these in until they are fully and uniformly blended into the pudding. At this stage, the mixture will thin out slightly, which is completely normal. Now is the time to add your food coloring. Start with just two or three drops, whisking them in thoroughly, and then assess the color. You can always add more to achieve your desired “candy apple” vibrancy.
Step 3: The Delicate Folding Technique
Add the thawed Cool Whip or your own freshly whipped cream to the bowl. This is the pivotal moment for texture. Ditch the whisk and switch to a large spatula. To fold correctly, cut the spatula down through the center of the mixture, sweep along the bottom, and fold the mixture from the bottom over the top. Give the bowl a quarter turn and repeat. Continue this gentle process just until the whipped topping is fully incorporated and no white streaks remain. The goal is to maintain as much air as possible, resulting in a light and fluffy mousse.
Step 4: The Patient Chill
Using a spoon or a piping bag for a cleaner look, portion the mixture into your chosen shot cups. Once filled, place the cups in the refrigerator to chill for a minimum of one to two hours. This resting period is non-negotiable. It allows the pudding to fully set, the flavors to meld together harmoniously, and the texture to firm up to the perfect spoonable consistency. For a firmer, more candy-like bite, you can follow the pro-tip to freeze them for 20-30 minutes before serving.
Mastering the Craft: Pro-Tips for a Flawless Finish
To truly make this recipe your own and impress your guests, consider these advanced techniques for flavor and presentation.
The Flavorful Twist: Cinnamon Schnapps
For an added layer of complexity that evokes the warm spices of autumn, introduce a “twist” of cinnamon schnapps. When adding the other liqueurs, incorporate one to two tablespoons of cinnamon schnapps. This will introduce a gentle, spicy warmth that plays beautifully against the tart apple and sweet caramel, creating a more sophisticated and holiday-appropriate flavor profile.
The Ultimate Presentation: The Candy Rim
Elevate your shots from simple to stunning with a professional-grade garnish. Before filling the shot cups, take a small amount of caramel sauce and use a brush or the back of a spoon to coat the rims. Then, gently dip the caramel-coated rims into a plate of finely crushed hard candy, such as Jolly Ranchers or candy canes. The result is a dazzling, sugary rim that perfectly mimics the cracked shell of a real candy apple and provides a delightful crunch with every spoonful.
Layering for Dramatic Effect
For a visually striking interior, consider a layering technique. After preparing your shot cups (with or without the candy rim), drizzle a small amount of caramel sauce inside each cup before adding the pudding mixture. As the shots set, this will create a beautiful caramel layer at the bottom, offering a surprise burst of flavor and a marbled effect when served.
The Final Presentation
The Twisted Candy Apple Shot is more than just a recipe; it is an experience. It is a celebration of nostalgia, a testament to creative mixology, and a guaranteed crowd-pleaser. By understanding the role of each ingredient and mastering the techniques of folding and presentation, you can create a dessert that is not only delicious but also a visual masterpiece. So, embrace your inner pastry mixologist, have fun with the colors and garnishes, and get ready to deliver a unforgettable taste of festive joy to your guests.
Print
Twisted Candy Apple Shots
Ingredients
The genius of the Twisted Candy Apple Shot lies in its clever use of simple, accessible ingredients to create a complex and satisfying dessert. Each component plays a specific and vital role in building the final product’s flavor, texture, and structure.
The Structural Foundation: Instant Vanilla Pudding Mix and Milk
At its core, this recipe is a stabilized mousse, and the instant vanilla pudding mix is the unsung hero that makes it all possible. When combined with cold milk, the powders in the pudding mix—primarily starches and gums—hydrate and swell, creating a thick, smooth, and stable gel. This gel forms the structural backbone of the shot, providing a base that can support the addition of liquids and air without breaking down. The vanilla flavor is a neutral yet sweet canvas, perfectly complementing the primary apple and caramel notes without overpowering them.
The Spirited Soul: Sour Apple Schnapps and Caramel Vodka
This dynamic duo is where the “twisted” in the name comes to life. Sour Apple Schnapps delivers the unmistakable, bright, and tangy punch of a green apple. This sharp, acidic note is crucial for cutting through the sweetness of the other ingredients, replicating the delightful tartness you experience when biting into a real apple. Caramel Vodka provides the other half of the classic flavor pairing, contributing a rich, buttery, and toasty sweetness. The combination of the two spirits creates a layered flavor profile that is far more sophisticated than either could achieve alone. For those without caramel vodka, the simple substitution of regular vodka mixed with a tablespoon of caramel syrup is a testament to the recipe’s versatility.
The Visual Spectacle: Food Coloring
While optional, the addition of red or green food coloring is a masterstroke of presentation. We eat with our eyes first, and this single step transforms the mixture from a simple beige pudding into a vibrant visual representation of a candy apple. A few drops of red food coloring create the iconic ruby-red glaze of a classic candy apple, while green enhances the “sour apple” theme, signaling the tart flavor within. This attention to visual detail is what separates a good party treat from a great one.
The Pillowy Texture: Cool Whip or Whipped Cream
The final textural component is the whipped topping. The instruction to “fold” in the Cool Whip is the most critical technique in the entire recipe. Folding—a gentle, deliberate motion that cuts down through the mixture and lifts it over itself—is designed to incorporate the whipped cream while preserving its precious air bubbles. This aeration is what transforms the dense pudding base into a light, fluffy, and mousse-like consistency. Vigorous stirring would deflate the cream, resulting in a dense, heavy shot; proper folding ensures a cloud-like texture that melts in your mouth.
Instructions
Creating these shots is a straightforward process, but precision and patience at each stage are the keys to achieving a flawless final product.
Step 1: Creating the Base
Begin by combining the entire box of instant vanilla pudding mix with one cup of cold milk in a medium-sized bowl. The temperature of the milk is important, as it helps activate the thickening agents effectively. Using a whisk, beat the two together until the mixture is completely smooth and has begun to thicken. Ensure there are no visible lumps of dry powder. This smooth base is the foundation for everything that follows.
Step 2: Incorporating the Spirits and Color
Once your pudding base is smooth, pour in the half-cup of sour apple schnapps and the half-cup of caramel vodka. Stir these in until they are fully and uniformly blended into the pudding. At this stage, the mixture will thin out slightly, which is completely normal. Now is the time to add your food coloring. Start with just two or three drops, whisking them in thoroughly, and then assess the color. You can always add more to achieve your desired “candy apple” vibrancy.
Step 3: The Delicate Folding Technique
Add the thawed Cool Whip or your own freshly whipped cream to the bowl. This is the pivotal moment for texture. Ditch the whisk and switch to a large spatula. To fold correctly, cut the spatula down through the center of the mixture, sweep along the bottom, and fold the mixture from the bottom over the top. Give the bowl a quarter turn and repeat. Continue this gentle process just until the whipped topping is fully incorporated and no white streaks remain. The goal is to maintain as much air as possible, resulting in a light and fluffy mousse.
Step 4: The Patient Chill
Using a spoon or a piping bag for a cleaner look, portion the mixture into your chosen shot cups. Once filled, place the cups in the refrigerator to chill for a minimum of one to two hours. This resting period is non-negotiable. It allows the pudding to fully set, the flavors to meld together harmoniously, and the texture to firm up to the perfect spoonable consistency. For a firmer, more candy-like bite, you can follow the pro-tip to freeze them for 20-30 minutes before serving.
