
Sensory-Rich Introduction with Immediate Craving
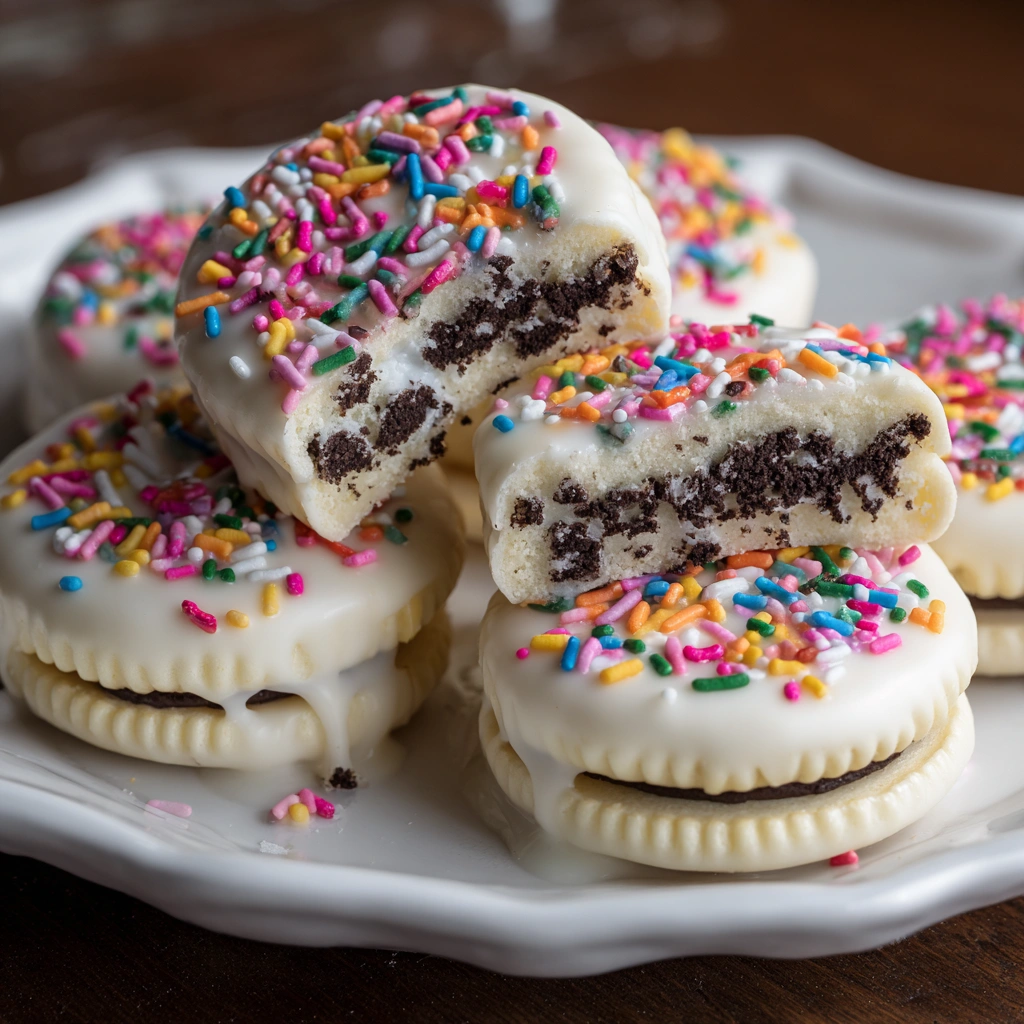
Imagine this: you take a bite of a White Chocolate Covered Oreo, and the first sensation is the smooth, creamy chocolate melting in your mouth. As you sink your teeth into the cookie, the satisfying crunch contrasts beautifully with the velvety coating, creating a delightful symphony of textures. The sweetness of the white chocolate dances on your palate, perfectly complementing the rich, chocolatey flavor of the Oreo. It’s a moment of pure bliss!
I still remember the first time I made these treats for a family gathering. The kitchen was filled with laughter and the sweet aroma of melting chocolate. As I dipped each Oreo, my little niece watched with wide eyes, her excitement palpable. When I finally presented the platter, the joy on everyone’s faces was priceless. It was as if I had conjured up a little piece of magic, and those cookies quickly became the star of the show!
These White Chocolate Covered Oreos evoke a sense of nostalgia, reminding me of childhood celebrations filled with sweet treats and laughter. They are perfect for any occasion—whether it’s a birthday party, a festive holiday gathering, or simply a sweet surprise for loved ones. Each bite is not just a treat; it’s a memory waiting to be made, a moment to savor, and a reason to celebrate the little joys in life.
Why You’ll Love This White Chocolate Covered Oreos
Let me tell you, there are so many reasons to fall head over heels for these White Chocolate Covered Oreos. Each bite is a delightful experience that keeps you coming back for more!
- Texture Contrast: The delightful crunch of the Oreo juxtaposed with the creamy smoothness of the white chocolate creates a satisfying mouthfeel. It’s like a little party in your mouth, where the cookie and chocolate dance together in perfect harmony!
- Flavor Balance: The sweetness of the white chocolate perfectly complements the rich, chocolatey flavor of the Oreo. It’s a match made in dessert heaven! The balance of flavors ensures that each bite is not overly sweet, making it a treat you can enjoy without feeling overwhelmed.
- Versatility: One of the best things about these cookies is their adaptability. You can easily customize them with different types of chocolate—dark, milk, or even flavored varieties. Add toppings like crushed nuts, coconut flakes, or seasonal sprinkles to suit your taste or the occasion!
- Ease of Preparation: With just a few simple steps, you can whip up these treats in no time. Whether you’re a novice baker or a seasoned pro, the straightforward process makes it enjoyable and stress-free. Plus, there’s no baking involved, which is a huge bonus!
- Universal Appeal: These cookies are loved by kids and adults alike, making them a hit at any gathering. Whether you’re serving them at a birthday party, holiday celebration, or just as a sweet surprise for your family, they’re sure to bring smiles all around!
So, whether you’re looking to impress guests or simply indulge in a sweet treat, these White Chocolate Covered Oreos are the perfect choice. Trust me, once you try them, you’ll understand why they’re such a beloved dessert!
Essential Tools & Preparation Strategy
Before we dive into the delightful world of White Chocolate Covered Oreos, let’s make sure you have all the essential tools at your fingertips. Having the right equipment not only makes the process smoother but also enhances your overall experience in the kitchen. Here’s what you’ll need:
- Microwave-safe bowl: This is crucial for melting chocolate safely and efficiently. Choose one that’s large enough to hold all your chocolate chips without spilling over.
- Fork: An everyday kitchen hero! It’s perfect for dipping and lifting the cookies without creating a mess. Plus, it gives you a good grip on those slippery cookies!
- Parchment paper: This simple tool prevents sticking and simplifies cleanup. Trust me, you’ll thank yourself later when it’s time to remove the cookies from the baking sheet!
- Baking sheet: A stable surface is essential for cooling the dipped cookies. Make sure it fits in your refrigerator, as you’ll need it for chilling!
- Measuring cups: Accurate measurements are key to consistent results. Using the right amount of chocolate and cookies ensures that every batch is just as delicious as the last.
- Spatula: This handy tool is useful for mixing and scraping melted chocolate from the bowl. It helps you get every last bit of that creamy goodness!
- Optional: Candy thermometer: If you want to take your chocolate melting to the next level, a candy thermometer can help you achieve the perfect temperature. Aim for around 110°F to 120°F for smooth, glossy chocolate.
With these tools in hand, you’re well on your way to creating a batch of White Chocolate Covered Oreos that will impress everyone. Remember, preparation is key, so take a moment to gather everything before you start. Happy dipping!
Ingredients & Their Roles in This White Chocolate Covered Oreos
Let’s take a closer look at the ingredients that come together to create these delightful White Chocolate Covered Oreos. Each component plays a vital role in achieving that perfect balance of flavor and texture!
- Oreo Cookies: The star ingredient! These iconic cookies provide the base flavor and satisfying crunch that we all know and love. Their rich, chocolatey taste pairs beautifully with the creamy white chocolate, making each bite a delightful experience.
- White Chocolate Chips: This is where the magic happens! The creamy coating adds a luscious sweetness and richness that envelops the Oreo. When melted, the white chocolate transforms into a smooth, velvety layer that contrasts perfectly with the crunchy cookie. Just be sure to use high-quality chocolate for the best results!
- Sprinkles (optional): While not essential, sprinkles add a fun pop of color and festive flair to your cookies. They can elevate the visual appeal, making your treats even more inviting. Plus, who doesn’t love a little extra sparkle on their desserts?
Substitutions
If you’re looking to mix things up, consider these substitutions:
- Dark Chocolate: For a richer flavor, swap out the white chocolate for dark chocolate. This will give your cookies a more intense taste and a beautiful contrast against the Oreo.
- Milk Chocolate: If you prefer a sweeter option, milk chocolate is a great alternative. It offers a nice balance between the sweetness of the white chocolate and the richness of the Oreo.
Preparation Notes
To ensure your White Chocolate Covered Oreos turn out perfectly, keep these tips in mind:
- Make sure your chocolate is melted smoothly. Stir it well after each heating interval to avoid any lumps. If you notice any stubborn bits, a quick stir with a spatula can help.
- Always use fresh Oreo cookies. Stale cookies can affect the overall taste and texture of your treats. A fresh cookie will provide that satisfying crunch we all crave!
With these ingredients and tips in your back pocket, you’re well on your way to creating a batch of White Chocolate Covered Oreos that will impress everyone. Let’s keep the momentum going and dive into the next steps!
Step-by-Step Guide to Perfect White Chocolate Covered Oreos
Now that you’re all set with your ingredients and tools, let’s dive into the delightful process of creating these White Chocolate Covered Oreos. Trust me, the joy of watching those cookies transform is almost as sweet as the final product!
- Melt the White Chocolate: Start by placing your 2 cups of white chocolate chips in a microwave-safe bowl. Heat them in 30-second intervals, stirring in between, until the chocolate is fully melted and smooth. This should take about 1-2 minutes total. Be patient; the aroma of melting chocolate is worth the wait!
- Dip the Oreos: Grab your first Oreo cookie and dip it into the melted chocolate. Make sure it’s fully coated, allowing the creamy chocolate to envelop the cookie completely. The contrast of the smooth chocolate against the crunchy cookie is simply irresistible!
- Lift and Drain: Using a fork, gently lift the cookie out of the chocolate. Allow any excess chocolate to drip back into the bowl. This step is crucial to avoid a thick, gloopy coating that can mask the Oreo’s delightful crunch.
- Place on Baking Sheet: Carefully set the dipped Oreo on a parchment-lined baking sheet. This will prevent sticking and make cleanup a breeze. Plus, it gives your cookies a nice, professional look!
- Add Sprinkles: If you’re feeling festive, now’s the time to sprinkle on some colorful toppings before the chocolate sets. Just a light dusting will do; you want to enhance the visual appeal without overpowering the flavor.
- Repeat: Continue this delightful dipping process until all your cookies are coated. I often find myself sneaking a bite of the leftover chocolate—don’t judge!
- Chill: Pop the baking sheet into the refrigerator for about 30 minutes or until the chocolate is firm. This step is essential for achieving that perfect snap when you bite into your cookie.
- Serve: Once the chocolate has set, it’s time to enjoy your delicious treats! Whether you’re sharing them at a gathering or indulging solo, each bite is a creamy, crunchy bliss.
And there you have it! A simple yet satisfying process that transforms ordinary Oreos into a decadent treat. Remember, the key to success lies in patience and attention to detail. Happy dipping!
Chef’s Notes & Pro Tips for Flawless Results
As you embark on your journey to create these delightful White Chocolate Covered Oreos, I want to share some of my favorite tips and tricks that will ensure your cookies turn out perfectly every time. Trust me, a little extra care goes a long way in the kitchen!
- Make-ahead instructions: These cookies can be prepared a day in advance, making them a fantastic option for busy schedules. Simply store them in an airtight container to keep them fresh and delicious until you’re ready to serve.
- Storage tips: To maintain their delightful crunch, keep your White Chocolate Covered Oreos in a cool, dry place. If you prefer, you can refrigerate them for up to 1 week. Just be sure to let them come to room temperature before serving for the best texture!
- Equipment recommendations: For the best flavor and texture, I highly recommend using high-quality chocolate. Brands like Ghirardelli or Callebaut melt beautifully and provide a rich, creamy coating that elevates your cookies to gourmet status.
- Customization options: Don’t be afraid to get creative! Experiment with different toppings like crushed nuts, coconut flakes, or even a drizzle of caramel for added flair. You can also try flavored chocolate, such as mint or raspberry, to give your cookies a unique twist!
With these pro tips in your back pocket, you’re well-equipped to create a batch of White Chocolate Covered Oreos that will impress everyone. Remember, the joy of baking comes not just from the end result, but from the love and creativity you put into each step. Happy baking!
Avoid These Common Cooking Mistakes
As you embark on your journey to create the perfect White Chocolate Covered Oreos, it’s essential to be aware of some common pitfalls that can hinder your success. Trust me, I’ve made these mistakes myself, and learning from them has made all the difference in my baking adventures!
- Not cooling chocolate: If you dive straight into dipping without letting the chocolate cool slightly, you risk soggy cookies. Allow the melted chocolate to sit for a few minutes before dipping to ensure a crisp finish.
- Overheating chocolate: This is a classic blunder! Overheating can lead to a burnt taste that ruins the flavor. Stick to 30-second intervals in the microwave and stir often to keep the chocolate smooth and creamy.
- Skipping parchment paper: Trust me, this is a mistake you don’t want to make! Not using parchment paper can make it incredibly difficult to remove the cookies once they’ve set. Always line your baking sheet for easy removal and cleanup.
- Not refrigerating: If you skip the chilling step, you may end up with soft chocolate that doesn’t have that satisfying snap. Chill your cookies for about 30 minutes or until the chocolate is firm for the best texture.
- Using stale cookies: This can significantly affect the taste and texture of your treats. Always opt for fresh Oreo cookies to ensure that delightful crunch and flavor in every bite!
- Not shaking off excess chocolate: If you don’t shake off the excess chocolate, you’ll end up with a thick coating that can mask the Oreo’s delightful crunch. Gently tap the fork against the bowl to remove any extra chocolate before placing it on the baking sheet.
- Overusing sprinkles: While sprinkles add a fun touch, using too many can overpower the flavor of the cookie. Use them sparingly to maintain a balanced look and taste.
By keeping these common mistakes in mind, you’ll be well on your way to creating a batch of White Chocolate Covered Oreos that are not only visually appealing but also deliciously satisfying. Happy baking!
Creative Variations & Customizations
One of the best things about White Chocolate Covered Oreos is their versatility! You can easily customize them to suit your taste or the occasion. Here are some delightful variations that will take your cookie game to the next level:
- Dark Chocolate Covered Oreos: For those who prefer a richer flavor, swap out the white chocolate for dark chocolate. The deep, intense taste of dark chocolate pairs beautifully with the Oreo, creating a decadent treat that chocolate lovers will adore.
- Mint Chocolate Oreos: If you’re a fan of mint, add a few drops of mint extract to your melted chocolate. This refreshing twist will give your cookies a cool, invigorating flavor that’s perfect for the warmer months or holiday gatherings!
- Peanut Butter Drizzle: For an extra layer of flavor, melt some peanut butter and drizzle it over the chocolate-coated Oreos. The combination of creamy peanut butter and sweet white chocolate is simply irresistible and adds a delightful nutty twist!
- Seasonal Sprinkles: Get festive by using themed sprinkles for different holidays. For example, use red and green sprinkles for Christmas, pastel colors for Easter, or orange and black for Halloween. This not only enhances the visual appeal but also makes your treats perfect for any celebration!
- Gluten-Free Option: If you or your guests are gluten-sensitive, simply use gluten-free Oreos. They taste just as delicious and allow everyone to enjoy these sweet treats without worry.
Feel free to mix and match these ideas to create your own signature version of White Chocolate Covered Oreos. The possibilities are endless, and the joy of experimenting in the kitchen is part of the fun! Happy customizing!
Perfect Pairings: What to Serve With White Chocolate Covered Oreos
Now that you’ve created your delicious White Chocolate Covered Oreos, it’s time to think about how to elevate your treat experience even further! Here are some delightful pairings that will complement the creamy, crunchy bliss of your cookies:
- Cold Milk: You can’t go wrong with this classic pairing! A glass of cold milk enhances the cookie experience, providing a refreshing contrast to the sweetness of the white chocolate. It’s like a match made in dessert heaven!
- Fresh Strawberries: The juicy, fruity contrast of fresh strawberries beautifully complements the sweetness of the cookies. The tartness of the berries cuts through the richness, creating a balanced and delightful bite.
- Vanilla Ice Cream: For an indulgent dessert combination, serve your White Chocolate Covered Oreos alongside a scoop of creamy vanilla ice cream. The combination of textures and flavors is simply divine!
- Coffee or Tea: These cookies make for a perfect afternoon snack when paired with a warm cup of coffee or tea. The rich flavors of the beverage enhance the sweetness of the cookies, making for a cozy treat.
- Dessert Platters: Incorporate your cookies into a dessert platter filled with a variety of sweet treats. This not only adds visual appeal but also allows guests to enjoy a selection of flavors and textures.
- Gift Baskets: These cookies are ideal for homemade gifts! Package them in a beautiful box or basket, and they’ll make a thoughtful and delicious present for friends and family.
- Ice Cream Sundaes: Crumble your White Chocolate Covered Oreos on top of ice cream sundaes for added crunch and flavor. They make a delightful topping that takes your sundae to the next level!
- Fruit Salad: A refreshing fruit salad can serve as a light side that balances the sweetness of the cookies. The natural sugars and acidity from the fruits provide a nice contrast, making for a well-rounded dessert experience.
With these perfect pairings, you can create a delightful spread that will impress your guests and elevate your White Chocolate Covered Oreos to new heights. Enjoy the sweet moments and happy sharing!
Storage & Meal Prep Instructions
Now that you’ve created your delicious White Chocolate Covered Oreos, it’s important to know how to store them properly to maintain their delightful crunch and flavor. Here are some handy storage tips to keep your treats fresh and ready to enjoy!
- Fridge Storage: To keep your cookies at their best, store them in an airtight container in the refrigerator. They will stay fresh for up to 1 week. Just be sure to let them come to room temperature before serving for the best texture!
- Freezer Storage: If you want to make a batch ahead of time, these cookies can be frozen for up to 3 months. Simply place them in a freezer-safe container or bag, separating layers with parchment paper to prevent sticking. When you’re ready to enjoy, thaw them in the fridge overnight for a perfect treat!
- Reheating Methods: Typically, reheating isn’t necessary for these cookies, as they are best enjoyed at room temperature. However, if they’ve been chilled, you can leave them out for a few minutes to soften slightly before indulging. This will enhance the creamy texture of the chocolate!
By following these storage and meal prep instructions, you can ensure that your White Chocolate Covered Oreos remain a delightful treat for days to come. Enjoy every bite, and happy snacking!
Nutrition Facts & Health Insights
As we indulge in the delightful world of White Chocolate Covered Oreos, it’s essential to be mindful of the nutrition that comes with these sweet treats. Here’s a detailed breakdown of the nutritional content per cookie, so you can enjoy them with a little knowledge in your back pocket!
| Nutrient | Amount per Cookie |
|---|---|
| Calories | 150 |
| Sugar | 10 grams |
| Sodium | 50 milligrams |
| Fat | 7 grams |
| Saturated Fat | 4 grams |
| Unsaturated Fat | 2 grams |
| Trans Fat | 0 grams |
| Carbohydrates | 20 grams |
| Fiber | 1 gram |
| Protein | 1 gram |
| Cholesterol | 0 milligrams |
While these White Chocolate Covered Oreos are undeniably a treat, it’s important to enjoy them in moderation. The joy of indulging in a sweet snack can be part of a balanced diet, especially when paired with healthier options like fresh fruit or a glass of milk. Here are a few health insights to keep in mind:
- Moderation is Key: Enjoying a cookie or two as part of your dessert can satisfy your sweet tooth without derailing your healthy eating habits. It’s all about balance!
- Mindful Eating: Take the time to savor each bite. The creamy white chocolate and crunchy Oreo create a delightful experience that’s worth enjoying slowly.
- Sharing is Caring: These cookies are perfect for sharing at gatherings. By offering them to friends and family, you can enjoy the treat without overindulging.
- Incorporate Variety: Pair your cookies with healthier snacks, like a fruit salad or yogurt, to create a more balanced dessert experience.
Remember, it’s perfectly okay to indulge in sweet treats like White Chocolate Covered Oreos as part of a joyful and balanced lifestyle. So go ahead, treat yourself, and enjoy every delicious bite!
Frequently Asked Questions
As you embark on your journey to create the perfect White Chocolate Covered Oreos, you might have a few questions along the way. Don’t worry; I’ve got you covered! Here are some of the most frequently asked questions about this delightful treat:
- Can I use milk chocolate instead of white? Absolutely! Milk chocolate is a delicious alternative that adds a different flavor profile. Just keep in mind that it will be sweeter than white chocolate, so adjust your expectations accordingly!
- How long do these cookies last? When stored in an airtight container, your White Chocolate Covered Oreos will stay fresh for up to 1 week at room temperature. If you refrigerate them, they can last even longer!
- What if my chocolate seizes? If your chocolate seizes, don’t panic! You can try adding a small amount of vegetable oil or shortening to the chocolate and gently reheating it. This can help restore its smooth texture.
- Can I add flavoring to the chocolate? Yes! Feel free to get creative by adding extracts like vanilla, almond, or even peppermint to your melted chocolate. Just a few drops can elevate the flavor and make your cookies even more special!
- Are there vegan options available? Yes! You can use vegan white chocolate or dark chocolate chips to make these cookies vegan-friendly. Just ensure that your Oreos are also vegan, as some varieties may contain dairy.
- How do I store leftovers? To keep your cookies fresh, store them in an airtight container at room temperature or in the refrigerator. If you want to keep them for longer, consider freezing them for up to 3 months.
- Can I use homemade cookies instead of Oreos? While Oreos are the classic choice, you can certainly use homemade cookies! Just make sure they have a similar texture and flavor profile to ensure the best results.
- What’s the best way to melt chocolate? The best way to melt chocolate is in a microwave-safe bowl, heating it in 30-second intervals and stirring in between. This method helps prevent overheating and ensures a smooth consistency.
- Can I make these without sprinkles? Of course! Sprinkles are optional, and your White Chocolate Covered Oreos will still be delicious without them. Feel free to skip this step if you prefer a more classic look.
- How do I know when the chocolate is set? The chocolate is set when it feels firm to the touch and has a nice snap when you break a cookie. If you’re unsure, refrigerate them for about 30 minutes to ensure they’re fully hardened.
With these FAQs in mind, you’re well-equipped to tackle any challenges that may arise while making your White Chocolate Covered Oreos. Enjoy the process, and happy baking!
Final Inspiration & Kitchen Confidence
As you stand in your kitchen, surrounded by the delightful aroma of melting chocolate and the anticipation of creating your very own White Chocolate Covered Oreos, I want to take a moment to encourage you. Baking is not just about the end result; it’s about the joy of the process, the laughter shared, and the memories made along the way. Each time you step into the kitchen, you’re not just cooking; you’re crafting moments of happiness that can be shared with loved ones.
Remember, every attempt in the kitchen is a step towards mastery. Don’t be afraid to make mistakes; they are often the best teachers. Whether your cookies turn out perfectly or not, the experience is what truly matters. Embrace the journey, and let your creativity shine through!
So, gather your ingredients, put on your favorite apron, and dive into the delightful world of baking. Once you’ve created your White Chocolate Covered Oreos, don’t keep them to yourself! Share your delicious creations with friends and family, and relish in the sweet rewards of your efforts. Trust me, the smiles and compliments you receive will make it all worthwhile. Happy baking, and enjoy every scrumptious bite!
Print
White Chocolate Covered Oreos: Creamy, Crunchy Bliss!
- Total Time: 50 minutes
- Yield: 24 cookies
- Diet: Vegetarian
Description
Indulge in the delightful contrast of creamy white chocolate enveloping a crunchy Oreo cookie. Each bite offers a perfect balance of sweetness and texture, with the smooth chocolate melting in your mouth while the cookie provides a satisfying crunch.
Ingredients
- Oreo Cookies – 1 package (15.35 oz)
- White Chocolate Chips – 2 cups
- Sprinkles (optional) – 1/2 cup
Instructions
- Begin by melting the white chocolate chips in a microwave-safe bowl. Heat in 30-second intervals, stirring in between, until fully melted and smooth (about 1-2 minutes).
- Dip each Oreo cookie into the melted white chocolate, ensuring it is fully coated.
- Use a fork to lift the cookie out, allowing excess chocolate to drip off.
- Place the dipped Oreo on a parchment-lined baking sheet.
- If desired, sprinkle with colorful sprinkles before the chocolate sets.
- Repeat the process until all cookies are coated.
- Refrigerate the cookies for about 30 minutes or until the chocolate is firm.
- Serve and enjoy your delicious treats!
Notes
- Make-ahead: These cookies can be made a day in advance and stored in an airtight container.
- Storage: Keep in a cool, dry place or refrigerate for up to 1 week.
- Substitutions: Use dark or milk chocolate instead of white chocolate for a different flavor.
- Prep Time: 15 minutes
- Cook Time: 5 minutes
- Category: Desserts
- Method: Dipping
- Cuisine: American
Nutrition
- Serving Size: 1 cookie
- Calories: 150
- Sugar: 10 grams
- Sodium: 50 milligrams
- Fat: 7 grams
- Saturated Fat: 4 grams
- Unsaturated Fat: 2 grams
- Trans Fat: 0 grams
- Carbohydrates: 20 grams
- Fiber: 1 gram
- Protein: 1 gram
- Cholesterol: 0 milligrams
Keywords: White Chocolate Covered Oreos, Oreo dessert, chocolate dipped cookies, easy dessert recipes, party treats, homemade gifts, sweet snacks, no-bake desserts, festive cookies, chocolate treats, kid-friendly recipes, simple desserts, cookie recipes
