

Introduction to Witch Hat Cookie Cones
As the leaves turn and the air gets crisp, I find myself dreaming up fun Halloween treats to share with my family. One of my absolute favorites is Witch Hat Cookie Cones. These delightful little cones are not just a feast for the eyes; they’re a quick solution for busy days filled with Halloween festivities. With a little creativity and some simple ingredients, you can whip up these spooky delights that will impress your loved ones. Trust me, the smiles on their faces will be worth every minute spent in the kitchen!
Why You’ll Love This Witch Hat Cookie Cones
Witch Hat Cookie Cones are the perfect blend of fun and flavor. They’re incredibly easy to make, which is a lifesaver for busy moms like me. In just 35 minutes, you can create a treat that’s not only delicious but also visually captivating. Plus, the kids can help with the assembly, making it a delightful family activity. Trust me, these cones will be the highlight of your Halloween celebrations!
Ingredients for Witch Hat Cookie Cones
Gathering the right ingredients is half the fun of making Witch Hat Cookie Cones! Here’s what you’ll need:
- Chocolate cookies: These form the iconic witch hats. You can use store-bought or bake your own from scratch for a personal touch.
- Ice cream cones: The base of your witch hats! Choose regular cones or go for waffle cones for a bit of extra crunch.
- Chocolate frosting: This sticky goodness helps attach the cookie hats to the cones. You can use store-bought frosting or whip up a quick homemade version.
- Halloween-themed candies: Think candy corn, gummy worms, or any spooky treats that catch your eye. These will fill your cones with sweet surprises!
- Sprinkles (optional): Add a pop of color and fun! Choose festive sprinkles to make your cones even more eye-catching.
For exact quantities, check the bottom of the article where you can find everything you need for printing. Feel free to get creative with your ingredients! Swap in your favorite candies or even try different cookie flavors. The possibilities are endless!
How to Make Witch Hat Cookie Cones
Making Witch Hat Cookie Cones is a delightful adventure! Follow these simple steps to create your spooky treats. Each step is designed to be easy and fun, so let’s get started!
Step 1: Prepare the Chocolate Cookies
First, you’ll want to prepare your chocolate cookies. If you’re using a package mix, just follow the instructions on the box. If you’re feeling adventurous, whip up your favorite homemade recipe. The key is to bake them until they’re firm but not overdone. This ensures they hold their shape when you cut them. Let them cool completely on a wire rack before moving on to the next step. Trust me, patience pays off!
Step 2: Shape the Cookies into Hats
Once your cookies are cool, it’s time to shape them into witch hats! Grab a round cookie cutter and cut out the cookies into hat shapes. If you don’t have a cookie cutter, you can use a knife to create the iconic triangular shape. Just be sure to make them uniform so they fit nicely on the cones. A little tip: if the cookies crumble, don’t worry! You can always use frosting to patch them up later.
Step 3: Frost the Ice Cream Cones
Now, let’s get those ice cream cones ready! Dip the top edge of each cone into chocolate frosting. This step is crucial because it acts like glue for your cookie hats. Make sure to coat the edge well, so the cookies stick securely. If you want a thicker layer of frosting, feel free to double dip! It adds a delicious touch and makes the cones even more festive.
Step 4: Assemble the Witch Hat Cookie Cones
It’s time for the fun part—assembly! Carefully attach the cookie hats to the frosted edges of the cones. Press gently to ensure they stick. Once they’re secure, fill the cones with your choice of Halloween-themed candies. Think candy corn, gummy worms, or any spooky treats that make you smile. This is where you can get creative and let your imagination run wild!
Step 5: Add Final Touches
To make your Witch Hat Cookie Cones even more eye-catching, consider adding sprinkles. A sprinkle of color can elevate your treats from cute to spectacular! Just sprinkle them on top of the frosting before it sets. This little detail will make your cones pop and impress everyone at your Halloween gathering. Now, step back and admire your spooky creations!
Tips for Success
- Ensure cookies are completely cool before cutting and assembling.
- Use a sharp knife or cookie cutter for clean edges when shaping the hats.
- Don’t be shy with the frosting; it helps everything stick together!
- Let the kids help with filling the cones; it’s a fun family activity.
- Assemble close to serving time for the freshest taste and best presentation.
Equipment Needed
- Baking sheet: A standard baking sheet works perfectly. If you don’t have one, a large oven-safe dish will do.
- Wire rack: Essential for cooling cookies. If you’re in a pinch, a plate can work too.
- Round cookie cutter: For shaping the hats. A knife can also be used for a more rustic look.
- Mixing bowl: Any large bowl will suffice for mixing ingredients.
- Spatula: Great for spreading frosting. A butter knife can be a handy alternative!
Variations of Witch Hat Cookie Cones
- Gluten-Free Option: Use gluten-free chocolate cookies to make these cones suitable for those with dietary restrictions.
- Vegan Twist: Substitute the chocolate frosting with a vegan alternative and use dairy-free chocolate cookies for a plant-based treat.
- Nutty Delight: Add crushed nuts or nut butter to the candy filling for an extra crunch and flavor boost.
- Fruit-Filled Cones: Swap out candies for dried fruits like raisins or cranberries for a healthier twist.
- Spooky Colors: Use colored frosting or candy melts to create a more vibrant and festive look for your cones.
Serving Suggestions for Witch Hat Cookie Cones
- Pair with a spooky punch or apple cider for a festive drink option.
- Serve alongside a platter of Halloween-themed cookies for a delightful dessert spread.
- Display on a decorative cake stand to elevate the presentation.
- Consider adding themed napkins or plates to enhance the Halloween vibe.
FAQs about Witch Hat Cookie Cones
As I’ve shared my love for Witch Hat Cookie Cones, I often get questions from fellow home cooks. Here are some of the most common queries I’ve encountered, along with my answers to help you create these delightful Halloween treats!
Can I make Witch Hat Cookie Cones ahead of time?
Absolutely! You can bake the cookies and prepare the cones in advance. Just wait to assemble them until closer to serving time. This keeps everything fresh and delicious!
What candies work best for filling the cones?
Halloween-themed candies are a hit! Think candy corn, gummy worms, or chocolate-covered treats. You can even mix in some dried fruits for a healthier option.
Can I use different types of cookies for the hats?
Of course! While chocolate cookies are traditional, feel free to experiment with other flavors like vanilla or pumpkin spice. Just make sure they hold their shape!
How do I store leftover Witch Hat Cookie Cones?
If you have any leftovers, store them in an airtight container. However, they’re best enjoyed fresh, so try to eat them within a day or two!
Are Witch Hat Cookie Cones suitable for kids?
Definitely! These cones are a fun and interactive treat for kids. They can help with assembly and choose their favorite candies, making it a delightful family activity!
Final Thoughts
Creating Witch Hat Cookie Cones is more than just making a treat; it’s about crafting memories with your loved ones. The joy of baking together, the laughter shared over spilled sprinkles, and the delight in seeing those happy faces as they enjoy these spooky cones are priceless. This recipe is a wonderful way to celebrate Halloween, bringing a touch of magic to your kitchen. So, gather your family, unleash your creativity, and let these whimsical treats become a cherished tradition in your home. Trust me, the smiles will be worth every moment spent in the kitchen!
Print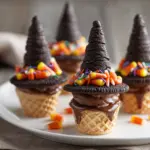
Witch Hat Cookie Cones: A Fun Halloween Treat!
- Total Time: 35 minutes
- Yield: 12 cones
- Diet: Vegetarian
Description
Witch Hat Cookie Cones are a delightful and spooky treat perfect for Halloween celebrations. These fun dessert cones are made with chocolate cookies shaped like witch hats and filled with sweet treats.
Ingredients
- Chocolate cookies (for the hats)
- Ice cream cones
- Chocolate frosting
- Halloween-themed candies (like candy corn or gummy worms)
- Sprinkles (optional)
Instructions
- Start by preparing the chocolate cookies according to the package instructions or your favorite recipe.
- Once the cookies are baked and cooled, use a round cookie cutter to cut them into hat shapes.
- Take the ice cream cones and dip the top edge into chocolate frosting.
- Attach the cookie hats to the frosted edge of the cones.
- Fill the cones with your choice of Halloween-themed candies.
- Optionally, decorate the cones with sprinkles for an extra festive touch.
- Serve immediately and enjoy your Witch Hat Cookie Cones!
Notes
- Make sure the cookies are completely cooled before assembling.
- Feel free to customize the fillings with your favorite candies.
- These can be made ahead of time, but assemble them close to serving for best results.
- Prep Time: 20 minutes
- Cook Time: 15 minutes
- Category: Dessert
- Method: Baking
- Cuisine: American
Nutrition
- Serving Size: 1 cone
- Calories: 250
- Sugar: 20g
- Sodium: 150mg
- Fat: 10g
- Saturated Fat: 5g
- Unsaturated Fat: 3g
- Trans Fat: 0g
- Carbohydrates: 35g
- Fiber: 1g
- Protein: 2g
- Cholesterol: 15mg
Keywords: Witch Hat Cookie Cones, Halloween Treats, Halloween Desserts, Fun Halloween Recipes
