
Introduction to Apple Pie Bars Recipe
As the leaves begin to turn and the air gets a little crisper, I find myself drawn to the warm, comforting aroma of baked apples and cinnamon. There’s something magical about autumn that makes me want to fill my kitchen with the sweet scent of homemade treats. One of my all-time favorites is the delightful Apple Pie Bars Recipe. These bars are like a hug in dessert form, combining the classic flavors of apple pie with the convenience of a bar. Perfect for sharing with friends or enjoying on a cozy evening at home, they never fail to bring a smile to my face.
My journey with apple pie bars began on a chilly October afternoon. I was rummaging through my pantry, searching for a way to use up the bushel of apples I had picked at the orchard. I wanted something easy, something that would remind me of my grandmother’s kitchen, where the warmth of the oven mingled with laughter and stories. That’s when I stumbled upon the idea of apple pie bars. They were simple to make, yet packed with all the flavors I adored.
What I love most about this recipe is its versatility. You can customize it to suit your taste, whether you prefer a crumbly topping or a flaky crust. Plus, they’re perfect for any occasion—be it a family gathering, a potluck, or just a sweet treat for yourself. So, grab your apron and let’s dive into this delicious adventure together. I promise, once you try these apple pie bars, they’ll become a staple in your baking repertoire!
Ingredients for Apple Pie Bars Recipe
Before we get our hands floury and dive into the baking process, let’s gather all the ingredients we’ll need for these scrumptious Apple Pie Bars Recipe. I always believe that the quality of your ingredients can make a world of difference in the final product. So, let’s make sure we’re using the best of the best!
Main Ingredients
- 2 cups all-purpose flour
- 1/2 cup granulated sugar
- 1/2 cup brown sugar, packed
- 1/2 cup unsalted butter, softened
- 1 large egg
- 1 teaspoon vanilla extract
- 1 teaspoon baking powder
- 1/2 teaspoon salt
- 4 cups apples, peeled, cored, and sliced (I recommend Granny Smith or Honeycrisp for their tartness and sweetness)
- 1 teaspoon ground cinnamon
- 1 tablespoon lemon juice
When selecting apples, I always opt for those that are firm and fresh. A quick tip: if you can, visit a local farmer’s market or orchard. The flavor of freshly picked apples is unbeatable!
Optional Add-ons
- 1/2 cup chopped nuts (walnuts or pecans add a delightful crunch)
- 1/4 cup raisins or dried cranberries for a chewy texture
- 1/2 teaspoon nutmeg for an extra layer of warmth
- Caramel sauce for drizzling on top after baking
Feel free to mix and match these optional ingredients based on your preferences. I often toss in some nuts for that extra crunch, and oh, the caramel drizzle? It’s like the cherry on top of an already perfect sundae!
How to Prepare Apple Pie Bars Recipe
Now that we have all our ingredients ready, it’s time to roll up our sleeves and get to the fun part—baking! I find that the process of making these Apple Pie Bars Recipe is just as enjoyable as eating them. So, let’s break it down step by step.
Step 1: Prepare the Crust
First things first, we need to create a buttery, flaky crust that will cradle our delicious apple filling. In a large mixing bowl, combine the flour, granulated sugar, brown sugar, baking powder, and salt. Then, add the softened butter and mix until the mixture resembles coarse crumbs. I like to use my fingers for this part; it feels more personal, like I’m connecting with the ingredients.
Next, add the egg and vanilla extract. Mix until everything is just combined. Don’t overwork the dough; we want it to be tender and flaky!
Tips for Achieving the Perfect Crust
- Make sure your butter is softened but not melted. This helps create that flaky texture.
- Chill the dough for about 30 minutes before pressing it into the pan. This helps it hold its shape while baking.
- Use a fork to poke holes in the crust before baking. This prevents it from puffing up.
Step 2: Make the Apple Filling
While the crust is chilling, let’s whip up the apple filling! In a separate bowl, toss the sliced apples with lemon juice, cinnamon, and any optional ingredients you’ve chosen. I love the way the lemon juice brightens the flavors and keeps the apples from browning.
Let the mixture sit for about 10 minutes. This allows the apples to release some of their juices, which will make the filling even more flavorful.
Tips for Choosing the Right Apples
- For the best flavor, mix different types of apples. A combination of tart and sweet apples creates a balanced filling.
- Granny Smith apples are great for their tartness, while Honeycrisp adds a lovely sweetness.
- Always taste your apples before using them. You want to ensure they’re sweet and juicy!
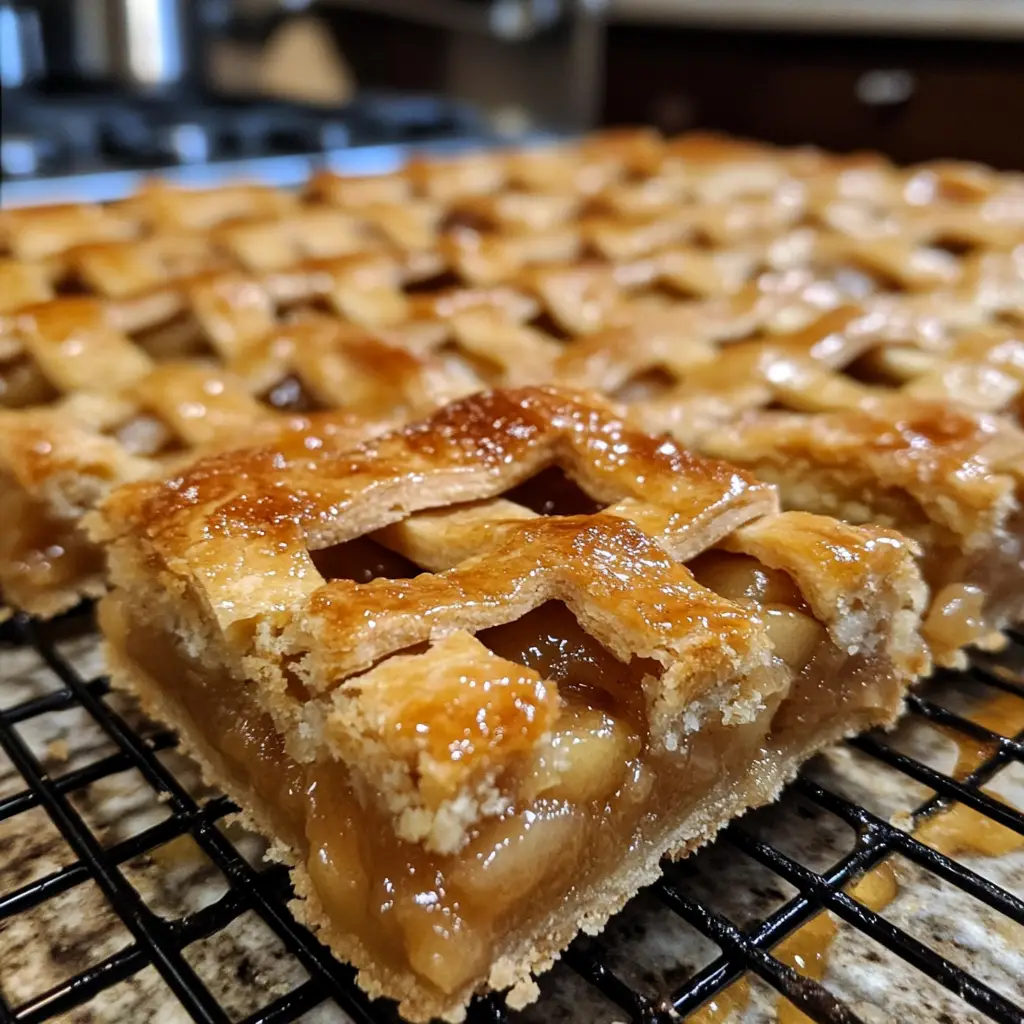
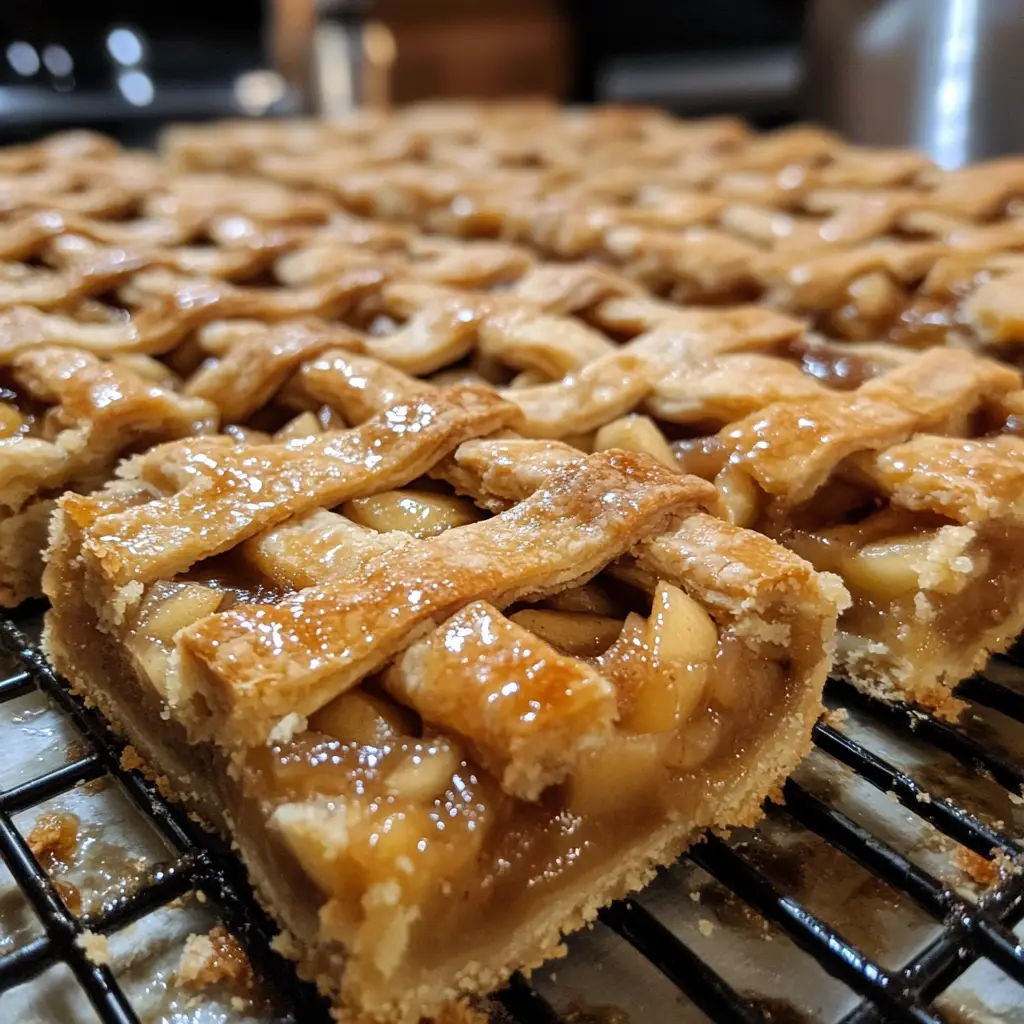
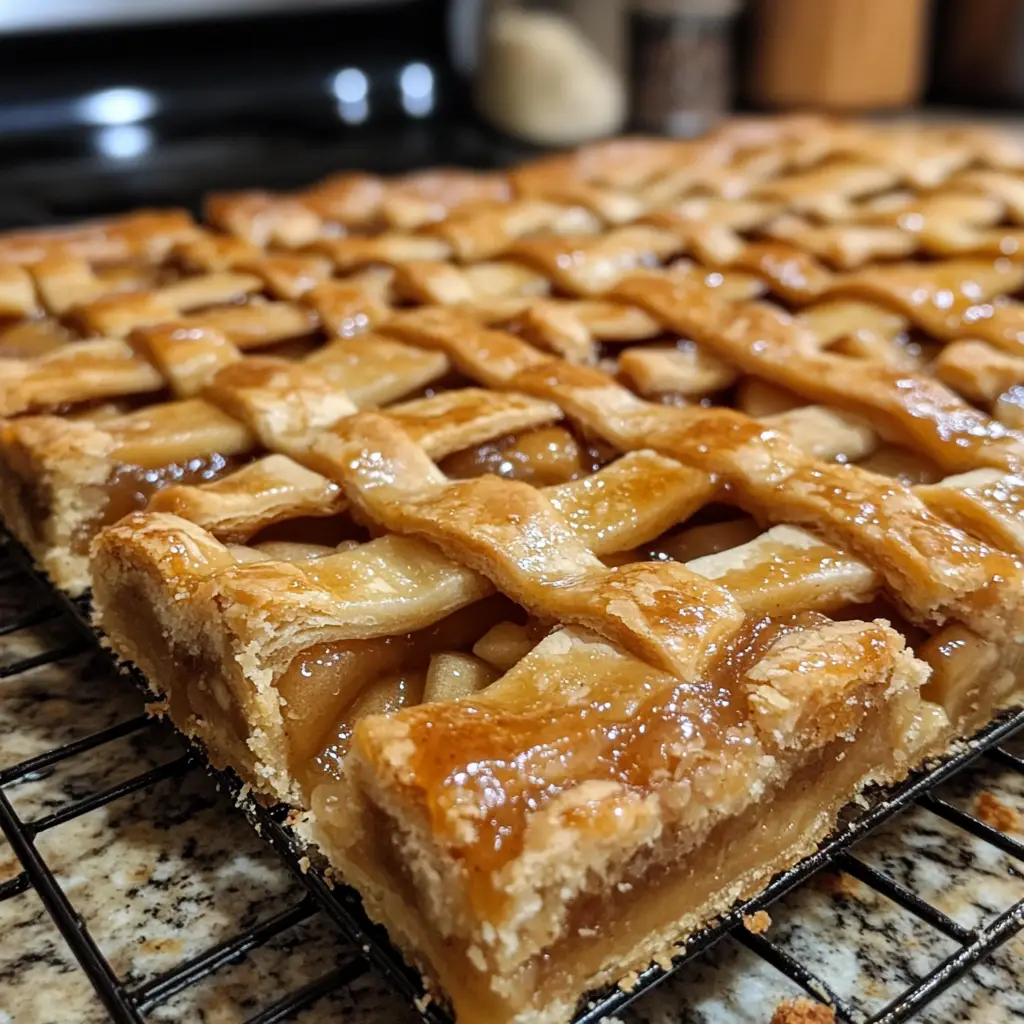
Step 3: Assemble the Bars
Now comes the fun part—assembling our bars! Preheat your oven to 350°F (175°C). Take your chilled crust and press it evenly into the bottom of a greased baking pan. Make sure it’s nice and compact. Then, spread the apple filling over the crust, making sure to distribute it evenly. If you’re adding nuts or raisins, sprinkle them on top of the apples.
Tips for Layering Ingredients
- Don’t be afraid to pile on the apples! They will cook down as they bake.
- For a crumbly topping, reserve a bit of the crust mixture and sprinkle it over the apples before baking.
- Make sure the filling is well-distributed to ensure every bite is packed with flavor.
Step 4: Bake the Apple Pie Bars
It’s time to bake! Place the assembled bars in the preheated oven and bake for about 30-35 minutes, or until the top is golden brown and the apples are bubbly. The aroma that fills your kitchen will be nothing short of heavenly!
Tips for Ensuring Even Baking
- Rotate the pan halfway through baking to ensure even cooking.
- Keep an eye on the bars during the last few minutes of baking to prevent over-browning.
- Let the bars cool in the pan for at least 10 minutes before cutting. This helps them set up nicely.
And there you have it! Your kitchen is now filled with the delightful scent of freshly baked apple pie bars. I can hardly wait to share them with my family and friends!
Equipment Needed for Apple Pie Bars Recipe
Before we dive into the baking, let’s make sure we have all the right tools at our fingertips. Having the right equipment can make the process smoother and more enjoyable. Here’s what you’ll need for this Apple Pie Bars Recipe:
- Mixing Bowls: A couple of medium-sized mixing bowls will do the trick. I love using glass bowls because I can see the ingredients mixing together!
- Measuring Cups and Spoons: Accurate measurements are key to baking success. A good set of measuring cups and spoons will ensure you get it just right.
- 9×13-inch Baking Pan: This is the perfect size for our apple pie bars. If you don’t have one, a similar-sized pan will work, but keep an eye on the baking time.
- Pastry Cutter or Fork: To mix the butter into the dry ingredients, a pastry cutter is great. If you don’t have one, a fork works just as well!
- Spatula: A sturdy spatula will help you spread the crust and filling evenly. I always keep one handy in my kitchen!
- Oven Mitts: Safety first! Protect your hands when taking the hot pan out of the oven.
And there you have it! With these tools in hand, you’re all set to create your delicious apple pie bars. If you find yourself missing any of these items, don’t worry! You can often improvise with what you have at home. Just remember, the most important ingredient is your passion for baking!
Variations of Apple Pie Bars Recipe
One of the things I adore about the Apple Pie Bars Recipe is how easily it can be adapted to suit different tastes and occasions. Here are a few delightful variations that I’ve tried and loved:
- Caramel Apple Pie Bars: Drizzle some caramel sauce over the apple filling before baking. The sweet, gooey goodness adds a rich flavor that’s simply irresistible!
- Nutty Apple Pie Bars: Incorporate a mix of chopped nuts into the crust and filling. Walnuts or pecans add a lovely crunch and depth of flavor.
- Spiced Apple Pie Bars: Add a pinch of nutmeg or allspice to the apple filling for an extra layer of warmth. It’s like wrapping your taste buds in a cozy blanket!
- Berry Apple Pie Bars: Mix in some fresh or frozen berries, like blueberries or raspberries, with the apples. The tartness of the berries complements the sweetness of the apples beautifully.
- Gluten-Free Apple Pie Bars: Substitute the all-purpose flour with a gluten-free blend. Just make sure to check that your other ingredients are also gluten-free!
These variations not only keep things exciting but also allow you to experiment with flavors that you love. I often find myself trying new combinations, and each time, it feels like a new adventure in my kitchen!
Cooking Notes for Apple Pie Bars Recipe
As I’ve baked these Apple Pie Bars Recipe countless times, I’ve gathered a few cooking notes that can help elevate your baking experience. These little tips can make a big difference in the outcome of your bars!
- Room Temperature Ingredients: Make sure your butter and egg are at room temperature. This helps them blend more easily into the dough, creating a smoother texture.
- Don’t Skip the Chilling: Chilling the dough before pressing it into the pan is crucial. It helps the crust maintain its shape and prevents it from becoming too crumbly.
- Adjusting Sweetness: Depending on the tartness of your apples, you may want to adjust the sugar in the filling. Always taste the mixture before baking to ensure it’s just right!
- Storage Tips: If you have leftovers (which is rare in my house!), store them in an airtight container at room temperature for up to three days. You can also refrigerate them for a longer shelf life.
- Freezing for Later: These bars freeze beautifully! Just wrap them tightly in plastic wrap and then in foil. They can last up to three months in the freezer. When you’re ready to enjoy, simply thaw them at room temperature.
With these cooking notes in mind, you’ll be well on your way to creating the perfect apple pie bars. Each time I bake them, I learn something new, and I can’t wait for you to experience the joy of baking these delicious treats!
Serving Suggestions for Apple Pie Bars Recipe
Now that your Apple Pie Bars Recipe is baked to golden perfection, it’s time to think about how to serve them! I find that the way you present your treats can elevate the whole experience. Here are some delightful serving suggestions that I love:
- Warm with Ice Cream: There’s nothing quite like a warm apple pie bar topped with a scoop of vanilla ice cream. The creamy texture melts into the warm apples, creating a heavenly combination!
- Drizzled with Caramel: If you opted for the caramel sauce, drizzle it generously over the bars just before serving. It adds a sweet touch that makes each bite even more indulgent.
- Sprinkled with Powdered Sugar: For a simple yet elegant touch, dust the bars with powdered sugar. It gives them a lovely finish and a hint of sweetness.
- Served with Whipped Cream: A dollop of freshly whipped cream on top can add a light and airy contrast to the rich flavors of the bars.
- Accompanied by a Hot Beverage: Pair your apple pie bars with a warm cup of spiced cider or a cozy chai latte. The flavors complement each other beautifully, making for a perfect autumn treat!
These serving suggestions not only enhance the flavors but also create a delightful experience for you and your guests. I love to set up a little dessert station with various toppings, allowing everyone to customize their own bars. It’s a fun way to share the joy of baking and create lasting memories around the table!
Tips for Perfecting Your Apple Pie Bars Recipe
As I’ve baked my fair share of Apple Pie Bars Recipe, I’ve gathered a treasure trove of tips that can help you achieve the best results. These little nuggets of wisdom can make all the difference in your baking journey!
- Use Fresh Ingredients: Always opt for fresh apples and quality butter. The flavor of your bars will shine through when you use the best ingredients.
- Don’t Rush the Process: Take your time with each step. Allow the crust to chill and the apple filling to sit. Patience pays off in flavor and texture!
- Experiment with Spices: Don’t be afraid to play with spices! A dash of cardamom or a sprinkle of ginger can add a unique twist to your apple filling.
- Check for Doneness: Every oven is different. Keep an eye on your bars as they bake. They should be golden brown and bubbly when done.
- Let Them Cool: Allow the bars to cool completely before cutting. This helps them set and makes for cleaner slices. Trust me, it’s worth the wait!
With these tips in your back pocket, you’ll be well on your way to creating apple pie bars that are not only delicious but also a joy to share. Each time I bake, I learn something new, and I can’t wait for you to experience the magic of these delightful treats!
Breakdown of Time for Apple Pie Bars Recipe
As a passionate home cook, I know that timing is everything in the kitchen. When it comes to my beloved Apple Pie Bars Recipe, having a clear breakdown of the time involved can help you plan your baking adventure. Here’s how it all adds up:
- Prep Time: 20 minutes. This includes gathering your ingredients, preparing the crust, and making the apple filling. It’s a great time to let your excitement build as you mix and measure!
- Chilling Time: 30 minutes. While this step isn’t strictly necessary, it’s essential for achieving that perfect flaky crust. Use this time to clean up your workspace or sip on a warm beverage.
- Cooking Time: 30-35 minutes. This is when the magic happens! Your kitchen will fill with the delightful aroma of baking apples and spices.
- Total Time: Approximately 1 hour and 25 minutes. This includes prep, chilling, and baking time. It’s a small investment for a delicious treat that will warm your heart and home!
With this time breakdown, you can easily fit these apple pie bars into your day. I often find that the anticipation of waiting for them to bake only adds to the joy of sharing them with loved ones. So, roll up your sleeves and let’s get baking!
Nutritional Information for Apple Pie Bars Recipe
As a passionate home cook, I always find it helpful to know the nutritional content of the treats I bake. It allows me to enjoy them mindfully while sharing them with family and friends. Here’s a general breakdown of the nutritional information for one serving of my delightful Apple Pie Bars Recipe, assuming the recipe yields about 12 bars:
- Calories: Approximately 200 calories
- Protein: 2 grams
- Fat: 8 grams
- Carbohydrates: 32 grams
- Fiber: 2 grams
- Sugar: 10 grams
Keep in mind that these values can vary based on the specific ingredients you use and any optional add-ons you choose to include. For instance, adding nuts or caramel will increase the calorie count, while using less sugar can lower it. I always encourage a balanced approach to enjoying desserts, and these apple pie bars are a delightful treat that can fit into a well-rounded diet. So, savor each bite and enjoy the warmth they bring to your home!
Frequently Asked Questions about Apple Pie Bars Recipe
As I’ve shared my Apple Pie Bars Recipe with friends and family, I’ve noticed a few common questions pop up. It’s always great to clarify any doubts and help fellow bakers feel confident in their kitchen adventures. Here are some of the most frequently asked questions I receive, along with my answers:
Can I use different types of apples for this recipe?
Absolutely! I love mixing different apple varieties to create a more complex flavor. Granny Smith apples provide a nice tartness, while Honeycrisp adds sweetness. Feel free to experiment with your favorites!
How do I store leftover apple pie bars?
If you happen to have any leftovers (which is rare in my house!), store them in an airtight container at room temperature for up to three days. You can also refrigerate them for a longer shelf life. Just make sure they’re completely cooled before storing!
Can I freeze apple pie bars for later?
Yes, you can! These bars freeze beautifully. Just wrap them tightly in plastic wrap and then in foil. They can last up to three months in the freezer. When you’re ready to enjoy, simply thaw them at room temperature or pop them in the microwave for a quick warm-up!
What can I substitute for butter in the crust?
If you’re looking for a dairy-free option, you can substitute the butter with coconut oil or a vegan butter alternative. Just make sure it’s softened for easy mixing!
Can I make these apple pie bars gluten-free?
Definitely! You can substitute the all-purpose flour with a gluten-free flour blend. Just ensure that your other ingredients, like baking powder, are also gluten-free. I’ve tried this, and they turn out just as delicious!
How do I know when the apple pie bars are done baking?
Keep an eye on them during the last few minutes of baking. They should be golden brown on top, and the apples should be bubbly. A toothpick inserted in the center should come out clean or with just a few crumbs attached.
These questions often come up, and I hope my answers help you feel more prepared to tackle this delightful recipe. Baking is all about experimenting and having fun, so don’t hesitate to reach out if you have more questions or need tips along the way!
Conclusion on Apple Pie Bars Recipe
As I wrap up this delightful journey through my Apple Pie Bars Recipe, I can’t help but feel a sense of warmth and nostalgia. These bars are more than just a dessert; they are a celebration of flavors, memories, and the joy of sharing with loved ones. The combination of tender apples, warm spices, and a buttery crust creates a treat that is both comforting and satisfying.
What I love most about this recipe is its versatility. Whether you’re baking for a family gathering, a cozy night in, or simply to indulge your sweet tooth, these apple pie bars fit the bill perfectly. They are easy to make, and the process is filled with love and creativity. Plus, the aroma that fills your kitchen while they bake is simply irresistible!
So, I encourage you to gather your ingredients, roll up your sleeves, and dive into this baking adventure. I promise that once you take that first bite, you’ll understand why these apple pie bars have a special place in my heart. Happy baking, and may your kitchen be filled with the sweet scent of homemade goodness!
