
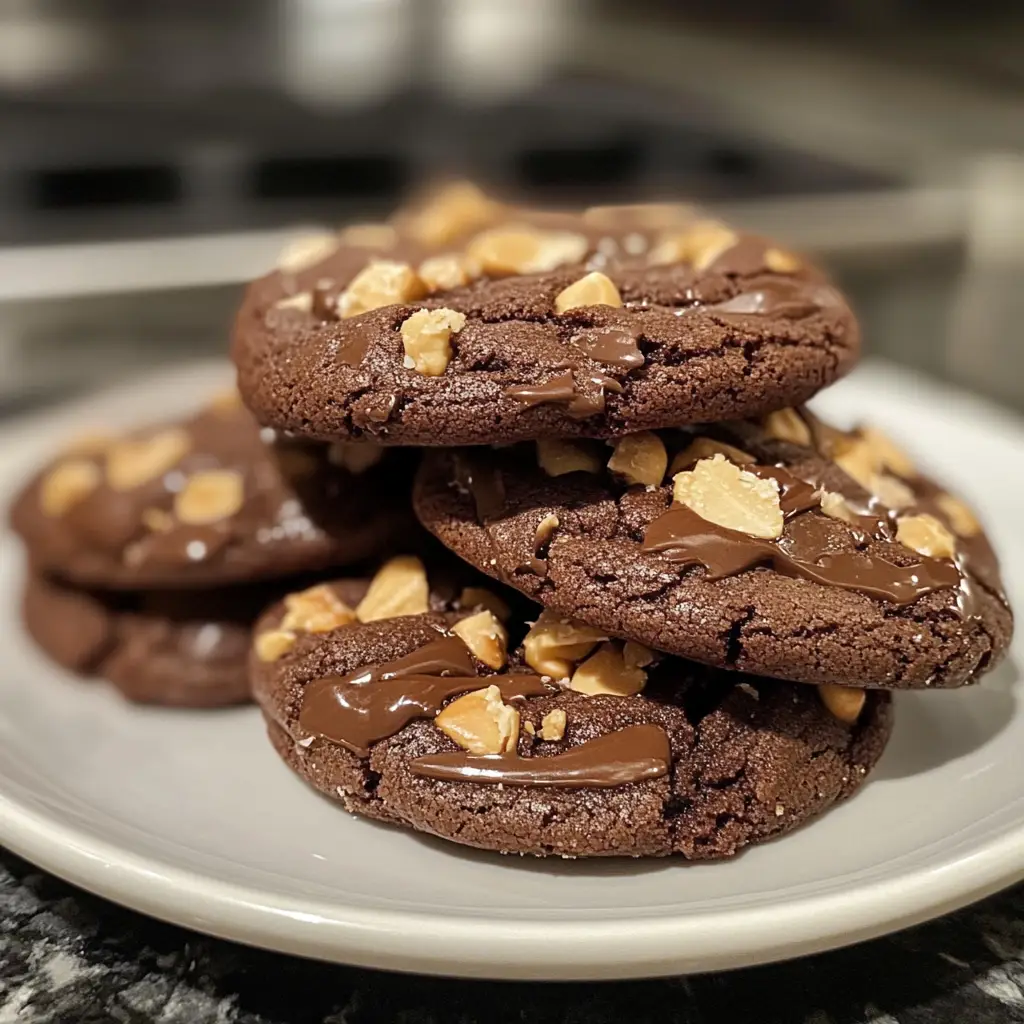
Introduction to Chocolate Peanut Butter Cookies
Ah, chocolate peanut butter cookies! Just the thought of them makes my heart skip a beat. I remember the first time I baked these delightful treats. It was a rainy afternoon, and the scent of melting chocolate and creamy peanut butter wafted through my kitchen, wrapping me in a warm embrace. I was instantly transported back to my childhood, where my mom would whip up a batch whenever I had friends over. Those moments were filled with laughter, sticky fingers, and the joy of sharing something delicious.
What I love most about chocolate peanut butter cookies is their perfect balance of flavors. The rich, velvety chocolate mingles beautifully with the nutty, slightly salty peanut butter, creating a symphony of taste that dances on your palate. Each bite is like a hug from an old friend, comforting and familiar. Plus, they’re incredibly easy to make! Whether you’re a seasoned baker or just starting out, this recipe is foolproof.
As I share this recipe with you, I hope to inspire you to create your own memories in the kitchen. Baking is not just about the end result; it’s about the journey, the joy of mixing ingredients, and the anticipation of that first warm cookie. So, grab your apron, and let’s dive into the world of chocolate peanut butter cookies together. Trust me, your taste buds will thank you!
Ingredients for Chocolate Peanut Butter Cookies
Before we embark on our baking adventure, let’s gather all the ingredients we need for these scrumptious chocolate peanut butter cookies. I always believe that quality ingredients make a world of difference in the final product. So, let’s make sure we have the best of the best!
Main Ingredients
- 1 cup creamy peanut butter (I prefer natural peanut butter for its rich flavor)
- 1/2 cup unsalted butter, softened (Make sure it’s at room temperature for easy mixing)
- 1 cup granulated sugar (This adds sweetness and helps with the cookie’s texture)
- 1/2 cup brown sugar, packed (For that lovely caramel flavor)
- 1 large egg (Fresh eggs work wonders in baking)
- 1 teaspoon vanilla extract (A splash of vanilla elevates the taste)
- 1 cup all-purpose flour (Sifted for a lighter texture)
- 1/2 teaspoon baking soda (This helps the cookies rise)
- 1/4 teaspoon salt (Just a pinch to balance the sweetness)
- 1 cup semi-sweet chocolate chips (Because who can resist chocolate?)
Optional Add-ons
- 1/2 cup chopped nuts (Like walnuts or pecans for added crunch)
- 1/2 cup oats (For a chewy texture and a bit of heartiness)
- 1/4 cup cocoa powder (If you want an extra chocolatey kick)
- Sea salt flakes (Sprinkled on top before baking for a sweet-salty contrast)
When it comes to sourcing ingredients, I always recommend visiting local markets or health food stores. They often have fresher options, especially for peanut butter and eggs. Plus, supporting local businesses is a win-win! Now that we have everything ready, let’s move on to the fun part—baking these delightful cookies!
How to Prepare Chocolate Peanut Butter Cookies
Now that we have our ingredients ready, it’s time to roll up our sleeves and get baking! I find that the process of making chocolate peanut butter cookies is just as enjoyable as eating them. Each step brings a little magic to the kitchen. Let’s dive into the steps together!
Step 1: Preheat the Oven
First things first, we need to preheat our oven to 350°F (175°C). This step is crucial because it ensures that our cookies bake evenly and come out perfectly golden.
Tips for Preheating
- While the oven is heating, you can start preparing your cookie dough. This saves time!
- Make sure to check that your oven rack is in the center position for even baking.
Step 2: Mix Dry Ingredients
In a medium bowl, combine the flour, baking soda, and salt. Whisk them together until they’re well mixed. This step helps to evenly distribute the leavening agent and salt throughout the flour.
Tips for Mixing
- Use a whisk or a fork to aerate the flour. This makes for lighter cookies!
- Set this bowl aside while we work on the wet ingredients.
Step 3: Cream Butter and Sugars
In a large mixing bowl, beat the softened butter, granulated sugar, and brown sugar together until the mixture is light and fluffy. This usually takes about 2-3 minutes.
Tips for Creaming
- Make sure your butter is at room temperature. Cold butter won’t cream well!
- Use an electric mixer for the best results, but a good old-fashioned wooden spoon works too if you’re feeling strong!
Step 4: Add Peanut Butter and Eggs
Next, it’s time to add the creamy peanut butter and the egg to the butter-sugar mixture. Mix until everything is well combined and smooth.
Tips for Incorporating
- For a richer flavor, use a peanut butter that has a bit of texture.
- Don’t forget to scrape down the sides of the bowl to ensure everything is mixed evenly.
Step 5: Combine Wet and Dry Ingredients
Now, gradually add the dry ingredients to the wet mixture. Stir until just combined. Be careful not to overmix, as this can make the cookies tough.
Tips for Combining
- Use a spatula or wooden spoon for this step to keep the dough light.
- If you’re adding chocolate chips or any optional add-ons, fold them in gently at this stage.
Step 6: Shape the Cookies
Using a cookie scoop or your hands, shape the dough into balls about 1 inch in diameter. Place them on a baking sheet lined with parchment paper, leaving some space between each cookie.
Tips for Shaping
- For a fun twist, you can use a fork to create a crisscross pattern on top of each cookie.
- Chill the dough for 10-15 minutes if it feels too soft to handle.
Step 7: Bake the Cookies
Finally, pop the baking sheet into the preheated oven and bake for 10-12 minutes. The cookies should look slightly underbaked in the center when you take them out.
Tips for Baking
- Keep an eye on them! Ovens can vary, and you don’t want to overbake.
- Let the cookies cool on the baking sheet for a few minutes before transferring them to a wire rack to cool completely.
And there you have it! The steps to creating your very own chocolate peanut butter cookies. I can already smell the deliciousness wafting through the air. Let’s move on to the next section and gather the equipment we’ll need for this delightful baking adventure!
Equipment Needed for Chocolate Peanut Butter Cookies
Before we dive into the baking process, let’s make sure we have all the right tools at our fingertips. Having the right equipment can make a world of difference in your baking experience. Here’s what you’ll need to whip up those delicious chocolate peanut butter cookies:
- Mixing Bowls: A large bowl for mixing the wet ingredients and a medium bowl for the dry ingredients. If you don’t have a set, any sturdy bowls will do!
- Electric Mixer: This is my go-to for creaming butter and sugars. If you don’t have one, a wooden spoon and some elbow grease will work just fine!
- Measuring Cups and Spoons: Accurate measurements are key in baking. If you’re in a pinch, you can use a kitchen scale for precision.
- Whisk: Perfect for mixing dry ingredients. A fork can also do the trick if you’re in a bind.
- Cookie Scoop or Spoon: For shaping the dough into uniform balls. If you don’t have a scoop, a tablespoon works well too!
- Baking Sheet: A sturdy baking sheet lined with parchment paper ensures easy cleanup and prevents sticking.
- Wire Rack: Ideal for cooling the cookies after baking. If you don’t have one, a plate will work in a pinch.
With these tools in hand, you’re all set to embark on your chocolate peanut butter cookie journey. Remember, it’s not just about the equipment; it’s about the love and joy you put into your baking. Let’s keep the momentum going and explore the delicious variations we can create with these cookies!
Variations of Chocolate Peanut Butter Cookies
As much as I adore the classic chocolate peanut butter cookies, there’s something thrilling about experimenting with different flavors and textures. Each variation brings a new twist to the beloved recipe, making it even more exciting to bake. Here are a few delightful variations that I’ve tried and loved:
- Chunky Monkey: Add 1/2 cup of mashed ripe bananas to the dough for a fruity twist. The bananas add moisture and a hint of sweetness that pairs beautifully with the chocolate and peanut butter.
- Nutty Delight: Swap out the chocolate chips for 1 cup of chopped dark chocolate or even white chocolate. You can also mix in 1/2 cup of your favorite nuts, like almonds or hazelnuts, for an extra crunch.
- Peanut Butter Swirl: Instead of mixing the peanut butter into the dough, create a swirl effect by dropping spoonfuls of peanut butter on top of the cookie dough before baking. This gives each cookie a beautiful marbled look and an extra burst of peanut flavor.
- Spicy Kick: For those who love a little heat, add a pinch of cayenne pepper or cinnamon to the dough. It adds a surprising depth of flavor that complements the sweetness perfectly.
These variations not only keep things interesting but also allow you to tailor the cookies to your taste preferences. I encourage you to get creative and make these cookies your own! After all, baking is all about having fun and sharing delicious moments with loved ones. Now, let’s move on to some essential cooking notes to ensure your cookies turn out perfectly every time!
Cooking Notes for Chocolate Peanut Butter Cookies
As I’ve baked these chocolate peanut butter cookies time and time again, I’ve gathered a few cooking notes that can help you achieve cookie perfection. These little tips can make a big difference in your baking journey!
- Room Temperature Ingredients: Always use room temperature butter and eggs. This helps create a smooth, creamy batter that blends beautifully.
- Don’t Overmix: When combining the wet and dry ingredients, mix just until everything is incorporated. Overmixing can lead to tough cookies, and nobody wants that!
- Chill the Dough: If your dough feels too soft or sticky, pop it in the fridge for about 30 minutes. Chilling helps the cookies hold their shape while baking.
- Watch the Baking Time: Every oven is different! Start checking your cookies a minute or two before the recommended baking time. They should be slightly golden around the edges but still soft in the center.
- Storage Tips: Store your cookies in an airtight container at room temperature for up to a week. If you want to keep them longer, freeze them in a single layer and transfer to a freezer bag.
These cooking notes are like little nuggets of wisdom I’ve picked up along the way. They help ensure that each batch of chocolate peanut butter cookies is as delightful as the last. Now that we have these tips in our back pocket, let’s explore some serving suggestions to make your cookie experience even sweeter!
Serving Suggestions for Chocolate Peanut Butter Cookies
Now that our chocolate peanut butter cookies are baked to perfection, it’s time to think about how to serve them! Presentation can elevate the experience, and I love to get a little creative when it comes to serving these delightful treats. Here are some of my favorite serving suggestions:
- Milk Dipping: There’s nothing quite like a warm cookie paired with a cold glass of milk. I often set out a pitcher of milk for dipping, making it a fun and nostalgic experience.
- Ice Cream Sandwiches: For a decadent treat, sandwich a scoop of your favorite ice cream between two cookies. The combination of warm cookie and cold ice cream is simply heavenly!
- Cookie Platter: Arrange the cookies on a beautiful platter and sprinkle some sea salt flakes on top for a gourmet touch. This makes for an impressive dessert at gatherings or parties.
- Gift Jars: Layer the cookies in a mason jar and tie it with a ribbon. It’s a sweet and thoughtful gift for friends or family, perfect for any occasion.
- Chocolate Drizzle: For an extra touch of indulgence, melt some chocolate and drizzle it over the cookies before serving. It adds a beautiful finish and enhances the chocolate flavor.
These serving suggestions not only make the cookies more enjoyable but also create memorable moments with family and friends. Whether it’s a cozy night in or a festive gathering, chocolate peanut butter cookies are sure to bring smiles all around. Now, let’s move on to some tips for perfecting these cookies even further!
Tips for Perfect Chocolate Peanut Butter Cookies
As I’ve baked countless batches of chocolate peanut butter cookies, I’ve learned a few secrets that can take your cookies from good to absolutely amazing. These tips are like little treasures I’ve gathered over the years, and I’m excited to share them with you!
- Use Quality Ingredients: The better the ingredients, the better the cookies! Opt for high-quality chocolate chips and natural peanut butter for the best flavor.
- Measure Accurately: Baking is a science! Use measuring cups and spoons for precise measurements. A kitchen scale can also be a handy tool for accuracy.
- Don’t Skip the Chilling: If your dough feels too soft, chilling it for 30 minutes can help the cookies maintain their shape while baking. It’s a simple step that makes a big difference!
- Experiment with Texture: For a chewy cookie, slightly underbake them. If you prefer a crispier texture, leave them in the oven a minute or two longer.
- Mix-Ins Galore: Don’t be afraid to get creative! Add in your favorite mix-ins like toffee bits, coconut flakes, or even a sprinkle of cinnamon for a unique twist.
These tips are my little baking hacks that ensure each batch of chocolate peanut butter cookies is a hit. Remember, baking is all about having fun and enjoying the process. So, roll up your sleeves, and let your creativity shine as you whip up these delightful treats!
Breakdown of Time for Chocolate Peanut Butter Cookies
Now that we’ve covered the ingredients, steps, and tips for making chocolate peanut butter cookies, let’s take a moment to break down the time involved in this delightful baking adventure. Knowing how long each part takes can help you plan your baking session better, especially if you’re making these cookies for a special occasion or just a cozy night in.
- Prep Time: Approximately 15-20 minutes. This includes gathering your ingredients, measuring them out, and mixing the dough. It’s a great time to put on your favorite music and enjoy the process!
- Cooking Time: About 10-12 minutes. Keep an eye on the cookies as they bake, and remember that they’ll continue to cook a bit after you take them out of the oven.
- Total Time: Roughly 30-35 minutes. In just over half an hour, you’ll have a batch of warm, gooey chocolate peanut butter cookies ready to enjoy!
With this time breakdown, you can easily fit cookie baking into your day. Whether it’s a rainy afternoon or a weekend treat, these cookies are worth every minute spent in the kitchen. Now, let’s move on to the nutritional information so you can enjoy these treats with a little more insight!
Nutritional Information for Chocolate Peanut Butter Cookies
As a passionate home cook, I believe it’s important to enjoy our treats while being mindful of what goes into them. Here’s a quick look at the nutritional information for one chocolate peanut butter cookie, based on the classic recipe I shared earlier. Keep in mind that these values can vary slightly depending on the specific ingredients you use and any optional add-ons you choose to include.
- Calories: Approximately 150-180 calories per cookie
- Protein: About 3-4 grams
- Fat: Roughly 8-10 grams (mostly from the peanut butter and butter)
- Carbohydrates: Around 18-20 grams
- Sugar: Approximately 8-10 grams
- Fiber: About 1 gram (more if you add oats or nuts)
These cookies are a delightful treat, and while they do contain sugar and fat, they also offer some protein and can be enjoyed in moderation. I often find that sharing them with friends and family makes the experience even sweeter! So, whether you’re indulging solo or spreading the joy, these chocolate peanut butter cookies are sure to bring smiles all around. Now, let’s wrap things up with some frequently asked questions about these delicious cookies!
Frequently Asked Questions about Chocolate Peanut Butter Cookies
As I’ve shared my love for chocolate peanut butter cookies, I’ve often encountered a few common questions from fellow bakers. It’s always fun to connect with others who share the same passion for baking! Here are some of the most frequently asked questions, along with my answers to help you on your cookie-making journey.
Can I use crunchy peanut butter instead of creamy?
Absolutely! Using crunchy peanut butter adds a delightful texture to the cookies. The little peanut pieces create a lovely contrast with the smooth chocolate. Just keep in mind that the cookies may have a slightly different consistency, but they’ll still be delicious!
How do I store leftover cookies?
To keep your cookies fresh, store them in an airtight container at room temperature. They should stay good for about a week. If you want to keep them longer, you can freeze them! Just place them in a single layer on a baking sheet, freeze until solid, and then transfer them to a freezer bag.
Can I make the dough ahead of time?
Yes, you can! If you want to prepare the dough in advance, simply wrap it tightly in plastic wrap and refrigerate it for up to 3 days. When you’re ready to bake, just scoop and bake as usual. You can also freeze the dough for up to 3 months. Just thaw it in the fridge before baking.
What can I substitute for eggs in this recipe?
If you’re looking for an egg substitute, you can use 1/4 cup of unsweetened applesauce or a flax egg (1 tablespoon of ground flaxseed mixed with 2.5 tablespoons of water, let it sit for a few minutes until it thickens). These alternatives work well and keep the cookies moist!
Why are my cookies flat?
Flat cookies can be a result of a few factors. Make sure your butter isn’t too soft; it should be just at room temperature. Also, check that you’re using the right amount of flour. If you accidentally add too little, the cookies may spread too much while baking. Chilling the dough for a bit can also help them hold their shape.
These questions are just a glimpse into the wonderful world of chocolate peanut butter cookies. I hope my answers help you feel more confident as you embark on your baking adventure. Remember, every batch is a chance to learn and create something delicious. Now, let’s wrap things up with a sweet conclusion!
Conclusion on Chocolate Peanut Butter Cookies
As we reach the end of our chocolate peanut butter cookie journey, I can’t help but feel a sense of joy and nostalgia. These cookies are more than just a delightful treat; they’re a celebration of flavors that bring people together. The rich, creamy peanut butter combined with the luscious chocolate creates a harmony that’s hard to resist. Each bite is a reminder of the simple pleasures in life—like sharing a warm cookie with loved ones or enjoying a quiet moment with a glass of milk.
What I love most about this recipe is its versatility. Whether you stick to the classic version or experiment with fun variations, there’s always room for creativity in the kitchen. Plus, the ease of preparation makes it accessible for bakers of all skill levels. You don’t need to be a professional to whip up a batch of these cookies; just a little passion and a sprinkle of love will do!
So, as you embark on your own baking adventure, remember that chocolate peanut butter cookies are not just about the end result. They’re about the memories you create, the laughter shared, and the joy of indulging in something truly delicious. I hope you find as much happiness in baking and sharing these cookies as I have. Happy baking!
