

Introduction to Easter Cookie Cake Recipe
As the vibrant colors of spring bloom around us, I find myself drawn to the kitchen, eager to whip up something special for Easter. The air is filled with the sweet scent of chocolate and vanilla, and my heart dances with joy at the thought of gathering my loved ones around the table. This is where my Easter Cookie Cake Recipe comes into play—a delightful twist on traditional cookies that brings a smile to everyone’s face.
Let me take you back to my childhood. I remember the excitement of Easter morning, hunting for eggs hidden in the garden, and the sweet treats that awaited us. My grandmother had a knack for baking, and her cookie cakes were legendary. They were soft, chewy, and adorned with colorful sprinkles that sparkled like jewels. Every bite was a celebration, and I knew I wanted to recreate that magic in my own kitchen.
This Easter Cookie Cake Recipe is not just a dessert; it’s a canvas for creativity. You can decorate it with pastel icing, sprinkle it with edible glitter, or even top it with your favorite candies. The possibilities are endless! Plus, it’s a fantastic way to involve the little ones in the kitchen. I can still hear the giggles and laughter as we mixed the dough and decorated our masterpiece together.
So, whether you’re hosting a festive gathering or simply want to indulge in a sweet treat, this recipe is sure to become a cherished tradition in your home. Let’s dive into the ingredients and get started on this delicious journey together!
Ingredients for Easter Cookie Cake Recipe
Before we embark on our baking adventure, let’s gather all the ingredients we’ll need for this delightful Easter Cookie Cake. I always believe that quality ingredients make a world of difference in the final product. So, let’s make sure we have everything ready to go!
Main Ingredients
- 2 ½ cups all-purpose flour
- 1 teaspoon baking soda
- ½ teaspoon salt
- 1 cup unsalted butter, softened (make sure it’s at room temperature for easy mixing)
- 1 cup granulated sugar
- 1 cup packed brown sugar
- 2 large eggs
- 2 teaspoons vanilla extract (the real stuff, if you can find it!)
- 1 cup chocolate chips (I love using semi-sweet, but feel free to mix it up!)
These main ingredients create a soft and chewy cookie cake that’s simply irresistible. I often find myself sneaking a taste of the dough—just a little, of course! It’s a guilty pleasure that brings back fond memories of my grandmother’s kitchen.
Optional Add-ons
- 1 cup colorful sprinkles (perfect for that festive touch!)
- ½ cup chopped nuts (walnuts or pecans add a nice crunch)
- 1 cup mini marshmallows (for a fun, gooey surprise)
- Edible glitter or pastel icing for decoration
These optional add-ons allow you to personalize your cookie cake. I love to let my kids choose their favorite sprinkles or candies to make it their own. It’s a wonderful way to spark creativity and make the baking process even more enjoyable!
Now that we have our ingredients lined up, we’re ready to dive into the preparation. Trust me, the aroma that fills your kitchen will be worth every moment spent mixing and baking!
How to Prepare Easter Cookie Cake Recipe
Now that we have our ingredients ready, it’s time to roll up our sleeves and get baking! I love the process of creating something delicious from scratch. Each step is like a little adventure, and I can’t wait to share it with you. Let’s dive into the preparation of our Easter Cookie Cake!
Step 1: Preheat the Oven and Prepare the Baking Pan
First things first, let’s get that oven preheating to 350°F (175°C). This is crucial because a hot oven helps our cookie cake rise beautifully. While the oven warms up, grab a 9×13 inch baking pan and grease it lightly with butter or cooking spray. You can also line it with parchment paper for easy removal later.
Tips for Step 1
- Make sure your oven is fully preheated before placing the cake inside. This ensures even baking.
- If you’re using parchment paper, leave some overhang on the sides. This makes it super easy to lift the cake out later!
Step 2: Mix the Dry Ingredients
In a large bowl, whisk together the flour, baking soda, and salt. This step is important because it helps to evenly distribute the baking soda throughout the flour, ensuring our cookie cake rises perfectly.
Tips for Step 2
- Use a sifter if you have one! It helps to aerate the flour and makes for a lighter cake.
- Don’t skip the salt! It enhances the flavors and balances the sweetness.
Step 3: Cream the Butter and Sugar
In another bowl, it’s time to cream the softened butter, granulated sugar, and brown sugar together. I usually use an electric mixer for this, but a good old-fashioned whisk works too! Beat them until the mixture is light and fluffy—about 2-3 minutes.
Tips for Step 3
- Make sure your butter is at room temperature. This helps it blend smoothly with the sugars.
- Scrape down the sides of the bowl occasionally to ensure everything is mixed well.
Step 4: Combine Wet and Dry Ingredients
Now, it’s time to add the eggs and vanilla extract to the butter-sugar mixture. Mix until well combined. Then, gradually add the dry ingredients to this mixture. I like to do this in three parts, mixing gently until just combined. Overmixing can lead to a tough cookie cake!
Tips for Step 4
- Don’t worry if the batter looks a little thick; that’s just how it should be!
- Use a spatula to fold in the dry ingredients gently. This keeps the batter light and fluffy.
Step 5: Fold in Optional Add-ons
Here comes the fun part! If you’re using any optional add-ons like sprinkles, nuts, or marshmallows, fold them into the batter now. This is where you can get creative and make the cake truly yours!
Tips for Step 5
- Save a few sprinkles for the top! They’ll add a lovely pop of color once baked.
- Be careful not to overmix; just fold until everything is evenly distributed.
Step 6: Bake the Cookie Cake
Pour the batter into your prepared baking pan and spread it out evenly. Pop it into the preheated oven and bake for about 25-30 minutes. The edges should be golden brown, and a toothpick inserted in the center should come out clean.
Tips for Step 6
- Keep an eye on the cake during the last few minutes of baking. Ovens can vary, and you don’t want it to overbake!
- If the top starts to brown too quickly, you can cover it loosely with aluminum foil.
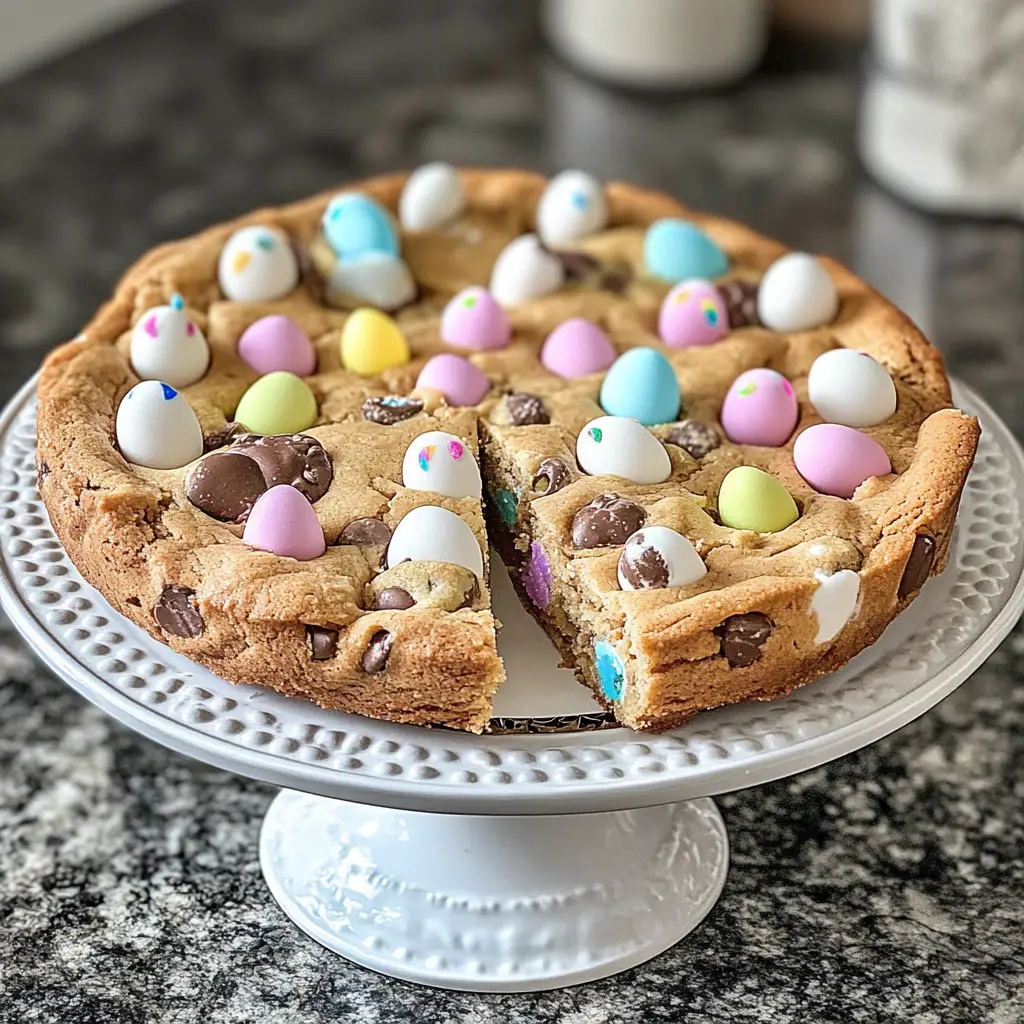
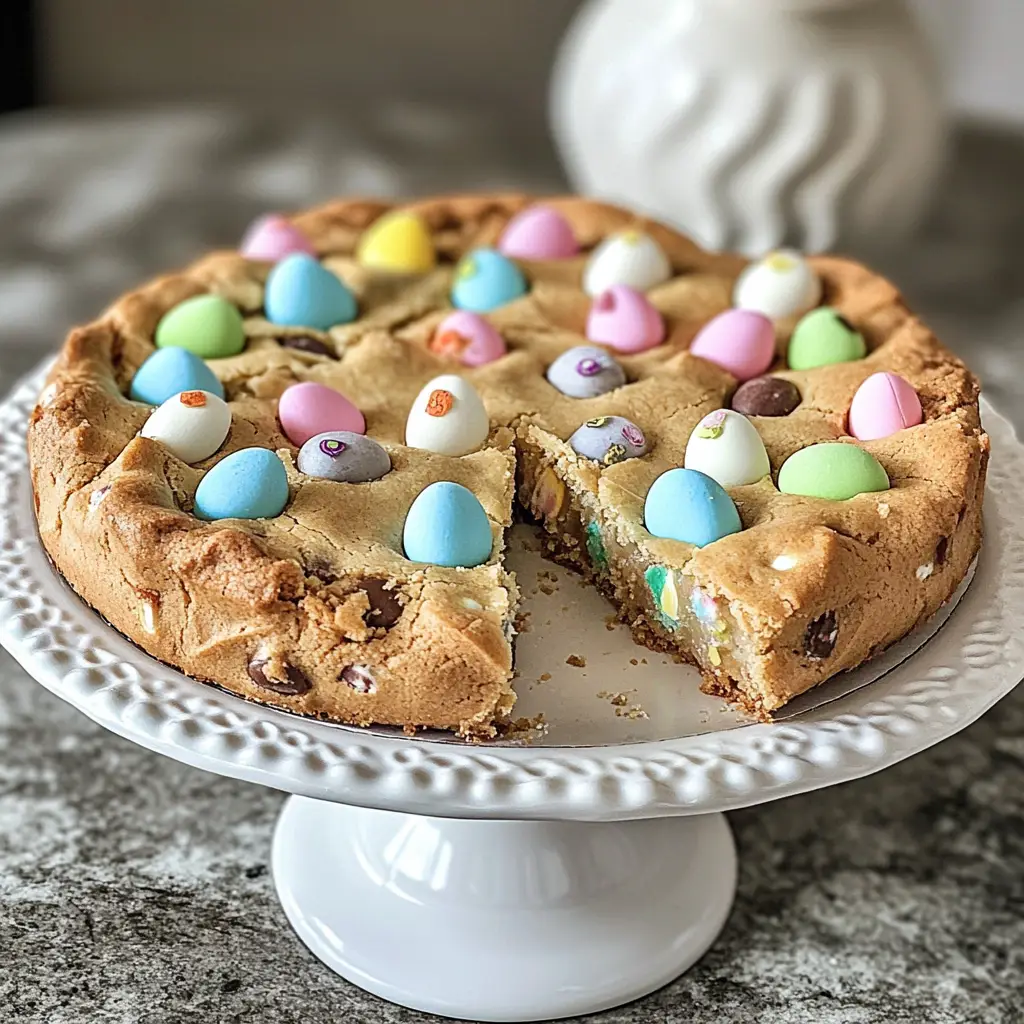
Step 7: Cool and Decorate
Once baked, remove the cookie cake from the oven and let it cool in the pan for about 10 minutes. Then, transfer it to a wire rack to cool completely. Once cooled, it’s time to unleash your inner artist! Decorate with icing, sprinkles, or whatever your heart desires.
Tips for Step 7
- For a smooth icing finish, make sure the cake is completely cool before decorating.
- Get the kids involved! They’ll love helping with the decoration.
And there you have it! Your Easter Cookie Cake is ready to be enjoyed. The joy of baking is not just in the final product but in the memories created along the way. I can’t wait for you to experience this delightful treat!
Equipment Needed for Easter Cookie Cake Recipe
Before we dive into the baking process, let’s make sure we have all the necessary equipment at hand. Having the right tools can make a world of difference in your baking experience. Here’s what you’ll need for our Easter Cookie Cake:
- Mixing Bowls: A couple of large mixing bowls will help you keep your dry and wet ingredients separate.
- Electric Mixer or Whisk: An electric mixer makes creaming the butter and sugars a breeze, but a whisk works just as well if you’re feeling a bit nostalgic!
- Measuring Cups and Spoons: Accurate measurements are key to a successful cookie cake, so don’t skimp on these!
- Baking Pan: A 9×13 inch baking pan is perfect for this recipe. If you don’t have one, a round cake pan will work too—just adjust the baking time.
- Parchment Paper (optional): Lining your baking pan with parchment paper can make for easy removal and cleanup.
- Spatula: A rubber spatula is great for folding in ingredients and scraping down the sides of your mixing bowls.
- Wire Rack: This is essential for cooling your cookie cake evenly after baking.
If you find yourself missing any of these tools, don’t worry! You can often improvise with what you have at home. For example, a sturdy plate can substitute for a wire rack, and a fork can help mix ingredients if you don’t have a whisk. The most important thing is to have fun and enjoy the process!
Variations of Easter Cookie Cake Recipe
One of the things I adore about baking is the endless possibilities for creativity. This Easter Cookie Cake Recipe is no exception! While the classic version is delightful on its own, there are so many fun variations you can try to make it uniquely yours. Here are a few ideas that I’ve experimented with and loved:
- Chocolate Chip Swirl: For a double chocolate delight, add cocoa powder to the dry ingredients and swirl in some chocolate fudge before baking. It’s like a chocolate lover’s dream!
- Fruit-Infused: Incorporate dried fruits like cranberries or apricots for a chewy texture and a burst of flavor. You can even add a hint of orange zest for a refreshing twist.
- Nutty Delight: If you’re a fan of nuts, try adding a mix of chopped almonds, pecans, or hazelnuts. They add a lovely crunch and depth to the cookie cake.
- Carrot Cake Twist: For a festive Easter touch, mix in grated carrots and spices like cinnamon and nutmeg. Top it off with cream cheese frosting for a deliciously different treat!
- Layered Cookie Cake: Bake two separate cookie cakes and layer them with frosting or whipped cream in between. It’s a showstopper for any gathering!
These variations not only add a personal touch but also allow you to cater to different tastes and preferences. I love to experiment with these ideas, especially when I have friends and family over. It’s always a joy to see their faces light up with each new flavor combination!
Cooking Notes for Easter Cookie Cake Recipe
As I’ve journeyed through countless baking adventures, I’ve gathered a few cooking notes that can help elevate your Easter Cookie Cake experience. These little nuggets of wisdom can make a big difference in the outcome of your cake!
- Room Temperature Ingredients: Always remember to bring your butter and eggs to room temperature before starting. This helps them blend more easily, creating a smoother batter.
- Don’t Overmix: When combining your wet and dry ingredients, mix just until combined. Overmixing can lead to a dense cookie cake, and we want it to be soft and chewy!
- Cooling Time: Allow your cookie cake to cool completely before decorating. This prevents the icing from melting and ensures a beautiful finish.
- Storage Tips: If you have leftovers (which is rare in my house!), store the cookie cake in an airtight container at room temperature for up to three days. You can also freeze it for later enjoyment!
- Experiment with Flavors: Don’t hesitate to play around with different extracts or spices. Almond extract or a pinch of cinnamon can add a delightful twist to the flavor profile.
These cooking notes are like little secrets I’ve learned along the way. They help me create a cookie cake that not only looks good but tastes amazing too! I hope they inspire you to bake with confidence and joy.
Serving Suggestions for Easter Cookie Cake Recipe
Now that our Easter Cookie Cake is baked and beautifully decorated, it’s time to think about how to serve it! I love to make the presentation as delightful as the cake itself. Here are some of my favorite serving suggestions that will surely impress your family and friends:
- Slice and Serve: Cut the cookie cake into squares or rectangles for easy serving. Place them on colorful plates to add a festive touch!
- À la Mode: For a decadent twist, serve warm slices with a scoop of vanilla ice cream on top. The melting ice cream creates a deliciously gooey experience!
- With Fresh Berries: Pair the cookie cake with a side of fresh strawberries, raspberries, or blueberries. The tartness of the berries balances the sweetness perfectly.
- Drizzle of Chocolate: A drizzle of melted chocolate or caramel sauce over the top adds an extra layer of indulgence. It’s like a cherry on top of an already delightful dessert!
- Festive Platter: Create a dessert platter with slices of cookie cake, assorted candies, and colorful Easter-themed treats. It’s a fun way to celebrate the holiday!
These serving suggestions not only enhance the visual appeal but also elevate the overall experience of enjoying this delightful treat. I can’t wait for you to share this cookie cake with your loved ones and create sweet memories together!
Tips for Perfecting Your Easter Cookie Cake Recipe
As I’ve baked my fair share of cookie cakes, I’ve picked up a few tips that can help you achieve cookie cake perfection. These little tricks can make a big difference in the texture and flavor of your Easter Cookie Cake. Let’s dive into my favorite tips!
- Measure Accurately: Baking is a science, so precise measurements are key. Use the spoon-and-level method for flour—spoon it into your measuring cup and level it off with a knife. This prevents packing and ensures a light cake.
- Chill the Dough: If you have time, chilling the dough for about 30 minutes can enhance the flavors and help the cookie cake hold its shape better while baking.
- Use Quality Ingredients: Opt for high-quality butter and pure vanilla extract. They make a noticeable difference in flavor, elevating your cookie cake from good to extraordinary!
- Don’t Skip the Salt: A pinch of salt balances the sweetness and enhances the overall flavor. It’s a small step that packs a big punch!
- Experiment with Toppings: Get creative with your decorations! Try different colored icing, edible flowers, or even themed candies to make your cookie cake a true showstopper.
These tips are like little golden nuggets of wisdom that I’ve gathered over the years. They help me create a cookie cake that not only looks beautiful but tastes heavenly too! I hope you find them helpful as you embark on your baking adventure!
Breakdown of Time for Easter Cookie Cake Recipe
As a passionate home cook, I know that timing is everything in the kitchen. It’s essential to plan ahead so you can enjoy the baking process without feeling rushed. Here’s a quick breakdown of the time you’ll need for our delightful Easter Cookie Cake:
- Prep Time: Approximately 20 minutes. This includes gathering your ingredients, mixing the batter, and preparing the baking pan. I always find that having everything ready makes the process smoother and more enjoyable!
- Cooking Time: About 25-30 minutes. This is the time it takes for your cookie cake to bake to golden perfection. I recommend keeping an eye on it during the last few minutes to ensure it doesn’t overbake.
- Total Time: Roughly 50-60 minutes. This includes both prep and cooking time. Once the cake is out of the oven, you’ll want to let it cool before decorating, which adds a little extra time but is well worth it!
With this time breakdown, you can easily plan your baking session. I love to put on some music and enjoy the process, knowing that soon I’ll have a delicious Easter Cookie Cake to share with my family. Happy baking!
Nutritional Information for Easter Cookie Cake Recipe
As a passionate home cook, I believe that enjoying a sweet treat like this Easter Cookie Cake can be part of a balanced lifestyle. While it’s important to savor every bite, it’s also good to know what’s in our delicious creations. Here’s a general breakdown of the nutritional information for one slice of this delightful cookie cake, assuming it yields about 12 servings:
- Calories: Approximately 250 calories
- Fat: 12g (Saturated Fat: 7g)
- Carbohydrates: 34g (Sugars: 18g)
- Protein: 3g
- Sodium: 150mg
- Fiber: 1g
Keep in mind that these values can vary based on the specific ingredients you use and any optional add-ons you choose to include. For instance, adding nuts or using different types of chocolate can change the nutritional profile. I always encourage my friends and family to enjoy treats like this in moderation, especially during festive occasions like Easter!
So, as you gather around the table to share this delightful cookie cake, remember that it’s not just about the numbers—it’s about the joy of baking and the memories created with loved ones. Happy baking and happy indulging!
Frequently Asked Questions about Easter Cookie Cake Recipe
As I’ve shared my Easter Cookie Cake Recipe with friends and family, I’ve noticed a few common questions pop up. It’s always great to clarify any doubts and help fellow bakers feel confident in their kitchen adventures. Here are some frequently asked questions that I hope will guide you as you embark on your own baking journey!
Can I make this cookie cake ahead of time?
Absolutely! One of the best things about this Easter Cookie Cake is that it can be made a day in advance. Just bake it, let it cool completely, and store it in an airtight container at room temperature. When you’re ready to serve, simply decorate it and enjoy!
What can I use instead of eggs in this recipe?
If you’re looking for an egg substitute, you can use unsweetened applesauce or mashed bananas. Typically, ¼ cup of applesauce or ½ a mashed banana replaces one egg. This will keep your cookie cake moist and delicious!
How do I store leftovers?
If you happen to have any leftovers (which is rare in my house!), store the cookie cake in an airtight container at room temperature for up to three days. You can also freeze it for later enjoyment. Just wrap it tightly in plastic wrap and then in aluminum foil before placing it in the freezer.
Can I use gluten-free flour?
Yes, you can! If you or someone you know is gluten-sensitive, feel free to substitute all-purpose flour with a gluten-free blend. Just make sure it’s a 1:1 ratio for the best results. I’ve had success with gluten-free baking, and it’s just as delightful!
What’s the best way to decorate the cookie cake?
The sky’s the limit when it comes to decorating! I love using pastel icing, colorful sprinkles, and even edible glitter for a festive touch. You can also get creative with fresh fruits or themed candies. Let your imagination run wild, and have fun with it!
These questions are just a few of the many that can arise while baking. I hope my answers help you feel more prepared and excited to create your own Easter Cookie Cake. Remember, baking is all about joy and creativity, so don’t hesitate to make this recipe your own!
Conclusion on Easter Cookie Cake Recipe
As we wrap up our delightful journey through the Easter Cookie Cake Recipe, I can’t help but feel a sense of warmth and joy. This recipe is more than just a sweet treat; it’s a celebration of love, creativity, and cherished memories. Each bite transports me back to those sunny Easter mornings spent with family, laughter echoing through the kitchen as we decorated our cookie cakes together.
What I love most about this recipe is its versatility. Whether you choose to stick with the classic version or explore the fun variations, each creation is a reflection of your unique style. The vibrant colors, the sweet aroma wafting through your home, and the smiles on your loved ones’ faces make every moment spent baking worthwhile.
So, as you gather your ingredients and prepare to bake, remember that the heart of this recipe lies in the joy of sharing. Whether it’s a festive gathering or a simple family dinner, this Easter Cookie Cake is sure to bring everyone together. I can’t wait for you to experience the magic of this recipe in your own kitchen. Happy baking, and may your Easter be filled with love, laughter, and, of course, delicious cookie cake!
Conclusion on Easter Cookie Cake Recipe
As we come to the end of our delightful exploration of the Easter Cookie Cake Recipe, I can’t help but feel a warm glow of happiness. This recipe is not just about baking; it’s about creating memories that last a lifetime. The joy of mixing ingredients, the sweet aroma filling your kitchen, and the laughter shared with loved ones as you decorate your cake are what truly make this experience special.
What I love most about this Easter Cookie Cake is its versatility. You can customize it with your favorite flavors, colors, and toppings, making it a unique creation every time. Whether you’re celebrating with family or simply indulging in a sweet treat, this cookie cake brings a festive spirit to any occasion.
So, as you gather your ingredients and prepare to bake, remember that the heart of this recipe lies in the joy of sharing. Each slice is a reminder of love, creativity, and the simple pleasures of life. I can’t wait for you to experience the magic of this recipe in your own kitchen. Happy baking, and may your Easter be filled with love, laughter, and, of course, delicious cookie cake!
