
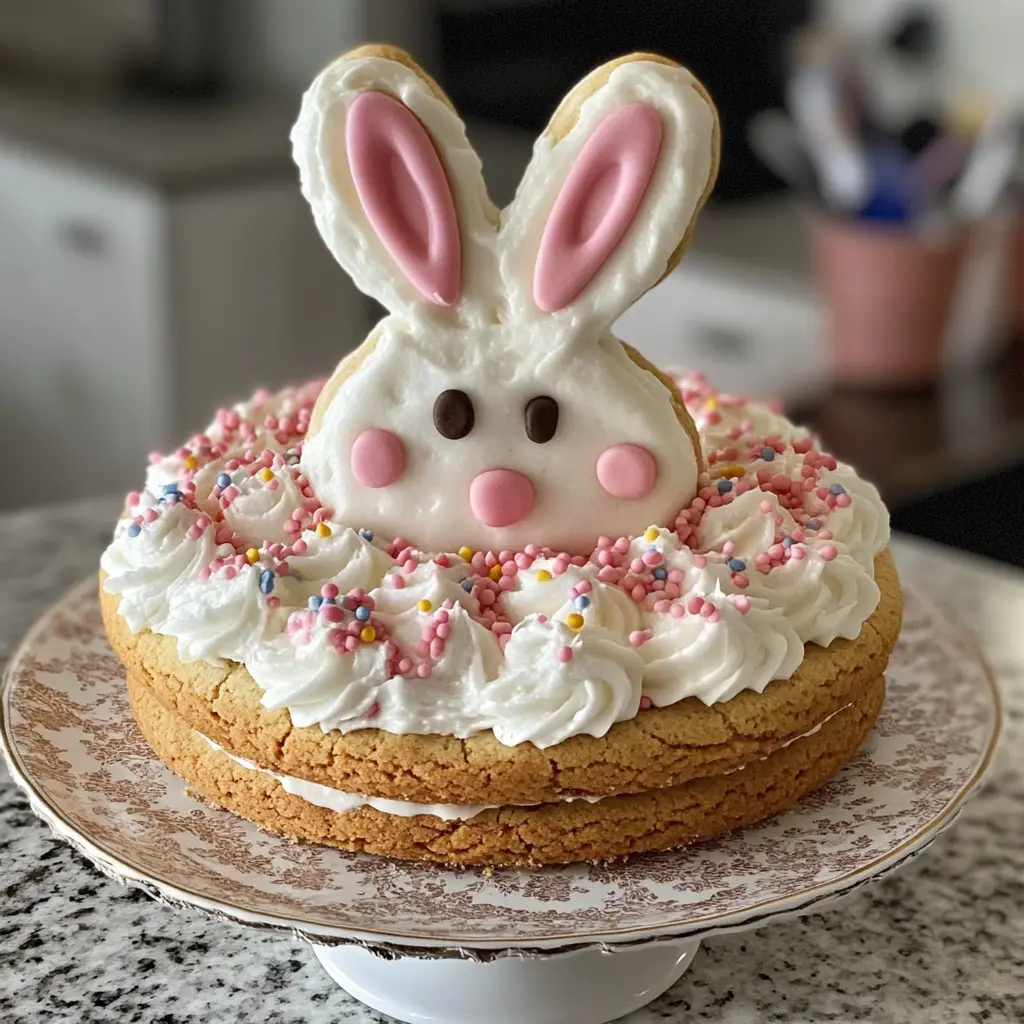
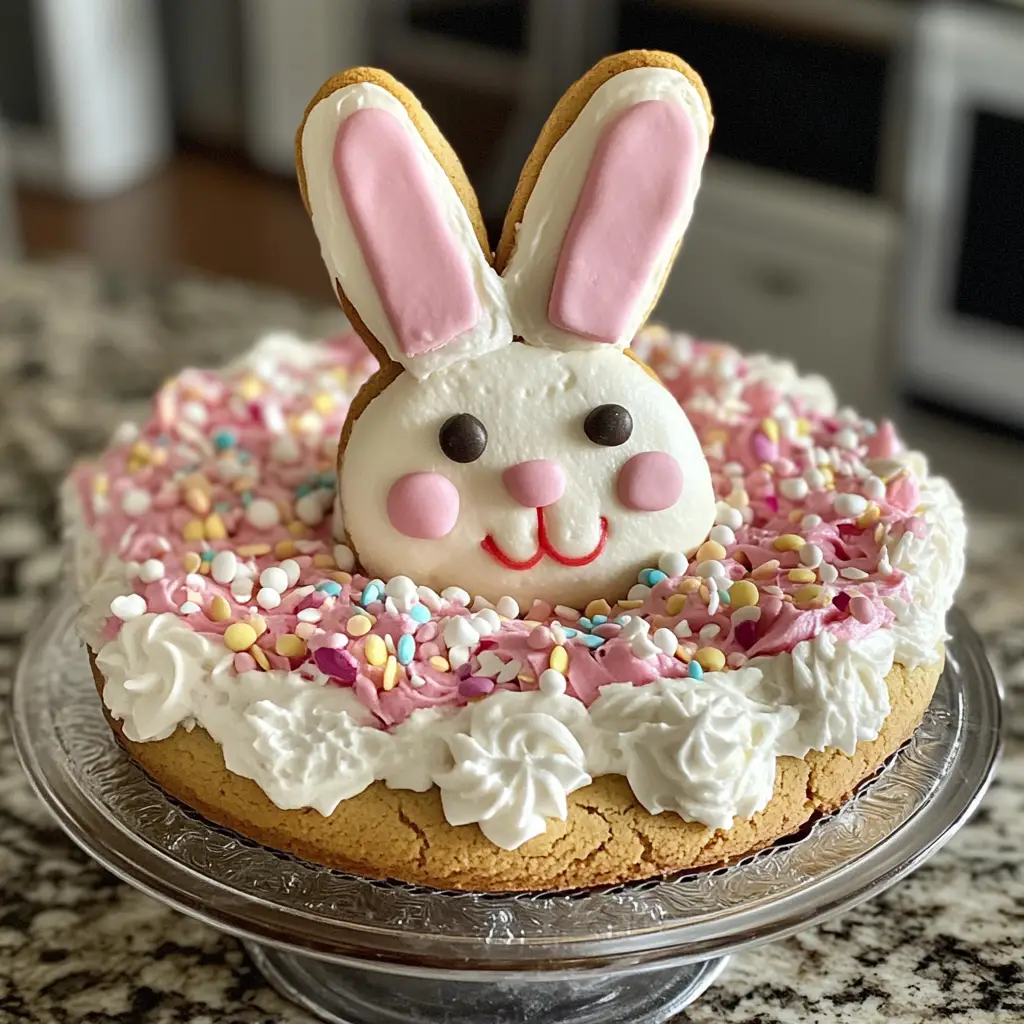
Introduction to Frosted Bunny Cookie Cake Recipe
As a passionate home cook, I find joy in creating delightful treats that bring smiles to faces. One of my all-time favorites is the Frosted Bunny Cookie Cake. This whimsical dessert is not just a feast for the eyes; it’s a deliciously sweet experience that captures the essence of springtime celebrations. I remember the first time I made this cake for an Easter gathering. The moment I placed it on the table, the room lit up with excitement. Kids and adults alike couldn’t resist its charm!
The idea of a bunny-shaped cake is simply enchanting. It reminds me of childhood memories spent hunting for Easter eggs and enjoying family picnics. The soft, chewy cookie base paired with creamy frosting creates a delightful contrast that dances on your taste buds. Plus, it’s a fun project to involve the little ones in the kitchen. They love helping shape the bunny and decorating it with colorful sprinkles!
In this recipe, I’ll guide you through each step, sharing tips and tricks that I’ve learned along the way. Whether you’re a seasoned baker or just starting out, this Frosted Bunny Cookie Cake Recipe is sure to become a cherished addition to your dessert repertoire. So, let’s hop into the kitchen and create something magical together!
Ingredients for Frosted Bunny Cookie Cake Recipe
Before we dive into the fun of baking, let’s gather our ingredients! Having everything ready makes the process smoother and more enjoyable. Here’s what you’ll need for the Frosted Bunny Cookie Cake Recipe.
Main Ingredients
- 2 ½ cups all-purpose flour
- 1 teaspoon baking soda
- ½ teaspoon salt
- 1 cup unsalted butter, softened
- 1 cup granulated sugar
- 1 cup brown sugar, packed
- 2 large eggs
- 2 teaspoons vanilla extract
- 1 cup chocolate chips (or your favorite mix-ins)
- 1 cup frosting (store-bought or homemade)
When choosing your ingredients, I always recommend using high-quality butter and fresh eggs. They make a noticeable difference in flavor and texture. If you can, opt for organic or free-range eggs for a richer taste!
Optional Add-ons
- 1 cup chopped nuts (like walnuts or pecans)
- ½ cup shredded coconut for a tropical twist
- Food coloring to tint your frosting
- Sprinkles or edible glitter for decoration
Feel free to get creative with these optional add-ons! I love adding a sprinkle of coconut for a fun texture. And if you want to make your frosting pop, a few drops of food coloring can turn your bunny into a vibrant masterpiece. The possibilities are endless!
How to Prepare Frosted Bunny Cookie Cake Recipe
Now that we have our ingredients ready, it’s time to roll up our sleeves and get baking! I love the process of creating this Frosted Bunny Cookie Cake. Each step is filled with excitement and anticipation. Let’s hop right into it!
Step 1: Preheat the Oven and Prepare the Baking Pan
First things first, preheat your oven to 350°F (175°C). This ensures that your cake bakes evenly. While the oven warms up, grab a large baking sheet and line it with parchment paper. This will help prevent sticking and make cleanup a breeze!
Tips for Step 1
- Make sure your oven is fully preheated before placing the cake inside. This helps achieve that perfect golden-brown color.
- If you don’t have parchment paper, you can lightly grease the baking sheet with butter or cooking spray.
Step 2: Mix the Cookie Dough
In a large mixing bowl, cream together the softened butter, granulated sugar, and brown sugar until it’s light and fluffy. This usually takes about 2-3 minutes. Then, add in the eggs and vanilla extract, mixing until well combined. In a separate bowl, whisk together the flour, baking soda, and salt. Gradually add the dry ingredients to the wet mixture, stirring until just combined. Finally, fold in the chocolate chips or any optional add-ons you desire!
Tips for Step 2
- Don’t overmix the dough! It’s okay if there are a few flour streaks left. Overmixing can lead to a tough cookie.
- For a fun twist, try using different flavored chips, like peanut butter or butterscotch!
Step 3: Shape the Bunny Cake
Now comes the fun part! Take about two-thirds of the dough and press it into the shape of a bunny on your prepared baking sheet. Use the remaining dough to form the ears and tail. I like to use my hands for this, but you can also use a spatula to help shape it. Make sure to leave some space around the bunny for spreading while baking.
Tips for Step 3
- Don’t worry about making it perfect! The charm of this cake is in its homemade look.
- If you have cookie cutters, you can use them to create fun shapes for the ears and tail!
Step 4: Bake the Cookie Cake
Place your bunny-shaped cookie cake in the preheated oven and bake for about 20-25 minutes. You’ll know it’s done when the edges are lightly golden and the center is set. Keep an eye on it, as baking times can vary based on your oven.
Tips for Step 4
- To check for doneness, insert a toothpick into the center. If it comes out clean or with a few crumbs, it’s ready!
- Don’t overbake! A slightly underbaked center will give you that chewy texture we love.
Step 5: Cool the Cake
Once baked, remove the cookie cake from the oven and let it cool on the baking sheet for about 10 minutes. Then, carefully transfer it to a wire rack to cool completely. This step is crucial, as frosting a warm cake can lead to a melty mess!
Tips for Step 5
- Be gentle when transferring the cake to avoid breaking it. A large spatula works wonders!
- If you’re in a hurry, you can place the cake in the fridge for a few minutes to speed up the cooling process.
Step 6: Frost the Bunny Cookie Cake
Once your bunny cookie cake is completely cool, it’s time to frost! Spread your frosting generously over the top, making sure to cover all the nooks and crannies. Get creative with your decorations! Use sprinkles, edible glitter, or even fruit to make your bunny come to life.
Tips for Step 6
- If you want to tint your frosting, add a few drops of food coloring and mix until you reach your desired shade.
- For a fun touch, use a piping bag to create decorative swirls or patterns on your bunny!
And there you have it! Your very own Frosted Bunny Cookie Cake is ready to be enjoyed. I can’t wait for you to experience the joy of making this delightful dessert!
Equipment Needed for Frosted Bunny Cookie Cake Recipe
Before we jump into the baking fun, let’s make sure we have all the right tools at our fingertips. Having the right equipment can make the process smoother and more enjoyable. Here’s what you’ll need for the Frosted Bunny Cookie Cake Recipe.
- Mixing Bowls: A large mixing bowl for combining your ingredients and a smaller one for whisking the dry ingredients.
- Measuring Cups and Spoons: Accurate measurements are key to baking success, so make sure you have these handy!
- Spatula: A sturdy spatula is perfect for mixing and scraping down the sides of your bowl.
- Baking Sheet: A large baking sheet lined with parchment paper is essential for shaping and baking your bunny cake.
- Wire Rack: This is great for cooling your cake evenly after baking. If you don’t have one, a plate will work in a pinch!
- Toothpick: A simple toothpick is your best friend for checking if the cake is done.
- Piping Bag (optional): If you want to get fancy with your frosting, a piping bag can help you create beautiful designs.
Don’t worry if you don’t have all the fancy tools! Most of these items are common kitchen staples. I’ve even used a regular spoon when I was in a pinch, and it worked just fine. The most important thing is to have fun and enjoy the process of creating your Frosted Bunny Cookie Cake!
Variations of Frosted Bunny Cookie Cake Recipe
One of the things I love most about baking is the freedom to experiment and make a recipe your own. The Frosted Bunny Cookie Cake Recipe is no exception! Here are a few fun variations that I’ve tried and absolutely adored:
- Chocolate Bunny Cake: Swap out half of the all-purpose flour for cocoa powder to create a rich chocolate version. It’s like a chocolate chip cookie cake with a twist!
- Carrot Cake Bunny: Add 1 cup of finely grated carrots and a teaspoon of cinnamon to the dough for a delightful carrot cake flavor. It’s perfect for springtime celebrations!
- Nutty Bunny: Incorporate 1 cup of chopped nuts, like almonds or pecans, into the dough for a crunchy texture. It adds a lovely contrast to the soft cookie base.
- Fruit-Infused Frosting: Mix in some pureed strawberries or raspberries into your frosting for a fruity twist. It not only tastes amazing but also adds a pop of color!
- Gluten-Free Bunny Cake: Substitute the all-purpose flour with a gluten-free blend. Just make sure to check that your other ingredients are also gluten-free!
These variations allow you to tailor the Frosted Bunny Cookie Cake to your taste or dietary needs. I encourage you to get creative and try out different flavors and textures. Who knows? You might just discover your new favorite version!
Cooking Notes for Frosted Bunny Cookie Cake Recipe
As I’ve baked the Frosted Bunny Cookie Cake numerous times, I’ve gathered a few cooking notes that can help you achieve the best results. These little tips can make a big difference in your baking adventure!
- Room Temperature Ingredients: Make sure your butter and eggs are at room temperature before you start. This helps them blend more easily, creating a smoother dough.
- Chill the Dough: If you find the dough too soft to shape, pop it in the fridge for about 30 minutes. Chilling helps firm it up, making it easier to work with.
- Watch the Baking Time: Every oven is different! Keep an eye on your bunny cake as it bakes. If you notice it browning too quickly, you can cover it loosely with aluminum foil.
- Frosting Consistency: If your frosting is too thick, add a splash of milk to thin it out. If it’s too runny, a little powdered sugar can help thicken it up.
- Storage Tips: Store any leftovers in an airtight container at room temperature for up to three days. If you want to keep it longer, you can freeze it for up to a month!
These cooking notes are like little nuggets of wisdom I’ve picked up along the way. They help ensure that your Frosted Bunny Cookie Cake turns out just as delightful as you envision. Happy baking!
Serving Suggestions for Frosted Bunny Cookie Cake Recipe
Now that your Frosted Bunny Cookie Cake is beautifully decorated and ready to go, it’s time to think about how to serve it! Presentation can elevate your dessert from delightful to absolutely enchanting. Here are some of my favorite serving suggestions that will make your bunny cake the star of the show:
- Slice and Serve: Cut the cake into fun bunny-shaped slices. You can use a cookie cutter to create bunny shapes from the slices for an extra touch of whimsy!
- Pair with Fresh Fruit: Serve your cake alongside a colorful assortment of fresh fruit, like strawberries, blueberries, or kiwi. The fruity flavors complement the sweetness of the cake beautifully.
- Ice Cream Delight: A scoop of vanilla or chocolate ice cream on the side adds a creamy contrast to the chewy cookie cake. It’s a match made in dessert heaven!
- Festive Platter: Arrange the cake on a decorative platter and sprinkle some edible flowers or extra sprinkles around it. This adds a festive touch, perfect for spring celebrations!
- Tea or Coffee Pairing: Serve slices of the cake with a warm cup of tea or coffee. The flavors meld together wonderfully, making for a cozy dessert experience.
These serving suggestions not only enhance the visual appeal of your Frosted Bunny Cookie Cake but also create a delightful experience for your guests. I love to see their faces light up when they take that first bite! Enjoy sharing this sweet creation with family and friends, and watch as it brings joy to your gatherings.
Tips for Making the Perfect Frosted Bunny Cookie Cake Recipe
As I’ve whipped up the Frosted Bunny Cookie Cake time and time again, I’ve gathered a treasure trove of tips that can help you achieve cookie cake perfection. These little nuggets of wisdom can make all the difference in your baking journey!
- Measure Accurately: Baking is a science! Use measuring cups and spoons for precise measurements. This ensures your cake has the right texture and flavor.
- Don’t Rush the Cooling: Allow your cake to cool completely before frosting. This prevents the frosting from melting and sliding off, keeping your bunny looking adorable!
- Experiment with Flavors: Don’t hesitate to add your favorite extracts or spices. A dash of almond extract or a sprinkle of cinnamon can elevate the flavor profile beautifully.
- Use Quality Frosting: Whether you choose store-bought or homemade, using a good-quality frosting makes a world of difference. It should be creamy and easy to spread!
- Get Creative with Decorations: Let your imagination run wild! Use different colored sprinkles, edible flowers, or even fruit to make your bunny cake uniquely yours.
These tips are like little guiding stars on your baking adventure. They’ll help you create a Frosted Bunny Cookie Cake that not only looks fantastic but tastes heavenly too. Happy baking, and may your kitchen be filled with joy and delicious aromas!
Breakdown of Time for Frosted Bunny Cookie Cake Recipe
When it comes to baking, timing is everything! I’ve learned that having a clear idea of how long each step takes can make the process feel more manageable and enjoyable. Here’s a quick breakdown of the time you’ll need for the Frosted Bunny Cookie Cake Recipe:
- Prep Time: Approximately 20 minutes. This includes gathering your ingredients, mixing the dough, and shaping the bunny cake. It’s a fun time to get the little ones involved!
- Cooking Time: About 20-25 minutes. Keep an eye on your bunny cake as it bakes to ensure it reaches that perfect golden-brown hue.
- Total Time: Roughly 45-50 minutes. This includes both prep and cooking time, plus a little extra for cooling before frosting.
Knowing this timeline helps me plan my baking sessions better. I often find that I can whip up this delightful Frosted Bunny Cookie Cake in under an hour, making it a perfect treat for last-minute gatherings or special occasions. Happy baking!
Nutritional Information for Frosted Bunny Cookie Cake Recipe
As a home cook, I always find it helpful to know the nutritional content of the treats I make. It allows me to enjoy them mindfully and share that information with family and friends. Here’s a general breakdown of the nutritional information for a slice of the Frosted Bunny Cookie Cake, assuming the cake is cut into 12 slices:
- Calories: Approximately 250 calories per slice
- Protein: 3 grams
- Fat: 12 grams
- Carbohydrates: 35 grams
- Sugar: 15 grams
- Fiber: 1 gram
Keep in mind that these values can vary based on the specific ingredients you use, especially if you opt for different types of frosting or add-ins. If you’re looking to lighten things up, consider using a reduced-sugar frosting or swapping some of the butter for applesauce. It’s all about finding that perfect balance while still enjoying the delightful flavors of your Frosted Bunny Cookie Cake!
Frequently Asked Questions about Frosted Bunny Cookie Cake Recipe
As I’ve shared my Frosted Bunny Cookie Cake Recipe with friends and family, I’ve noticed a few common questions pop up. I love answering these queries because it helps everyone feel more confident in their baking journey. Here are some of the most frequently asked questions about this delightful dessert:
Can I make the cookie cake ahead of time?
Absolutely! You can bake the bunny cookie cake a day in advance. Just make sure to store it in an airtight container at room temperature. Frost it on the day you plan to serve it for the best results. This way, the frosting stays fresh and delicious!
What if I don’t have a bunny-shaped cookie cutter?
No worries at all! You can easily shape the bunny by hand using your fingers. Just press the dough into the desired shape on the baking sheet. If you want, you can also use a round cutter for the head and a smaller one for the tail. The charm of this cake is in its homemade look!
Can I use a different type of frosting?
Definitely! While I love a classic buttercream frosting, you can use cream cheese frosting, whipped cream, or even a chocolate ganache for a different flavor profile. Just make sure it’s spreadable and complements the cookie cake!
How do I store leftovers?
To keep your Frosted Bunny Cookie Cake fresh, store any leftovers in an airtight container at room temperature for up to three days. If you want to keep it longer, you can freeze it for up to a month. Just make sure to wrap it well to prevent freezer burn!
Can I make this recipe gluten-free?
Yes! You can substitute the all-purpose flour with a gluten-free flour blend. Just ensure that all your other ingredients are gluten-free as well. I’ve tried this, and it turned out just as delicious!
What can I use instead of chocolate chips?
The beauty of this recipe is its versatility! You can use any mix-ins you like, such as white chocolate chips, butterscotch chips, or even dried fruit like cranberries or raisins. Get creative and make it your own!
These FAQs are just a glimpse into the wonderful world of baking the Frosted Bunny Cookie Cake. I hope they help you feel more prepared and excited to create this delightful dessert. Remember, baking is all about having fun and enjoying the process, so don’t hesitate to ask questions and experiment along the way!
Conclusion on Frosted Bunny Cookie Cake Recipe
As I wrap up this delightful journey of creating the Frosted Bunny Cookie Cake, I can’t help but reflect on the joy it brings to both the baker and the lucky eaters. This whimsical dessert is more than just a treat; it’s a celebration of creativity, family, and the sweet moments we share together. The soft, chewy cookie base paired with creamy frosting makes for a delightful combination that’s hard to resist.
Whether you’re making it for a special occasion or just because, this recipe is a wonderful way to bring a smile to everyone’s face. The process of shaping the bunny and decorating it with colorful sprinkles is not only fun but also a fantastic opportunity to involve the little ones in the kitchen. It’s a memory-making experience that will surely be cherished for years to come.
So, gather your ingredients, roll up your sleeves, and let your creativity shine! I hope you enjoy making and sharing this Frosted Bunny Cookie Cake as much as I do. Happy baking, and may your kitchen be filled with laughter and sweet aromas!
