
Introduction to No-Bake Butterbeer Cheesecake Jars
As a busy mom, I know how precious time can be, especially when it comes to whipping up something special for my family. That’s why I absolutely adore these No-Bake Butterbeer Cheesecake Jars! They’re not just a treat; they’re a delightful escape into the magical world of Harry Potter. Imagine indulging in a creamy, dreamy dessert that requires no baking at all! Perfect for those hectic days, these jars are a quick solution that will impress your loved ones and satisfy your sweet tooth. Trust me, once you try them, you’ll be hooked!
Why You’ll Love This No-Bake Butterbeer Cheesecake Jars
These No-Bake Butterbeer Cheesecake Jars are a dream come true for anyone short on time but big on flavor. They come together in just 20 minutes, making them a fantastic choice for busy weeknights or last-minute gatherings. Plus, the rich butterscotch flavor paired with creamy cheesecake is simply irresistible. You’ll love how easy they are to make, and your family will adore the magical taste that transports them straight to Hogwarts!
Ingredients for No-Bake Butterbeer Cheesecake Jars
Gathering the right ingredients is half the fun of making these No-Bake Butterbeer Cheesecake Jars! Here’s what you’ll need:
- Cream cheese: This is the star of the show, providing that rich, creamy texture we all love.
- Powdered sugar: It sweetens the cheesecake without the graininess of granulated sugar, giving it a smooth finish.
- Heavy whipping cream: This adds fluffiness and a lightness to the cheesecake, making it feel indulgent.
- Butterscotch sauce: The magical flavor that brings the essence of butterbeer to life! You can use store-bought or homemade.
- Vanilla extract: A splash of this adds depth and enhances the overall flavor profile.
- Crushed graham crackers: These create a delightful crust that adds a crunchy texture to each bite.
- Butter: Melted butter binds the graham cracker crumbs together, making them easy to layer.
- Whipped cream: For topping, it adds a light and airy finish that’s simply irresistible.
- Extra butterscotch sauce: Drizzle this on top for an extra touch of sweetness and visual appeal.
For those looking to switch things up, feel free to experiment with flavored extracts or even add a pinch of sea salt to enhance the butterscotch flavor. You can find the exact measurements for these ingredients at the bottom of the article, ready for printing!

How to Make No-Bake Butterbeer Cheesecake Jars
Step 1: Prepare the Cheesecake Mixture
Start by grabbing a mixing bowl and adding the softened cream cheese and powdered sugar. Beat them together until the mixture is smooth and creamy, like a fluffy cloud. Next, pour in the heavy whipping cream, butterscotch sauce, and vanilla extract. Mix everything together until it’s well combined and fluffy. This is where the magic happens! The butterscotch flavor will make your taste buds dance with joy. Trust me, you’ll want to sneak a taste before moving on to the next step!
Step 2: Make the Graham Cracker Crust
In another bowl, combine the crushed graham crackers with the melted butter. Mix them together until the crumbs are evenly coated and crumbly. This mixture will create a delightful crust that adds texture to your jars. It’s like a little crunch of happiness in every bite! If you want a more intense flavor, consider adding a pinch of cinnamon to the graham cracker mix. It’s a simple twist that can elevate your dessert!
Step 3: Layer the Ingredients in Jars
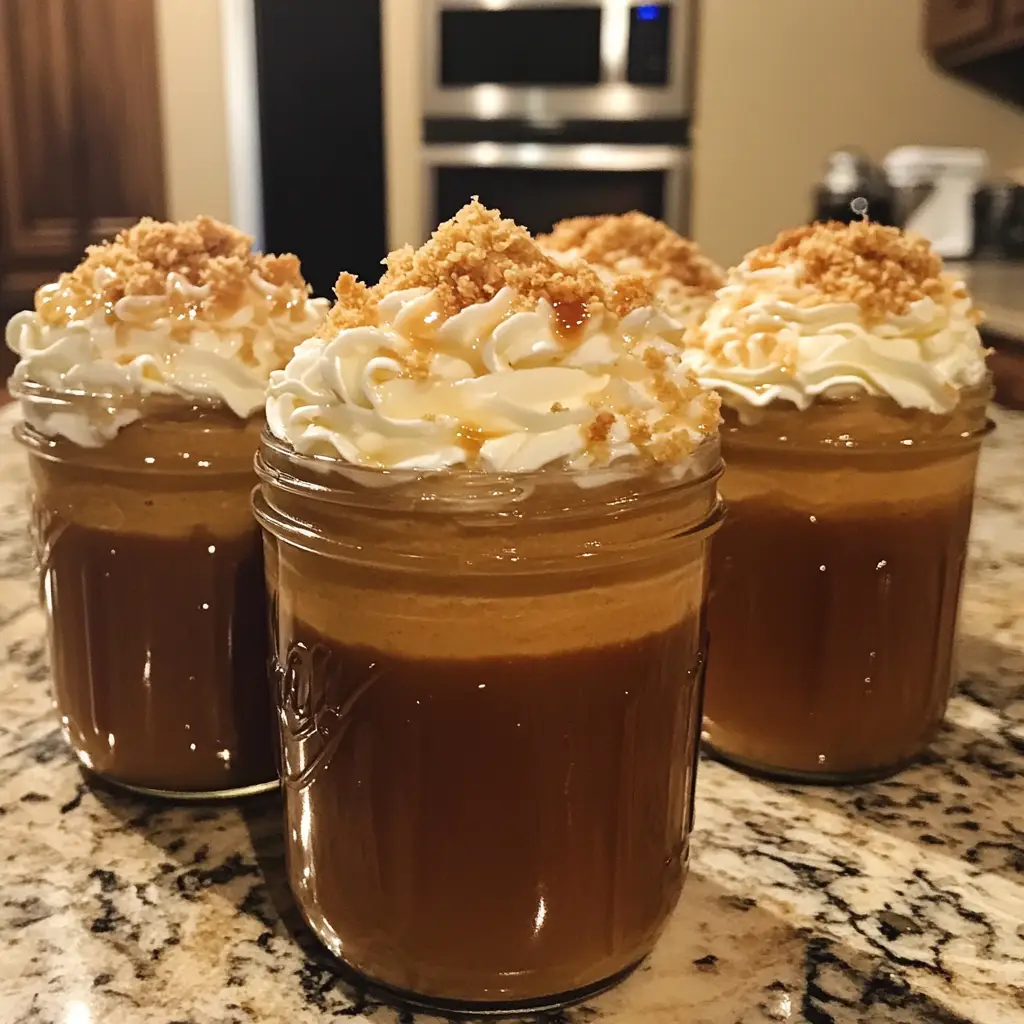
Now comes the fun part—layering! Grab your jars and start with a spoonful of the graham cracker mixture at the bottom. Press it down gently to form a nice base. Next, add a generous layer of the cheesecake mixture on top. Repeat this process, alternating layers until the jars are filled to the brim. You can create as many layers as you like, but I recommend at least two of each for that perfect balance. The visual appeal of these layers is just as delightful as the taste!
Step 4: Chill and Serve
Once your jars are beautifully layered, it’s time to top them off with a dollop of whipped cream. Drizzle some extra butterscotch sauce on top for that finishing touch. Now, here’s the key: chill the jars in the refrigerator for at least two hours. This allows the flavors to meld together and the cheesecake to set. When you’re ready to serve, just grab a spoon and dig in. Your family will be begging for seconds!
Tips for Success
- Make sure your cream cheese is softened for easy mixing.
- Chill the jars overnight for an even better flavor.
- Use a piping bag for the whipped cream topping for a professional look.
- Feel free to customize the layers with your favorite toppings, like crushed candies or nuts.
- Keep an eye on the chilling time; the longer, the better!
Equipment Needed
- Mixing bowls: A set of various sizes is handy; you can also use a large pot if needed.
- Electric mixer: A hand mixer works great, but a whisk can do the job too—just be prepared for a workout!
- Jars: Any small glass or plastic jars will work; mason jars add a charming touch.
- Spoon or spatula: For layering and mixing; a silicone spatula is perfect for scraping every last bit.

Variations
- Chocolate Lovers: Add cocoa powder to the cheesecake mixture for a chocolatey twist that pairs beautifully with butterscotch.
- Nutty Delight: Incorporate crushed nuts, like pecans or walnuts, into the graham cracker crust for added crunch and flavor.
- Gluten-Free Option: Substitute regular graham crackers with gluten-free ones to make this dessert suitable for gluten-sensitive friends.
- Vegan Version: Use vegan cream cheese and coconut whipped cream to create a plant-based version of these jars.
- Fruit Infusion: Layer in fresh fruit, like sliced bananas or strawberries, between the cheesecake layers for a refreshing touch.
Serving Suggestions
- Pair these No-Bake Butterbeer Cheesecake Jars with a warm cup of spiced apple cider for a cozy treat.
- Serve alongside buttery popcorn for a fun movie night snack.
- Garnish with a sprinkle of crushed graham crackers for added texture and visual appeal.
- Consider a side of chocolate-dipped pretzels for a sweet and salty contrast.
FAQs about No-Bake Butterbeer Cheesecake Jars
Can I make No-Bake Butterbeer Cheesecake Jars in advance?
Absolutely! These jars can be made a day in advance, making them perfect for busy schedules. Just store them in the refrigerator until you’re ready to serve. The flavors will meld beautifully overnight!
How long do leftovers last?
If you have any leftovers (which is rare!), they can be stored in the refrigerator for up to three days. Just make sure to cover them well to keep them fresh!
Can I use a different flavor of sauce?
Of course! While butterscotch sauce is the star here, you can experiment with caramel or chocolate sauce for a different twist. Each will bring its own unique flavor to the cheesecake jars!
What can I substitute for cream cheese?
If you’re looking for a lighter option, you can use Greek yogurt or mascarpone cheese. Just keep in mind that the texture and flavor will vary slightly, but they’ll still be delicious!
Is this recipe suitable for kids?
Definitely! Kids will love the fun presentation and the sweet, creamy taste. Just be sure to supervise them while they help with the layering—it’s a great way to get them involved in the kitchen!
Final Thoughts
Creating these No-Bake Butterbeer Cheesecake Jars is more than just making a dessert; it’s about crafting a little moment of joy in our busy lives. Each layer tells a story, from the creamy cheesecake to the crunchy graham cracker base. They’re perfect for sharing with family or enjoying during a cozy night in. Plus, the smiles on my loved ones’ faces when they take that first bite? Absolutely priceless! So, gather your ingredients, unleash your inner wizard, and let these delightful jars bring a sprinkle of magic to your kitchen. You won’t regret it!
Print
No-Bake Butterbeer Cheesecake Jars You Can’t Resist!
- Total Time: 2 hours 20 minutes
- Yield: 4 jars 1x
- Diet: Vegetarian
Description
Delicious and easy-to-make no-bake butterbeer cheesecake jars inspired by the magical world of Harry Potter.
Ingredients
- 8 oz cream cheese, softened
- 1/2 cup powdered sugar
- 1/2 cup heavy whipping cream
- 1/4 cup butterscotch sauce
- 1 tsp vanilla extract
- 1/2 cup crushed graham crackers
- 1/4 cup butter, melted
- Whipped cream for topping
- Butterscotch sauce for drizzling
Instructions
- In a mixing bowl, beat the softened cream cheese and powdered sugar until smooth.
- Add the heavy whipping cream, butterscotch sauce, and vanilla extract, and mix until well combined and fluffy.
- In another bowl, combine crushed graham crackers and melted butter, mixing until crumbly.
- In jars, layer the graham cracker mixture followed by the cheesecake mixture. Repeat layers until jars are filled.
- Top with whipped cream and drizzle with butterscotch sauce.
- Chill in the refrigerator for at least 2 hours before serving.
Notes
- For a stronger butterscotch flavor, add more butterscotch sauce to the cheesecake mixture.
- These jars can be made a day in advance for convenience.
- Store leftovers in the refrigerator for up to 3 days.
- Prep Time: 20 minutes
- Cook Time: 0 minutes
- Category: Dessert
- Method: No-Bake
- Cuisine: American
Nutrition
- Serving Size: 1 jar
- Calories: 350
- Sugar: 25g
- Sodium: 150mg
- Fat: 22g
- Saturated Fat: 12g
- Unsaturated Fat: 8g
- Trans Fat: 0g
- Carbohydrates: 30g
- Fiber: 1g
- Protein: 4g
- Cholesterol: 60mg
Keywords: No-Bake Butterbeer Cheesecake Jars, Harry Potter dessert, easy cheesecake recipe
