
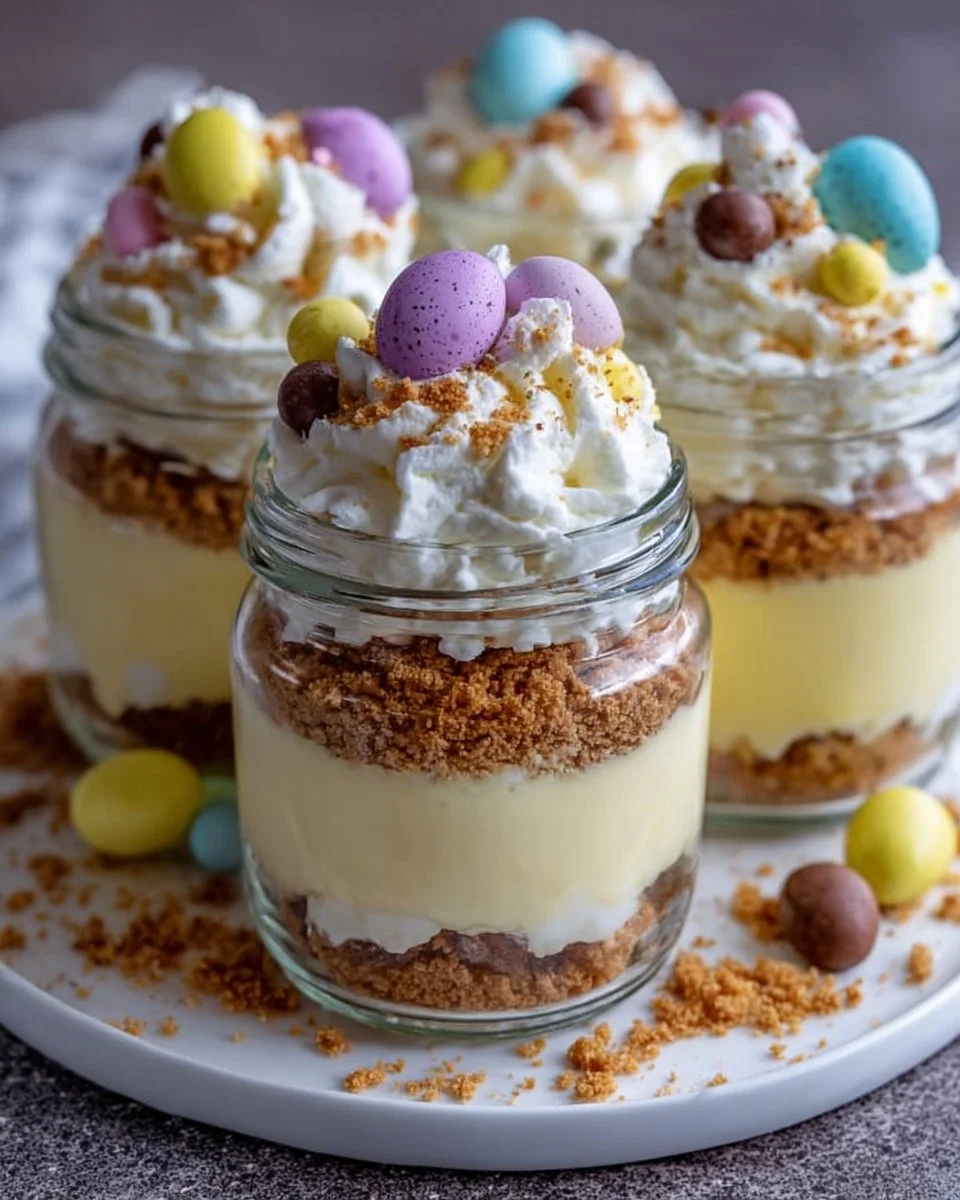
Each spring, when the world bursts into vibrant color and the scent of blooming flowers fills the air, the promise of Easter weaves its way through our hearts and kitchens. Celebrate this joyous occasion with a whimsical twist on a classic dessert: Easter Egg Cheesecake Jars. Imagine holding a jar filled with layers of creamy cheesecake, crunchy graham cracker crumbs, and a shower of cheerful pastel candy eggs. With each spoonful, you encounter a symphony of textures and flavors—a delightful tang from the cream cheese mingling with the sweetness of powdered sugar, all topped off with the airy fluffiness of whipped cream. It’s not just a dessert; it’s an experience reminiscent of joyful egg hunts and family gatherings.
The sweet scent that wafts through your kitchen as these jars chill provides an unmistakable hint of what’s to come. The layers come together like a beautiful spring day, inviting everyone to gather around the table, share stories, and create memories. With their stunning presentation and indulgent taste, these Easter Egg Cheesecake Jars elevate any gathering, from intimate family dinners to festive potlucks, making them an instant crowd-pleaser.
Why You’ll Love This Easter Egg Cheesecake Jars
Easter Egg Cheesecake Jars shine for many reasons. First, they invite creativity—the colorful candy eggs or sprinkles transform an ordinary dessert into a festive masterpiece that delights the eyes before it even reaches the palate. The delightful blend of textures—from the smooth, rich cheesecake filling to the crunchy graham cracker base—will have your taste buds dancing with every bite.
These jars are perfect for any occasion, not just Easter. What’s more, they provide a seamless solution for serving dessert at gatherings, as each guest gets their individualized portion in delightful jars. The beauty of this recipe lies in its simplicity. It requires no baking, allowing flavors to meld in the fridge while you prepare for other festivities or simply unwind and enjoy the holiday’s atmosphere.
Preparation Phase & Tools to Use
Creating the perfect Easter Egg Cheesecake Jars requires just a few essential tools:
- Mixing Bowls: Use at least two. A large one for combining the cheesecake and a smaller one for the graham cracker crust.
- Electric Mixer or Whisk: For a smooth cheesecake filling that captures that airy creaminess, an electric mixer makes the process effortless. However, a good whisk works too if you prefer a workout!
- Spatula: Essential for folding the whipped cream into the cheesecake mixture, ensuring it remains fluffy and light.
- Jars: Clear glass jars or dessert cups provide beautiful presentations, allowing the colorful layers to shine through.
- Measuring Cups and Spoons: Precision in baking is crucial, and these tools ensure you get every ingredient just right.
Practical Preparation Tips:
- Soften your cream cheese thoroughly, as this prevents lumps and ensures a perfectly smooth mixture.
- For a deeper flavor, consider allowing the cheesecake to chill overnight; this blend intensifies the tastes and adds to that luxurious experience.
Ingredients for Easter Egg Cheesecake Jars
Gather the following ingredients to embark on this delicious adventure:
- 8 oz cream cheese (softened): This creates the rich, velvety base of your cheesecake.
- 1/2 cup powdered sugar: Adds the perfect sweetness without the grit of granulated sugar.
- 1 tsp vanilla extract: Enhances the overall flavor, adding warmth and depth.
- 1 cup whipped cream: Provides a light, airy texture, making each bite feel like a cloud of dessert.
- 1 1/2 cups graham cracker crumbs: Bring in that iconic cheesecake crust flavor and texture.
- 1/4 cup melted butter: Acts as the glue for the graham cracker crust and adds richness.
- Colorful candy eggs or sprinkles for topping: The festive touch that makes this dessert truly special.
Substitutions:
- Cream Cheese: You may use Greek yogurt for a lighter version, though the texture will differ slightly.
- Powdered Sugar: Honey or maple syrup can be used for a more natural sweetness but adjustments are needed for consistency.
- Graham Crackers: For a gluten-free option, swap these for ground almonds or gluten-free cookies.
How to Make Easter Egg Cheesecake Jars
Creating this dreamy dessert is as enjoyable as savoring it. Follow these simple steps:
-
Beat the Base: In a mixing bowl, beat together the softened cream cheese, powdered sugar, and vanilla extract until smooth and creamy. Make sure there are no lumps; this is the foundation of your cake!
-
Fold in the Fluff: Gently fold in the whipped cream with a spatula until fully combined, preserving that light, airy texture.
-
Prepare the Crust: In another bowl, mix the graham cracker crumbs with the melted butter until crumbly. This mix should resemble wet sand and clump together without being overly soggy.
-
Layer It Up: In your jars, start by layering a generous spoonful of the graham cracker mixture at the bottom. Follow this with a layer of the creamy cheesecake filling. Repeat until the jars are filled to the top, finishing with the cheesecake layer.
-
Add the Festivity: Top each jar with colorful candy eggs or sprinkles. Watch as those vibrant hues dance against the creamy white backdrop!
-
Chill for Happiness: Place your jars in the refrigerator and allow them to chill for at least 2 hours—this helps the flavors meld and sets the dessert perfectly.
Chef’s Notes & Helpful Tips
- Make-ahead Tips: You can prepare these jars a day in advance. Just make sure to store them tightly covered in the refrigerator to maintain freshness and consistency.
- Cooking Alternatives: While this is a no-bake recipe, you can bake the crust in the oven at 350°F for approximately 8-10 minutes if you prefer a more toasted flavor.
- Customization Ideas: Create a fun twist by adding fruit purees or flavored extracts to your cheesecake layer. Think about strawberry or lemon flavors for a refreshing zing.
Common Mistakes to Avoid
Creating your perfect cheesecake jars should be a breeze, but some simple pitfalls could detract from your glorious creation:
-
Not Soften Cream Cheese: A common error is to skip softening the cream cheese. This could result in lumps, which no one wants in creamy cheesecake jars. Always bring it to room temperature first!
-
Overmixing the Whipped Cream: It’s easy to take beating too far, leading to a grainy texture. Stop mixing as soon as you see soft peaks forming.
-
Skipping the Chill Time: Don’t rush! Allowing the jars to chill for adequate time allows flavors to harmonize and sets the dessert.
What to Serve With Easter Egg Cheesecake Jars
Complement your jars with delightful beverages and snacks:
- Fresh Fruit Salad: A refreshing mix of berries or citrus adds a burst of freshness.
- Coffee or Tea: The rich flavors of coffee can balance out the sweetness, while a fragrant tea creates a cozy atmosphere.
- Whipped Topping: Add a dollop of plain whipped cream on top for the ultimate indulgence.
- Chocolate Fondue: Dip in strawberries or pretzels, enhancing the chocolatey goodness alongside your dessert.
- Mini Pastries: Serve with delicate pastries for a buffet-style dessert.
- Tangy Lemonade: A sweet-tart drink can cut through the richness of the cheesecake.
- Ice Cream: A scoop of vanilla ice cream elevates the experience to another layer of decadence.
Storage & Reheating Instructions
When it comes to storage, these jars hold up beautifully:
-
Fridge: Store your cheesecakes in the refrigerator for up to 4 days. Just ensure they’re tightly covered or sealed to maintain freshness.
-
Freezer: While we recommend enjoying them chilled, if you wish to freeze them, do not add the toppings. They last in the freezer for about a month. Thaw in the fridge overnight before serving.
-
No Reheating Needed: These jars are best served cold, so enjoy them straight from the refrigerator.
Estimated Nutrition Information
Each jar of these delightful desserts approximately contains:
- Calories: 350
- Fat: 22g
- Carbohydrates: 35g
- Protein: 4g
(Values may vary based on exact ingredients and serving size.)
FAQs
1. Can I use low-fat cream cheese?
Absolutely! Low-fat cream cheese will work; however, be prepared for a slightly different texture.
2. How long do these jars last?
These cheesecake jars can last up to four days in the fridge when properly covered.
3. Can I make gluten-free versions?
Yes! Use gluten-free graham crackers or almond flour mixed with melted butter to create the crust.
4. How can I add flavor variations?
Try adding flavored extracts like almond or lemon to the cheesecake mixture. You can also fold in pureed fruits.
5. Can I use whipped topping instead of homemade whipped cream?
Certainly! Pre-made whipped topping can save time; just ensure to fold it gently for the best result.
Conclusion
As you gather around with friends and family, the Easter Egg Cheesecake Jars will not only serve as a sweet finale to your meal but will also spark joy and laughter in each spoonful. The blend of textures, the pop of flavors, and the beautiful presentation make these jars a charming addition to your holiday celebrations. Embrace the whimsical spirit of Easter with these delightful desserts, and let the sweetness linger in both taste and cherished memories. Give these jars a try, and experience the delight that this unique treat brings to the season. Happy baking!
Print
Easter Egg Cheesecake Jars
- Total Time: 120 minutes
- Yield: 4 servings 1x
- Diet: Vegetarian
Description
Celebrate Easter with these whimsical cheesecake jars filled with creamy layers, crunchy graham cracker crumbs, and colorful candy eggs.
Ingredients
- 8 oz cream cheese (softened)
- 1/2 cup powdered sugar
- 1 tsp vanilla extract
- 1 cup whipped cream
- 1 1/2 cups graham cracker crumbs
- 1/4 cup melted butter
- Colorful candy eggs or sprinkles for topping
Instructions
- Beat together the softened cream cheese, powdered sugar, and vanilla extract until smooth and creamy.
- Fold in the whipped cream with a spatula until fully combined.
- Prepare the graham cracker crust by mixing the crumbs with melted butter until crumbly.
- Layer a spoonful of the graham cracker mixture at the bottom of jars, followed by the cheesecake filling. Repeat layers until filled.
- Add colorful candy eggs or sprinkles on top.
- Chill the jars in the refrigerator for at least 120 minutes.
Notes
These jars can be made a day in advance and stored tightly covered. They are best served cold.
- Prep Time: 15 minutes
- Cook Time: 0 minutes
- Category: Dessert
- Method: No-Bake
- Cuisine: American
Nutrition
- Serving Size: 1 jar
- Calories: 350
- Sugar: 23g
- Sodium: 150mg
- Fat: 22g
- Saturated Fat: 12g
- Unsaturated Fat: 8g
- Trans Fat: 0g
- Carbohydrates: 35g
- Fiber: 1g
- Protein: 4g
- Cholesterol: 30mg
Keywords: Easter dessert, cheesecake jars, no-bake cheesecake, festive dessert, creamy dessert
