
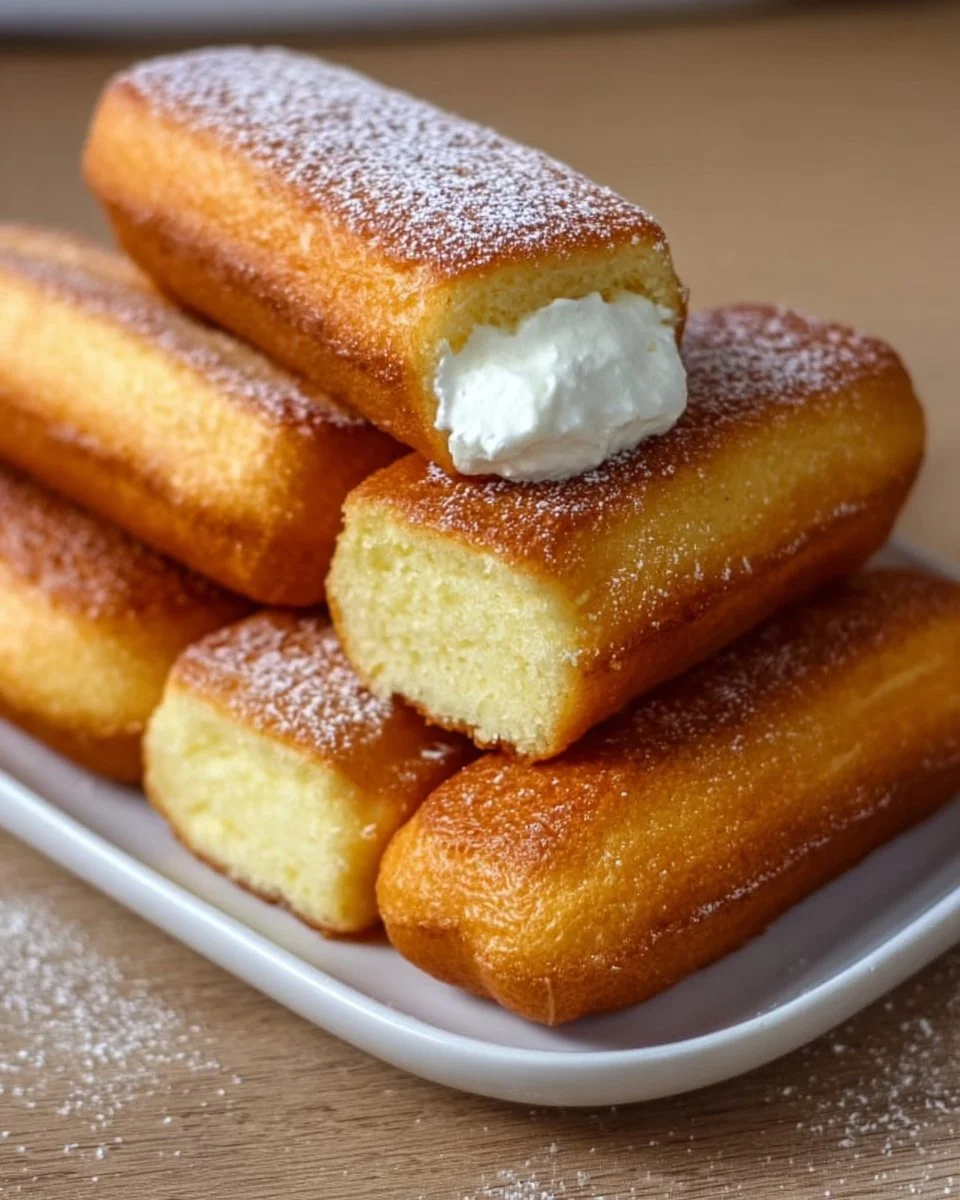
Picture this: a golden sponge cake, light and airy, with a melt-in-your-mouth texture that brings back memories of childhood. As you slice into it, the soft cake yields to your eager touch, revealing its luscious, sweet cream filling nestled in the center. Each bite offers a delightful interplay of flavors — the sweetness of the vanilla mingling with the buttery richness, accompanied by the faintest hint of nostalgia. Homemade Twinkies transform that childhood snack into something truly special, evoking warm feelings, cherished memories, and pure happiness.
Creating your own Twinkies is not just about the taste; it’s an adventure that invites you to relive those joyful moments. With just a few steps, you’ll fill your kitchen with an irresistible aroma that merges the essence of baking with the thrill of crafting something uniquely yours. The satisfaction of biting into a creamy, decadent treat that you made by hand is unmatched. This is not simply a dessert; it’s a joyful experience, an homage to the simplicity of childhood indulgence that everyone deserves to embrace.
Why You’ll Love This Homemade Twinkies
These homemade Twinkies stand out for countless reasons. Firstly, their taste enchants both young and old, making them perfect for birthday parties, tea time, or simply a sweet treat any day of the week. The buttery sponge cake provides a rich base that cradles a sweet and velvety filling, creating a harmonious balance that leaves you wanting more.
Not only do they taste incredible, but making your own Twinkies also allows for customization. Add a pinch of zest, a dash of chocolate, or even a hint of almond extract to make the recipe your own! They also capture the joy of baking, allowing you to share the process with family or friends. Each delightful bite becomes a celebration of creativity, where imperfections are just part of the charm. Homemade Twinkies remind us of the joy found in the kitchen and the magic that comes from sharing treats made with love.
Preparation Phase & Tools to Use
Before diving into the baking process, gathering the right tools makes the entire experience smooth and enjoyable. Here’s what you’ll need:
-
Mixing Bowls: A couple of medium-sized mixing bowls will help you combine your dry and wet ingredients effortlessly.
-
Electric Mixer: While you can whisk by hand, an electric mixer makes quick work of creaming butter and sugar into a fluffy delight.
-
Twinkie Molds or Cupcake Pans: Investing in Twinkie molds yields the authentic shape, but you can easily use cupcake pans if necessary. Just remember to allow extra baking time.
-
Piping Bag: This will help you fill your delightful creations with cream filling for that classic Twinkie taste.
Armed with these tools, you’ll find yourself in the proper spirit to embark on this delicious journey. Remember to embrace the process; baking should be fun, and a little music or a podcast in the background can elevate your experience even more.
Ingredients for Homemade Twinkies
- 1 cup all-purpose flour: The foundation of your cake; it gives structure and lightness.
- 1 teaspoon baking powder: This lifts your cakes, ensuring a soft and fluffy crumb.
- 1/2 teaspoon baking soda: Adds extra leavening for a perfect rise.
- 1/4 teaspoon salt: Enhances all the flavors, balancing the sweetness.
- 1/2 cup unsalted butter, softened: For a rich, buttery flavor and tender texture.
- 1 cup granulated sugar: Sweetens your Twinkies and contributes to their beautiful golden color.
- 2 large eggs: The binding agent, adding moisture and richness.
- 1 teaspoon vanilla extract: Infuses your cakes with a classic flavor.
- 1/2 cup milk: Provides moisture for a tender crumb and richness.
- Cream filling: (powdered sugar, butter, vanilla extract, and milk for consistency) – The star of the show, creating that luscious, creamy center.
Feel free to substitute ingredients where necessary. For instance, if you need a dairy-free option, use almond milk and a vegan butter alternative. The essence of these treats lies in their comfort and versatility, so personalize them as you see fit!
How to Make Homemade Twinkies
-
Preheat your oven to 350°F (175°C). Getting your oven heated ensures the cakes start baking immediately upon being placed inside, maintaining that light, airy texture.
-
In a bowl, combine, flour, baking powder, baking soda, and salt. This step ensures even distribution of the leavening agents.
-
In another bowl, beat the butter and sugar together until light and fluffy, about 3 minutes. This helps trap air, making your Twinkies light.
-
Add the eggs one at a time, mixing well after each addition. Incorporating them gradually helps avoid breaking the air structure you’ve built so far.
-
Stir in the vanilla extract. The aroma will fill your kitchen, creating a cozy atmosphere as you dive deeper into the process.
-
Gradually add the dry mixture to the wet ingredients, alternating with the milk. Start and end with the dry ingredients. This technique provides the best consistency for your batter.
-
Spoon the batter into Twinkie molds or greased cupcake pans, filling each cavity about two-thirds full. This prevents overflow while allowing for rise.
-
Bake for 20-25 minutes, or until golden brown and a toothpick inserted into the center comes out clean. Keep an eye on them; ovens do vary!
-
Let cool completely before filling, ensuring that the warm cakes don’t melt the cream. Use a piping bag filled with your cream filling to fill the center of each cake.
-
Enjoy your homemade Twinkies! Take a moment to appreciate your accomplishment and indulge in every delightful bite.
Chef’s Notes & Helpful Tips
-
Make-ahead Tips: You can prepare the sponge cakes a day prior. Simply store them in an airtight container and fill them just before serving.
-
Cooking alternatives: If you’re in a hurry, air fryers can also yield impressive results, generally cutting down on cooking time.
-
Customization ideas: Experiment with different extracts, like almond or lemon, or even try adding cocoa powder to your batter for a chocolate version!
Common Mistakes to Avoid
-
Overmixing the batter: This can lead to dense cakes. Mix just until combined.
-
Skipping the cooling step: Filling warm cakes with cream may result in a melted, messy filling. Always let them cool completely.
-
Not checking the doneness: Relying solely on the timer can lead to underbaking or overbaking. Trust your toothpick!
What to Serve With Homemade Twinkies
Enjoying these delicious treats can be elevated with a variety of pairings:
-
Coffee or Tea: A warm beverage enhances their sweetness while creating a cozy ambiance.
-
Ice Cream: Pairing with a scoop offers an indulgent experience, melting in your mouth as you bite into the soft cake.
-
Fresh Berries: The tartness of strawberries or raspberries balances the sweetness, providing a bright contrast.
-
Chocolate Sauce: Drizzling over the top adds an element of decadence that chocolate lovers will appreciate.
-
Milk: The classic combination never fails, offering a nostalgic touch and refreshing drink to accompany your treat.
-
Whipped Cream: This light and airy topping adds a delightful element of creaminess that complements the Twinkies perfectly.
Storage & Reheating Instructions
Keep your homemade Twinkies fresh by storing them in an airtight container at room temperature for up to four days. For longer storage, you may freeze them for up to three months. Simply place them in an airtight freezer-safe container, separating layers with parchment paper to prevent sticking. When you’re ready to enjoy them, thaw in the fridge overnight or at room temperature for a few hours. Reheat briefly in the microwave to restore their softness.
Estimated Nutrition Information
Each homemade Twinkie contains roughly:
- Calories: 190
- Fat: 8g
- Carbohydrates: 28g
- Protein: 2g
- Sugars: 12g
(Note: these are estimates and can vary based on specific ingredient brands and measurements.)
FAQs
-
Can I make gluten-free Twinkies?
Absolutely! Simply substitute the all-purpose flour with a gluten-free baking blend. Ensure it contains xanthan gum for the best texture. -
How can I make the filling less sweet?
Adjust the sugar levels in the cream filling to suit your taste. You can also add a pinch of salt or a splash of lemon juice to balance the sweetness. -
Can I use flavored extracts in the cake?
Definitely! Experimenting with different extracts, like almond or lemon, can provide unique and delightful flavors. -
What if I don’t have Twinkie molds?
Use a cupcake pan instead. Your Twinkies will still taste amazing; just remember to adjust the baking time! -
Can I add a chocolate variation?
Yes! Add unsweetened cocoa powder to the dry ingredients. You can also use chocolate filling for a decadent twist.
Conclusion
Indulging in homemade Twinkies transcends mere dessert; it becomes an experience that connects us to our sweet recollections and joyful moments spent in the kitchen. Each bite speaks of care, nostalgia, and the sheer joy of creating something delightful. As you embark on this baking adventure, remember that the heart of cooking lies in experimentation and love. So, gather your ingredients, invite a friend into the kitchen, and let the delightful aroma of freshly baked Twinkies embrace you. Embrace the journey, savor the flavors, and indulge in the love that is poured into every creamy, delicious bite. You won’t regret it!
Print
Homemade Twinkies
- Total Time: 40 minutes
- Yield: 12 servings 1x
- Diet: Vegetarian
Description
Delightful homemade Twinkies that capture the sweetness of childhood nostalgia with a buttery sponge cake and creamy filling.
Ingredients
- 1 cup all-purpose flour
- 1 teaspoon baking powder
- 1/2 teaspoon baking soda
- 1/4 teaspoon salt
- 1/2 cup unsalted butter, softened
- 1 cup granulated sugar
- 2 large eggs
- 1 teaspoon vanilla extract
- 1/2 cup milk
- Cream filling (powdered sugar, butter, vanilla extract, and milk for consistency)
Instructions
- Preheat your oven to 350°F (175°C).
- In a bowl, combine flour, baking powder, baking soda, and salt.
- In another bowl, beat the butter and sugar together until light and fluffy, about 3 minutes.
- Add the eggs one at a time, mixing well after each addition.
- Stir in the vanilla extract.
- Gradually add the dry mixture to the wet ingredients, alternating with the milk.
- Spoon the batter into Twinkie molds or greased cupcake pans, filling each cavity about two-thirds full.
- Bake for 20-25 minutes or until golden brown and a toothpick comes out clean.
- Let cool completely before filling with cream using a piping bag.
- Enjoy your homemade Twinkies!
Notes
Allow cakes to cool completely before filling. You can customize the filling by adding different flavor extracts.
- Prep Time: 15 minutes
- Cook Time: 25 minutes
- Category: Dessert
- Method: Baking
- Cuisine: American
Nutrition
- Serving Size: 1 Twinkie
- Calories: 190
- Sugar: 12g
- Sodium: 200mg
- Fat: 8g
- Saturated Fat: 5g
- Unsaturated Fat: 2g
- Trans Fat: 0g
- Carbohydrates: 28g
- Fiber: 0g
- Protein: 2g
- Cholesterol: 30mg
Keywords: Twinkies, homemade dessert, childhood memories, baking, sponge cake, cream filling
